

A step-by-step French Café Scene acrylic painting
In this series I will be posting a weekly video on my YouTube channel that you can follow along at home. It’s free to subscribe to the website so you can keep updated with the painting progress.
You can watch Part 1 of the painting demonstration here.
This week we start to introduce the lightest lights and some blue…
Materials you will need for this stage of the painting:
- 12mm Acrylic brush – Pro Arte Prolene – flat
- Size 4 Kolinsky sable from Rosemary & co – round – (any small round will be fine)
Paints
- Artist quality Titanium white
- Burnt Umber
- Phthalo Blue (Red shade) or (Green shade) – I demonstrate using Phthalo blue green shade
Other materials used
- Kitchen roll
- Jam jar for cleaning brush.
- Small dipper for diluting paint
- Stay-wet or tear off palette
- Palette knife – 45 RGM
Step 1 – Introducing Whites
Following on from establishing the dark tones last week we can now start to introduce white.
Using the opaque Titanium White I start to draw in the lightest lights of the scene, even though it’s an opaque white I’m applying it quite thinly.
This is so I can start to see the ‘drawing’ of the painting, rather than going in too thick with the paint at this early stage.
It’s then easier to adjust the drawing without having to paint over thick passages of paint.
You can read more about the importance of contrast in your painting.

This is the painting after the lights have been painted in.

Step 2 – Introducing a Blue
Once we’ve established the darks and the lights we can start to judge how the scene is working tonally.
Once you’re happy with your painting at this stage you can introduce a blue.
As there are areas in the image that have a greeny blue hue I’m using a Phthalo blue (Green shade). This is a very powerful blue with a high tinting strength.
Notice the vivid undertone of the paint in the image below.


Notice how the paint is still quite translucent.

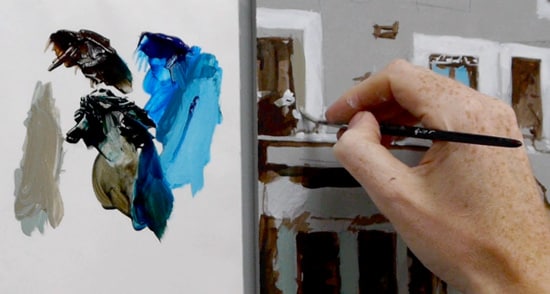
Once the lighter blues are painted in I mix a black with the Burnt umber & Phthalo Blue using the palette knife.
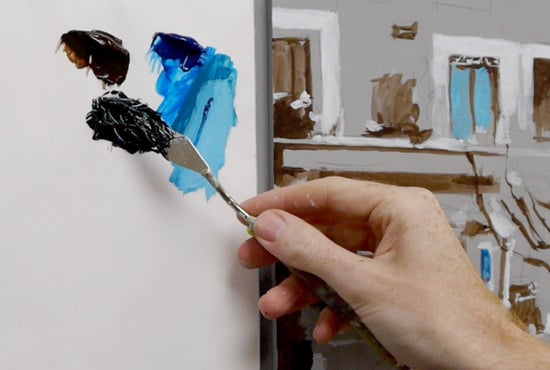
Toning the colour down with the burnt umber to produce a dull green/black to paint in the cafe front.
French Café scene Acrylic painting – Free video Course |Part 3
The video below shows the lightest lights and blue stages of the painting.
Here’s what the painting looks like at the end of Part 3.
Click here if you want to download it to work from.

Tune in next week when we start to introduce reds into the painting.
You might also like:
1. French Café Scene – Acrylic painting course |Part 1 & 2
2. French Café Scene – Acrylic painting course |Part 4


Merci! Very interesting the way you do your vidéo. Will help me a lot.
Hope I will receive part 4 and others. Thank you for communicating the way you paint.
You’re welcome Lorraine, great to hear you’re finding the tutorial helpful.
Cheers,
Will
I’m looking forward to the next step…it’s beginning to shape up well
Hey Frank, nice to here from you, pleased the painting coming along well.
Cheers,
Will
Hi Curiosity killed the Cat, but when you were painting the white around the windows, the one that you painted light Blue you made a scribble mark with the Titanium White. Why?
Hi Ned,
Are you referring to the part at 2 min 16 sec? If you have a look on the reference image on part 1, this is decorative ironwork on the window frame.
Cheers,
Will
Hi Will I checked the original and of course you were correct I think I must suffer from selective sight sometimes Thank you enjoying this very much Regards Ned
Good one Ned,
Will
It’s great! I learned a lot from your video. I am looking forward to the part 4.
I am a very very beginner for painting, Thank you for helping me out!
You’re welcome Rubing, pleased you’re learning a lot from the videos.
Cheers,
Will
Lecture already getting very tempting, I finish the portrait I am on and start this lesson.
Good one Jivko,
Cheers,
Will
Really enjoying your videos and so appreciate your generosity.!
Cheers Rose, pleased you’re enjoying the tutorials.
Will
Bravo Will
Svetlana
Cheers Svetlana,
Will
You have given me the confidence to pick up a paint brush after 20+ years of not touching one, and then, never acrylic…now, because of you, I can actually see that I am learning! Thank you, thank you, thank you!
Hi Lynda, that’s brilliant to hear, so pleased you are enjoying learning a new skill, and a new medium!
Cheers,
Will
Your painting is coming along beautifully! Thanks so much for doing these videos. You’re a great teacher! :-)
Thanks Heather, kind of you to say so.
Cheers Will
Yay part three is here! I have been checking my inbox with much anticipation. Can’t to see the next one. Thanks for sharing your knowledge with your videos :)
Thanks Cynthia, pleased you’re enjoying the course.
Cheers,
Will
thank you so much for the best way you do . thanks for doing these videos , will help me a lot.
You’re welcome Lili, great to hear its helping your paintings.
Cheers,
Will
Thoughly enjoying watching you the way you paint and I am learning how you use your brush strokes on the canvas. It’s loose painting that I am interesting as I am a bit too perfectionist in my paintings. Although I am deaf from birth I cannot hear what you said on the video but I am able to follow you very well with all you hand movements. Looking forward to the next video.
Thanks Robbie, I’m working on those transcripts, so soon you’ll be able to follow along with full instructions.
Cheers,
Will
Thanks Will, much appreciating these vids. Sometimes my confidence goes down the drain but seeing you pull a painting together is helping me to focus my mind. Looking forward to part 4.
You’re welcome Vivienne, painting can sometimes be an up and down journey – as some paints seem to flow so easily, and others your question yourself if you’re making any progress at all! Pleased you’re finding the tutorials are helping your focus.
Cheers,
Will
Hi Will,
When you were adding the white highlights, it made the background canvas look grey. Was your canvas underpainted a grey before you did your sketch?
Yes, that’s right Nancy, I’m painting on a coloured toned ground colour, a light grey mixed from raw umber & white.
Cheers,
Will
What made you choose a grey for underpainting as opposed to the raw umber you used in your French countryside painting?
Hi Nancy, for this scene the grey is a mix of raw umber & white, it is a close match in tone to the cobbles in the foreground so will make a nice tone to work from.
Cheers,
Will
It is so kind and generous of you to share and encourage others. I like the way you show how the painting is built up and you do paint very beautifully. I need to ask something – isnt it necessary to prime canvas with ochre colour prior to painting? May universe rewards you for your nice efforts. Thank you kindly.
Hi Maya, for this painting I’m still working on a coloured ground, it is a light grey (mixed from raw umber & white) rather than Yellow ochre. You can vary the ground colour depending on the subject you are painting.
Cheers,
Will
Great way to teach. i am still learning from you. please post all video.
sunil – sri lanka
Thanks Sunil, pleased you’re still learning new painting techniques.
Cheers,
Will
This parts are just fantastic! Thank you so much for sharing, you are so inspiring!
Thanks very much Catharina for your kind comments, so pleased you’re enjoying the tutorial.
Cheers,
Will
I am learning so much watching you paint. It’s amazing how you are getting so much of the painting done just by choosing and mixing a few colors. I am realizing that I have tried to use too many different colors in my paintings in the past. Thanks for sharing your awesome talent with us.
Thanks Perri, very kind of you to say so, a ‘less is more’ approach can really transform your paintings.
Cheers,
Will
Thank you Will so much. This series of videos is another very valuable and helpful tool you share with us through your art school. Thank you once more!!!
You’re welcome Christina, thanks for your kind comment.
Will
Enjoying the French Cafe scene. Thanks for the link ,looking forward to the next stage.
Regards nuala
Thanks Nuala, pleased you’re enjoying it.
Cheers,
Will
Hello Will, WOW I am having a wonderful time just watching this painting come to life. I love the greens and browns along with the white to add such depth to this picture. I really am surprised at myself , what I mean is that I like this particular style of work, not that I have arrived. I know this will not be exactly like yours, but just the teaching is so rewarding to me. I never was able to go to art school while I was younger and this really makes my day!
Hi Virginia, thanks for dropping by. Great to hear you’re enjoying seeing the painting come to life,
Cheers,
Will
Love watching you paint. You are so awsome! Thanks for the videos.
Cheers Rubie, kind of you to say so.
Will
Love your style and video.
Thanks Ginny, pleased you’re enjoying it.
Will
I AM AMAZED. You are so generous with your talent. I HAVE taken some lessons and I have taught art but no teacher I have learned from has been as through and explicit. Keep up the good work. I am learning a lot and intend to share it. Thanks.
Cheers Audie, kind of you to say so, really pleased you’ve been enjoying the lessons.
Thanks again,
Will
Hi Will – once again thanks for the progress painting they are very helpful. I took a break to do your drawing course which was wonderful, especially the feedback you provided, so now back to the Café scene before I start the portrait course. Once again many thanks.
Gloria
You’re welcome Gloria, pleased it has helped.
Cheers,
Will
I enjoy every moment of your tutorial. Big help! Thanks a lot!
Good one Lazar, really pleased you enjoyed the tutorial, looking forward to hearing how your painting turned out.
Cheers,
Will
This helps a lot! thank you so much! I don’t how can aspiring painters like me thank you enough! I have been “painting”–I’m not so confident yet that it can be called as such– before but I noticed I’m painting in a different way such as I do not start painting with the dark colors but I start painting whatever the background is and I’ll paint last the foreground. Is that wrong?
Hi Christelle, different paintings can have different approaches, but for a classical, realist approach this technique works very well.
Will