Bonjour Classe!
This week we’re off to France!
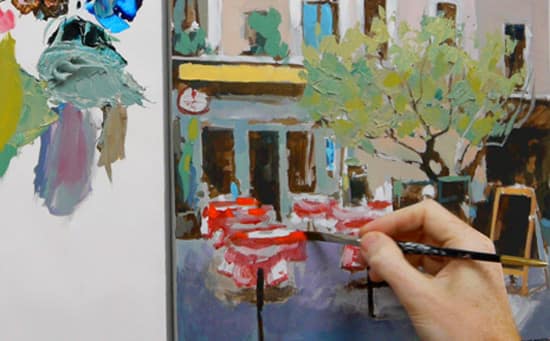
This tutorial takes us through a simple cafe scene, where we follow through the underlying structure of a painting.
We look at an easy way to check your perspective, the importance of ‘negative spaces’ when composing your image and how to mix the perfect consistency of paint…
A step-by-step French Café Scene acrylic painting
In this series I will be posting a weekly video on my YouTube channel that you can follow along at home. It’s free to subscribe to the channel so you can keep updated with the painting progress…
The image below can be ‘right clicked’ and ‘Save image as’, so you can use it as a guide or if you prefer click here for a larger download image.

Photo credit: Jean-Louis Zimmermann cc
Materials you will need:
- Any square canvas, I demonstrate on a 30 cm x 30 cm pre-primed canvas or MDF board.
- 12mm acrylic brush – Pro Arte Prolene – flat
- Size 4 Kolinsky sable from Rosemary & co – round – (any small round will be fine)
Paints
- Artist quality Titanium white. – Invest in this white even if you use student quality paint for the rest of the colours.
- Burnt umber
- Raw umber (for the ground)
- Cadmium red light
- Cadmium yellow light or Cadmium yellow
- Naples yellow
- Permanent Alizarin crimson – Winsor & Newton Artist Acrylic
- Phthalo blue (red shade) or (Green shade)
- 3B pencil (or 4B)
- Kitchen roll
- Jam jar for cleaning brush.
- Small dipper for diluting paint
- Stay-wet or tear off palette
- Palette knife – 45 RGM
- Chocolate croissant (optional)
3 simple steps to begin:
Step 1 – Apply a coloured Ground.
For this painting I wanted to have a subtle undertone of a cool neutral grey, quite close to the cobbled street colour.
Because red is the accent colour of the tablecloths, I wanted to paint on a cooler base, so using Raw Umber and White achieves this effect.
To see how I apply an acrylic ground see: How to apply a coloured ground
Step 2 – Draw out the Image – Free video Course |Part 1
The video below shows the drawing out stage of the scene, using a 3B pencil sketch out an under-drawing.
Key Points:
- Look for negative shapes to draw the trees, these spaces are really handy to create a nice balance in your composition.
- Keep your verticals, vertical. As we tackle perspective in this scene, it’s a common mistake for the vertical lines of the windows to start to have a slant to them. This usually occurs towards the centre of a drawing or painting, when we don’t have the straight lines of the side of the canvas to guide us. So before you start your painting, just check with a ruler that your windows haven’t started to slide.
- Measure objects that recede into the distance. Even though the tables are closely spaced, the effects of perspective result in a 1:1.5 ratio of the height of the rear table compared to the table closest to us. So use the top of your pencil to make a few rough comparisons to check that your drawing isn’t too far out.

Step 3 – Establish the darkest Darks.
Using Burnt Umber we establish the darkest area of the picture. You can squint your eyes at the image to help to distinguish which areas are the darkest, rather than getting hung up on the details.
You’ll notice a flow of dark shapes around the composition that help to draw the viewers eye around the piece.
This stage of a painting is a perfect time to experiment with brush strokes and paint consistency.

How to mix the perfect paint consistency
I’m often asked ‘how thin is thin’ when applying a glaze, or ‘how thick is thick’ when painting more impasto. Mixing the right consistency of your paint, for the right stage of your painting can be key.
However, mastering the correct paint consistency with acrylics can be frustrating.
A little too much water and it goes too thin.
Not enough water and the paint sticks to the brush bristles and doesn’t flow.
There are a few things to consider:
Brand of paint used
Different paints have a different consistency straight from the tube depending on the manufacturer, so a heavy body (thicker paint) from Golden, will be slightly different than a heavy body from Liquitex.
Heavy body or fluid
Fluid acrylic paints have already been mixed to a thinner consistency in the factory, they are perfect for strong glazing effects as the pigment load of the paint is more intense – in comparison to, if you diluted a heavy body acrylic to the same consistency with water.
Student or artist grade
An artist quality paint will always have a better coverage than a student quality and will usually need a bit more water to dilute, as the paint tends to be thicker straight from the tube.
Water or medium
Water will always make the thinnest mixes, mediums will dilute the paint but will ‘hold’ the paint film together. The thinner the paint application, the weaker the paint film. This is when mediums such as glazing liquid gloss can be very helpful because you can apply a thin coat of colour and it will hold in a film, as opposed to the same consistency of paint with water, which would have the tendency to run.
Brushes
For the whole of this demo I only use two brushes:
- A small size 4 sable round from Rosemary & co
- A small 12mm flat from Pro Arte Prolene
I work between both brushes throughout the tutorial and holding two brushes at the same time is an essential skill to master.

When I’m working with oils, the number of brushes I hold runs to 5-10. Practice holding the brushes in your hand, yet preventing the brush tips from touching each other. It can be quite a balancing act.
More so with oils, where the time to clean brushes takes longer and you want to keep a number of brushes with a ‘fresh colour’ so they don’t intermix. For example, I’d have a brush for the darks and a brush for the lights, nothing worse than reaching for that final mark of bright white paint only to realise you’ve picked up the wrong brush and have a streaky grey colour.
It’s a bit like when you dip your brush in your tea rather than your water!
French Café scene Acrylic painting – Free video Course |Part 2
The video below shows the first under-painting steps I take to block in the painting using Burnt umber.
Here’s what the painting looks like at the end of this stage. Click here if you want to download it to work from.

Join me next week when I add the lights and introduce some colour to the scene.
You might also like:
1. French Café Scene – Acrylic painting course |Part 3
2. French Café Scene – Acrylic painting course |Part 4



WOW Thanks for the link
You’re welcome Mihir, hope you enjoy it,
Cheers,
Will
I like it a lot
Pete
Good one Pete, looking forward to seeing your results.
Cheers,
Will
Paryska kawiarnia – jak żywa !
Dziękuję!!!
Paris cafe – a living!
Thank you!
Proszę bardzo Barbara!
You’re welcome Barbara!
Thanks Will!
Beautiful painting and perfect timing! I just finished your acrylic painting for absolute beginners (the “purple” seascape). It went really well so now I was looking for a new project!
Babs
You’re welcome Babs, pleased the seascape turned out well.
Cheers,
Will
Thanks Will this has inspired me to have a bash at a landscape.
Oh good one Livvy.
Cheers,
Will
Will,
What a wonderful surprise to wake up to….a fabulous tutorial of a French Cafe’ from Will Kemp…..How delightful…..Thank you, thank you, thank you for being so kind and generous to share your talent and time with us.
This email tutorial made my day.
I love your lessons and have decided that you are my Art Guru!!!!
Keep it coming, Will. God bless you!!!!
A hug from Mary
Hi Mary, nice to hear from you, pleased you enjoyed the lesson and thanks for your kind words.
Cheers,
Will
A new course… yessss !! And with a french café :))
Thanks Will
In the next acrylic course, I hope a beautiful old English cottage with flowers, it will be awesome ;)
christel
Thanks Christel, a nice suggestion!
Cheers,
Will
Have a great holiday thanks for the link
Thank you Will, I cannot wait to get started.
Good one Virginia
Hi Will,
Thanks for this free lesson. My paintbrushes haven’t been out for a while. :(
I hope to get back to it soon!
Angie
You’re welcome Angie,
Will
Great I’m off with my painting. Can’t wait to see the next steps.
Pleased to hear in Catherine,
Cheers,
Will
thanks for this, does the blocking in of dark and light work with oils too?
Yes, working with the burnt umber will dry quickly with the oils as its a quick drying pigment.
Cheers,
Will
Hi Will, thanks for the great tutorial. Explanations of paint consistency are really useful, as well as that of colour mixing. Thanks for sharing and teaching! :)
Hi Prabha, you’re welcome, paint consistency can be so important.
Pleased you enjoyed the first parts.
Cheers,
Will
Great to see you Will, thank you for your wonderful lessons and your generosity for sharing them with us. Allways looking forward to your classes I learned so much from them.
Mari
Hi Mari, great to hear from you, thanks for your kind comments.
Cheers,
Will
What a lovely scene to contemplate on Monday morning! Perspective is something that has to be done right or the whole painting fails. Thank you for making it easier to get right!
By the way, your painting looks good even in the beginning stages. THAT is a good point for all artists to note.
Mona
Hi Mona, thanks for dropping by. You’re so right about a painting ‘working’ at these beginner stages. Pleased the video helped to simplify the perspective for this scene.
Cheers,
Will
Hola Will:
I love your lessons, thank you for being so kind to share your talent with us.
GOD BLESS YOU!!!!!!!
Grandmother Rosa
You’re welcome Grandma Rosa, thanks for the kind comments.
Cheers,
Will
Thanks so much for this! You are a great teacher. . .the Impressionist Acrylic Seascape course is wonderful! Thanks, again.
Thanks Cheryl, really pleased to hear you’ve been enjoying the Impressionistic seascape course.
Cheers,
Will
Thanks again Will really looking forwards to the tree bit as I need help with landscapes
Cheers Sue, you’re welcome.
Will
Thank you once again, Will.
Especially helpful are your frequent references to the original photo. Having the photo aside of the painting at the same times makes a big difference. The squinting hint to perceive the darks and lights works well. Looking forward to the rest of the tutorial.
Jeanette
Thanks Jeanette, yes it can be hard to judge a painting without the reference side by side, pleased you found it helpful. Squinting is a painters secret weapon!
Cheers,
Will
woweeeeeeeeeeeeee………..wonderful……………….i am really trying……….thank you Wil
Thanks Birdie, pleased you enjoyed it.
Will
Thank you so much for this great tutorial!! Now that I am in cancer free mode I plan to get out the acrylics! I have been painting mainly with watercolours for 30 years and am now ready for some new challenges.
Thanks again!
~Connie
Hi Connie, pleased to hear it, and this will make the perfect challenge from watercolours as in these first stages the application of paint is quite watery and similar to watercolours, then we’re going to build up the painting using thicker colours which is more like oils, looking forward to hearing how you get on.
Cheers,
Will
Thank you so very much, Will! You are one very very generous art tutor. How did you happen to know that I’m a bit stuck in a rut at present? This tutorial is just what I need to unstick the creative juices, so thank you soooooooo very much again. Hope I can do the project and you also, justice! God Bless! Nuala
Hey Nuala, nice to hear from you, and really pleased the tutorial is going to help kickstart that creativity!
Cheers,
Will
Thank you Will. As usual your directions are clear and precise. I’ve been too tentative to try such a complicated scene before but watching you paint it is far more revealing than just reading the directions. I’ve recommended a friend to your site and she is very excited about your lessons.
Helen
Hi Helen, thanks for dropping by, yes, I find seeing the painting visually develop is often more revealing. Just take the scene a step at a time and I think you’ll surprise yourself.
Cheers,
Will
(p.s thanks for the recommendation btw!)
Hi Will!!!
I went to buy some supplies for the French Café painting…The list that you put out called for an 20 x 20 cm (8″ x 8″). Is that correct? It looks really small in person.
The one you were working on looked larger to me…Please advise.
Thanks once again.
Mary
Hi Mary, well spotted! I demonstrate on a 30 x 30cm, the 20 x 20cm was if you wanted to paint 1:1 scale from a computer printout. I’ve tweaked it in the post.
Cheers,
Will
Hello. Mr. Kemp
I’ve just bought your “Acrylic Seascape Landscape” online course and I love it.
Your free video led me to this site and I enjoyed your thoughtful and carefully designed lecture~~.
And this French Cafe Scene will be fun and I think I can try what I learned in your online course. Thanks for sharing this wonderful knowledge. !!!
God bless you.
In Seoul, Korea’
Hey Junghwa, really pleased you’re enjoying the Impressionistic Seascape Course and are looking forward to trying the Cafe Scene.
Thanks,
Will
Hi Will
I am so inspired Will thank you so much :) Now I know what I will be attempting this weekend.
Thanks once again,
Maria
You’re welcome Maria, enjoy the lesson,
Will
Great tutorial Will. I look forward to part 2. (paint flavoured tea does not taste good as I’ve found out recently)
Cheers Bridgit, it does have a certain twang to it!
Will
Thanks Will for the tutorial. Tomorrow is paint day at the Touchette household.. guess what we’re painting.. thanks again!
You’re welcome Noel, Looking forward to seeing how you get on.
Cheers,
Will
Hi Will
Are you able to show the painting with just the Burnt Umber part done please as I don’t think that I’ve picked out as much of the painting as you but it’s hard to tell without being able to see the whole thing. If you could allow a downloadable photo then that would be wonderful.
Many thanks for your demonstration.
Gloria
Hi Gloria,
Glad you’re enjoying the tutorial.
I’ve just added to the end of the post, a downloadable photo of what my painting looks like at this stage of the demo.
Hope this helps,
Will
Many thanks Will – so much easier to see where I’m going wrong now. Too thick paint certainly is one of the problems.
Thanks again
Gloria
You’re welcome Gloria,
Will
Hi from New Zealand ;-),
Thank you for putting this teaching on the internet. I am determined to learn to paint and this is a great way to do it in my own home and at any time available. When I looked at the cafe scene thought it was beyond me as a beginner but I have had a go. Can’t wait till the next part.
Thank you Will
Nana Green
Hi Anne,
Pleased to hear you faced your fear and had a go at the French scene. It does appear a bit complicated to start with, but just take it a step at a time and you’ll be fine.
Cheers,
Will
Loved this…want more!
Cheers Bren, only a few days to go until part 3
Will
Hello,Will, It’s wonderful!!!
I’ll try it
Good one Natalie, looking forward to seeing your results.
Cheers,
Will
Hello again.
I “met” you on ArtTutor. Really glad to find you again. I’m relatively new to acrylics but thanks to teachers like you, I’m getting better. And acrylics are quickly becoming my favorite medium.
So, thanks again.
Hi Mitch, nice to hear from you, pleased you’re enjoying the lessons and are improving in your acrylics.
Thanks again,
Will
Love your videos! The landscape tutorials really helped me a lot (considering im self taught and before trying your methods I wasn’t really satisfied with what I painted)
But i’ve got one question; when should/shouldn’t we apply the yellow ochre coloured ground? Is it only for nature landscapes? I read before that for portraits we apply another colour. But I see here you started with plain white and was wondering when should we/shouldn’t we consider a coloured ground.
Thanks a bunch!
Cheers!
Hi Katia,
Pleased you found the landscape tutorial helpful, the colour of the coloured ground can vary depending on the subject and the mood or feeling you want to create in your paintings.
I love the yellow ochre for creating brighter landscape scenes, but switch to a more neutral colour for portraits.
This French cafe scene is painted onto a grey tone (mixed with raw umber & white) that matched the tone of the cobbles in the foreground. I often have a few different canvas grounds painted up and then choose the one that is most appropriate for the particlar scene, or the particular mood I’m after.
Hope this helps,
Will
Hi Will,
I live in France in the region called ‘the impressionists’ valley’, not far from Giverny and Auvers-sur-Oise, home towns and favorite abodes of Monet, Renoir , Van Gogh and many more …
The scene you’ve painted is such a familiar setting here that it tends to get forgotten by the locals if it weren’t for artists like you to bring quite another dimension to it!
I’ve just started doing acrylics in a local art school in town and found your blog quite by chance. I’ve devoured all the free lessons you’ve so generously made available for everyone. I’ve learnt more from your lessons than my teacher and love your way of explaining things. I love the impressionists painting techniques and strokes you talked about in a previous lesson and find this present painting an immensely useful lesson for me. Thank you for your generosity !
I’m so looking forward to the next steps in the painting… I’ve started looking out for those ordinary , mundane scenes that you can turn into remarkable paintings by being observant and handy with a camera – or an iphone-!
‘Merci beaucoup’ and “Bonne continuation”!
Ghazala
Hi Ghazala, lovely to hear from you and what a fab place to live!
So pleased you’ve found the tutorials helpful. And you’re right, learning to see the beauty in seemingly mundane scenes really is the key to developing your artistic eye.
Cheers,
Will
Thanks will this wil help me a lot.I hope more up. Cheers
Cheers Paul,
Will
Hi Will,
I am your new student. Very appreciative of your generosity in teaching and sharing. I am retired from the corporate world. I have always had a passion in viewing art. Now I am trying to doing some art. Your instruction is going to contribute to me in doing some art. Thanks.
ALOHA
Roslin
Great to hear it Roslin,
Cheers,
Will
Great tutorial. Can’t wait to start it. Am also a new student and between staring at a blank canvas and getting that first set of values down ,this tutorial has been a great help.thanks
Cheers Kikt, pleased you’re enjoying the tutorials.
Will
Hi Will,
great to see this early morning … :) great tips along the way as well. sure am gonna try this.
Thanks aloot
Nelly
Hi Nelly, let me know how your painting turns out.
Cheers,
Will
I am looking forward to painting the Cafe scene. One question though – you use Naples Yellow which can really vary brand by brand. Which brand di you use for your example?
Hi Peg, for this particular painting I use Winsor & Newton Artist Acrylic Naples yellow, but any brand would be fine.
Cheers,
Will
I used this tutorial to help me paint a picture for my french Teacher thank you so much!!
I’ve never used paint all that much besides watercolors now i will from now on>.<
Great to hear it Sutton, hope your French teacherlikes it.
Cheers,
Will
Hi Will
Still a fresh beginner. Its easy to paint, but PAINTING is not the same. You will never get the color or contrast correct. This is what I like, to see second by second HOW you paint you picture, mixes, brushes, where you start, dimensions where the last colors must come.
I am going to print the tutorial on color printer and do the painting painstaking slowly. I know I am going to love doing it.
Thank you so much for helping the beginners who cannot afford a professional painter.
Regards
Joyce
Hi Joyce,
So pleased you’ve been finding the tutorial helpful. Seeing the painting progress mix by mix really is the best way to learn, enjoy the process and looking forward to hearing how your picture turns out.
Cheers,
Will
Ooh, can’t wait to paint this scene, I’m off to buy some more paints at my local Cowling and Wilcox. Thanks so much for all the lessons you offer. I’m working up to doing the drawing course and later, much later the advanced painting with acrylics. So, I will also be buying a chocolate croissant to have with my coffee as I wait for the ground to dry! I did the lemon this week too, and love it, even though it looks a bit prehistoric! I like the tonal range and the roughness of the brushwork – rather than trying to be too detailed.
Good one Gandha, a chocolate croissant is always a worthy addition to your paint supplies! enjoy painting the scene.
Cheers,
Will
I am taking up painting again after many many years. This painting is beautiful and so far mine is looking pretty good. I have a question because I’ve hit a roadblock, however. I am painting the Titanium White part now. It is not really showing up on my white canvas! Is it the grade of paint I’m using?? In your video your canvas looks grey not white. Help!!
Warmly,
Julie
So I see my mistake! I skipped the very first step of painting the coloured ground. Any advice?? Do I have to start over? Ugh.
Julie
Hi Julie, ahhh that’s why. For this particular lesson (and most lessons on the site) I use a coloured ground as it can really help with so many aspects of your painting, so I would personally start over and then compare the two paintings.
Cheers,
Will
Thanks for the advice!
French Cafe-take 2.
Warmly,
Julie
Love all your posts,
For this one can I use water mixable oils and instead of the croissant maybe a glass
Of red?
Ann
Sounds like a fair swap Ann! yes, you could use WMOs, using an acrylic ground first will help you to get to the painting quicker.
Cheers,
Will
Thanks for this great tuition video. This made for an enjoyable week and early pleased with the result. Tried hard to find that ‘ impressionist ‘ style and not get too intricate or delicate. My 4th course , onto the next !
Really pleased it turned out well for you Bob.
Cheers,
Will
I dont know if you can comment on this but I am looking to buy some artists quality acrylic paints and would like to try and get a UK manufacturer . I see that most are manufactured overseas with Winsor and Newton ( good English name ) now producing in France and China . Jacksons own brand in made in the UK and looks good and I am willing to pay a bit more to support British manufacturers . Are there any others ?
Thanks
Hi Bob, Wallace Seymour (previous Pip Seymour) make arsit quality acrylics in the UK “We make all our products in the United Kingdom, using bespoke machinery, with the latest paint chemistry.”
Hope this helps,
Will
Hi, Will. I’m only 12, but I am really enjoying your tutorials. This one looks simply marvelous! Going to try it out. Would it work on an rectangular canvas?
Warm regards,
Samaira
Sure would Samaira, pleased you’re enjoying the lessons.
Will