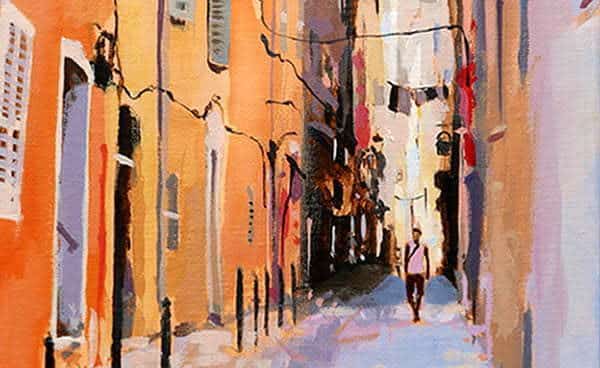
Will Kemp, Warm Shadows in Corsica, Acrylic On Board (detail)
It’s hard to believe that city breaks, art exhibitions and museum visits were something we used to enjoy almost casually.
Here in the U.K, we’re back in another full lockdown, a cold and wet one!
I was looking through some photos from last summer’s trip to Corsica needing a bit of escapism. They instantly transported me back to the atmosphere, the colours and smells, meandering down sun-dappled side streets, ice cream in hand with the anticipation of undiscovered delights around the next corner.
Drawing and painting can be very therapeutic; so with that in mind, I’ve created a couple of acrylic step-by-step street scenes to help get us through the next few weeks.
I think finding time for creativity, especially at the moment, really does bring a sense of peace and calm and taking inspiration from past trips, dare I say, brings hope for future travels!
I also wanted to use materials you’ve most likely got already at home, so I’m using a starter set of paints and basic brushes because they’re often what many students are gifted or have bought at the beginning of their artistic journey. Using only the limited colours that come in a pre-packed set sometimes has compromises but let’s see what we can achieve!
For this Starter Set Challenge, I’m using the Winsor & Newton Professional Acrylic Colour Set of 12 20 ml tubes with a wide range of artist quality paints. They only have a very little colour shift and with this set, you’ve got a good classical palette too. I’m working on an 8 x 10-inch canvas board because that’s the size I already had in.
Downloading the reference photograph
The photo below can be downloaded to use it as a reference image, print it out and follow along with the steps below. (The size of the image is 1:1 to the size I painted, 8 x 10 inch)
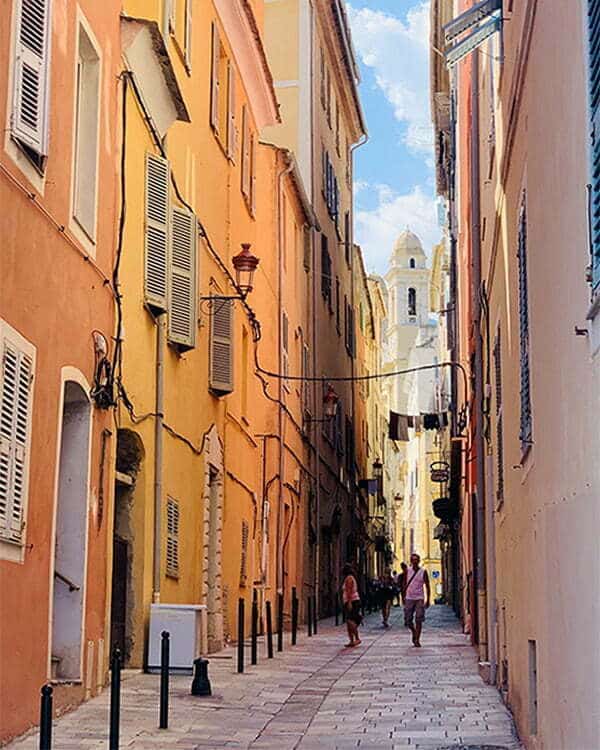
You can download a larger version of the image here.
Materials you will need:
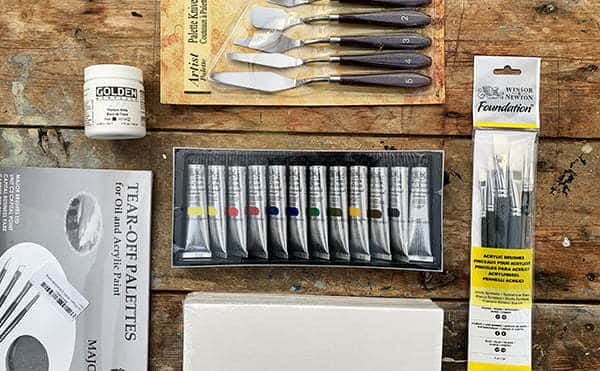
- 8 x 10 inch (20 x 25.4 cm) canvas or board
Paints:
- Titanium White (Golden Paints)
Colours in the Winsor & Newton Professional Acrylic Colour Set of 12 20 ml tubes:
- Azo Yellow Medium
- Lemon Yellow
- Naphthol Red Light
- Permanent Alizarin Crimson
- Phthalo Blue Red Shade
- Ultramarine Blue
- Phthalo Green Blue Shade
- Olive Green
- Yellow Ochre
- Raw Umber
- Mars Black
- Titanium White
Brushes:
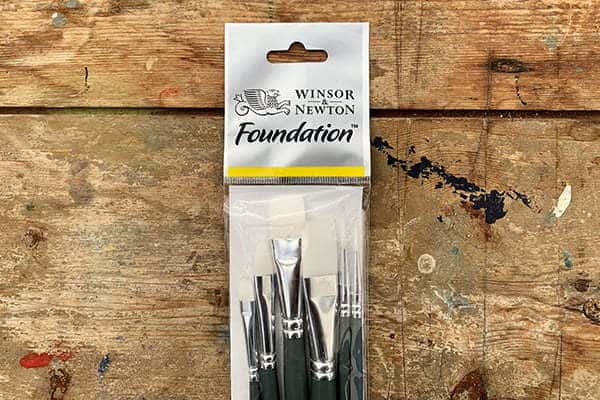
- Winsor & Newton Foundation set
Mediums/extra tools
- Kuru Toga 0.5 mm Mechanical pencil, HB
- Tear-off palette
- Palette Knife
2-minute sketches and tonal map
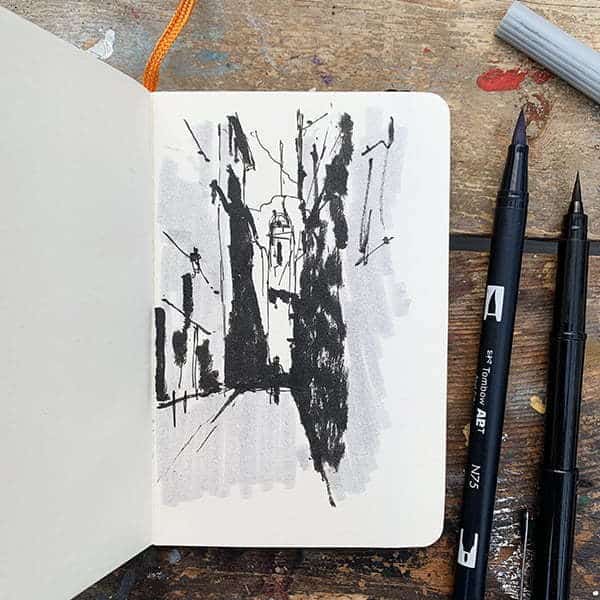
0.5mm Muji fineliner, Pentel Brush Pen & Tombow Brush pen in N75
I started by doing a 2-minute tonal sketch of the scene, looking at the two buildings’ shadow patterns and the central figure. There are three main areas. The light shape of the clocktower and sky, the shadow pattern between the buildings and the mid-tone of the vertical walls and alleyway.
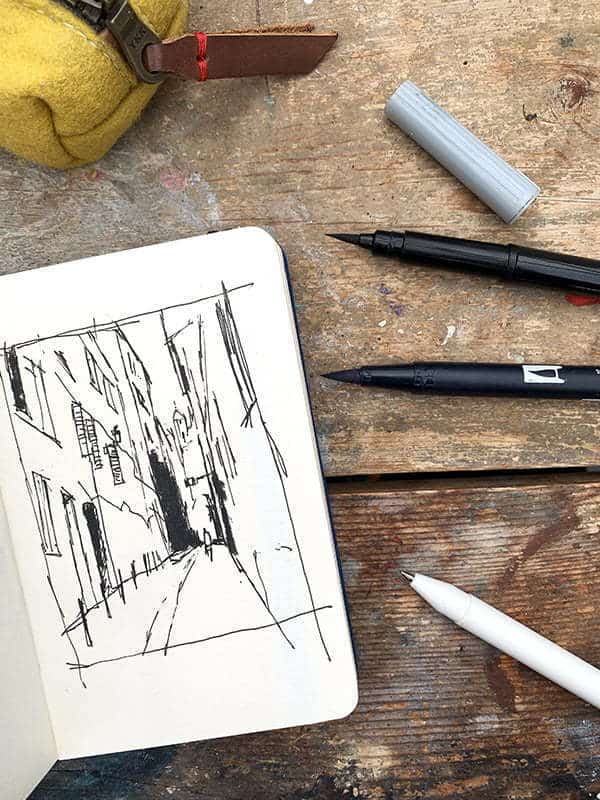
I then followed with a 10 min sketch, looking more closely at the perspective. Notice the diminishing size of the metal pillars as they get further into the distance. Also, the doorway’s scale on the left-hand side in comparison to the height of the figure will help give the illusion of depth into the scene. I decided to concentrate on the single central figure and enhance the tonal contrast around it.
Step #1. Mixing a coloured ground
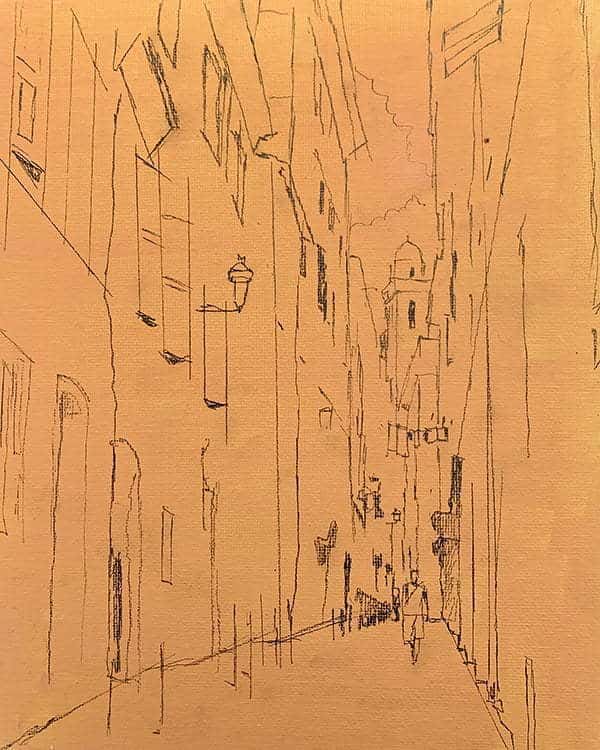
You can download a larger version of my drawing here.
I wanted to have an underlying warmth to the painting so mixed an orange using Naphthol Red Light, Azo Yellow Medium & Titanium White.
I’ve drawn out using an HB 0.5mm mechanical pencil. Most of it’s freehand, but I’ve also used a ruler on some of the window panes’ lines. Using a ruler can be quite handy when you first draw in this perspective. It can sometimes seem like the buildings’ angle is so steep that you could be fooled into thinking they don’t have an as acute angle as they actually do have.
By having these perspective construction lines in, you can then ‘hang’ the drawing’s details around those basic perspective lines.
I’ve also put a bit of the indication of some of the black electrical wires, they might get painted over later on, but they can really help to guide your eye to go into the distance.
Step #2. Raw umber block-in
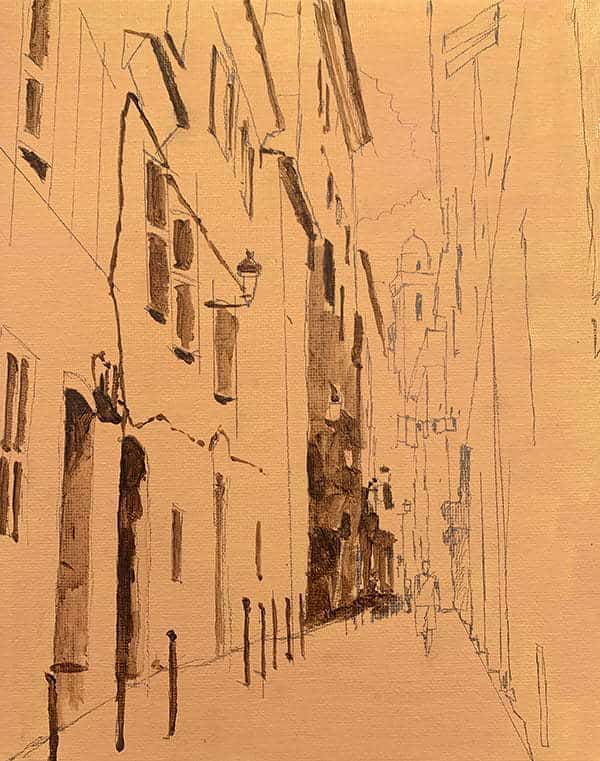
I’m using a round brush which was the size three from the Winsor & Newton foundation range.
Using Raw Umber diluted with water, I’m changing the dilution, depending on the tonal value of the shadow that I’m looking at. The more water, the lighter the wash.
I’m thinking back to those primary sketches and how the dark areas linked the buildings and the figure. Working from left to right, looking for those dark patterns in the buildings, and moving across the composition.
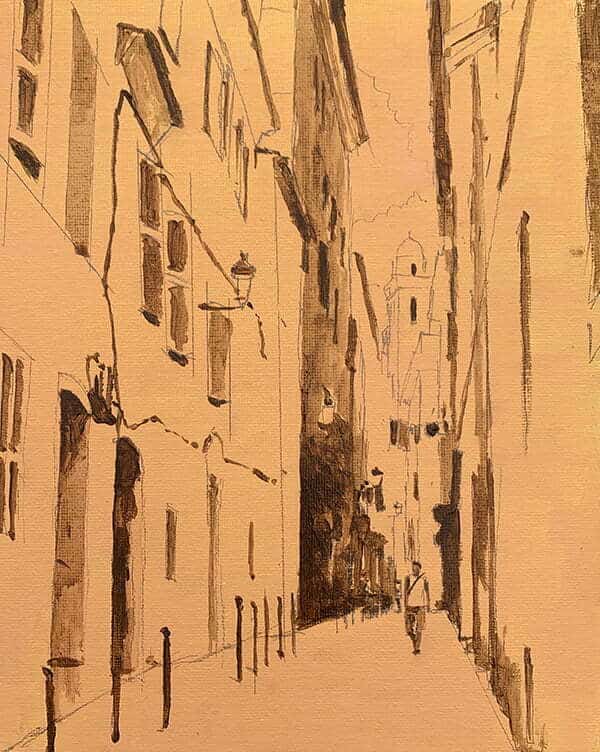
By painting in the figure’s dark pattern, I can really start to see how the shapes are working together and whether it’s still capturing the simplified tonal study in my first initial sketch.
Step #3. Adding the whitest white
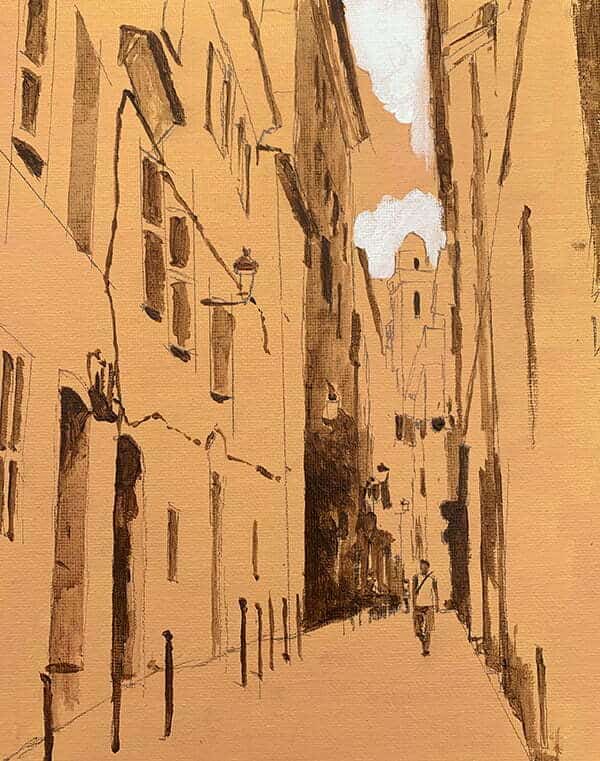
I then add the whitest white, the cloud behind the clock tower. This is pure Titanium White. I swapped brushes to one that has a slight filbert shape to it.
Step #4. Painting the sky
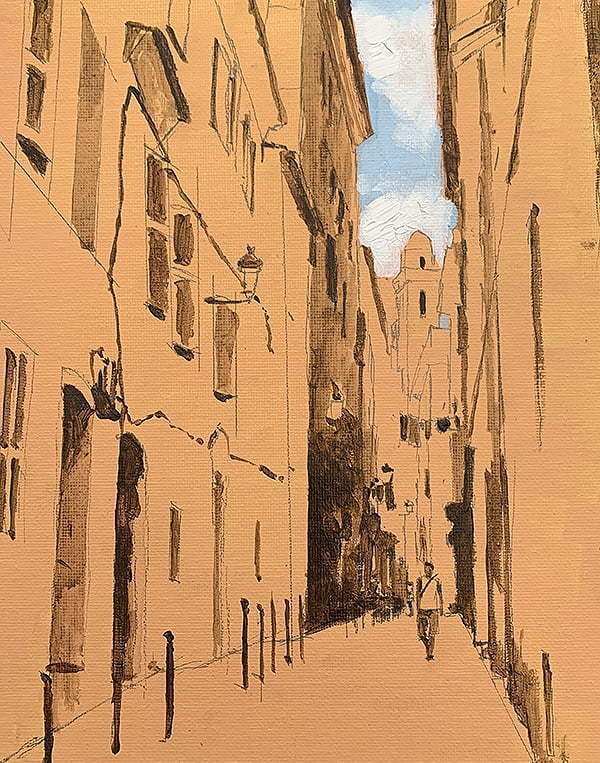
Using a small amount of Phthalo Blue – Red Shade mixed with Titanium White, to create a light blue, I work in-between this mix and Titanium White to paint in the sky.
Step #5. Painting warmth in the background
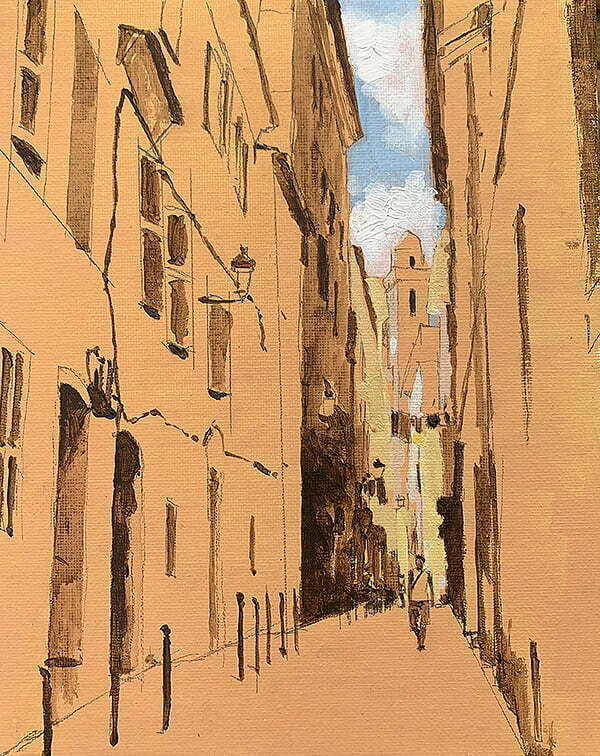
To illustrate that the clocktower is in the sunlight, I start my mix with some Yellow Ochre, Titanium White, and then add some Azo Yellow Medium to increase the intensity.
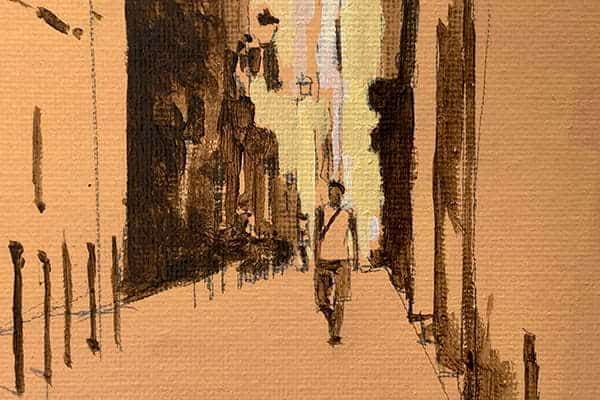
Here on this close-up, you can just get a better idea of how watery that initial block-in of the Raw Umber.
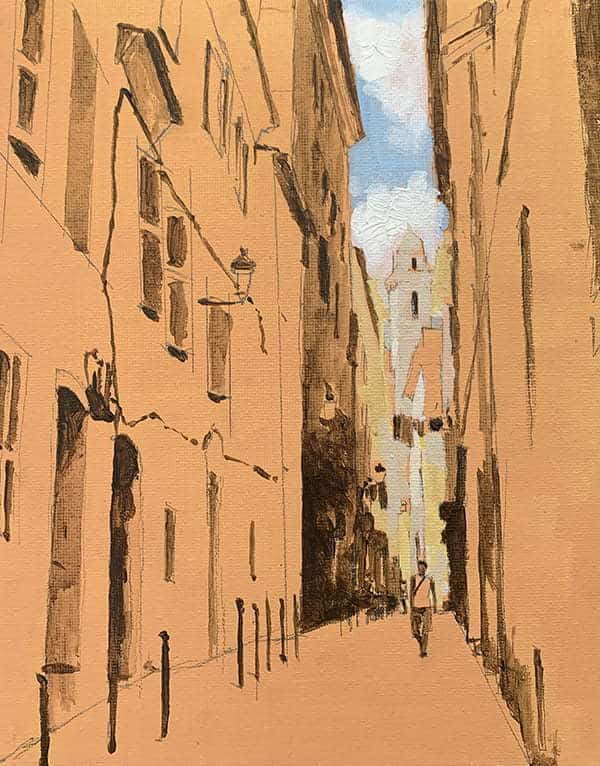
Then I’m painting the pattern of these muted greys and yellows to give a sense that the whole of these buildings are bathed in warm sunlight.
Step #6. Breaking up the buildings
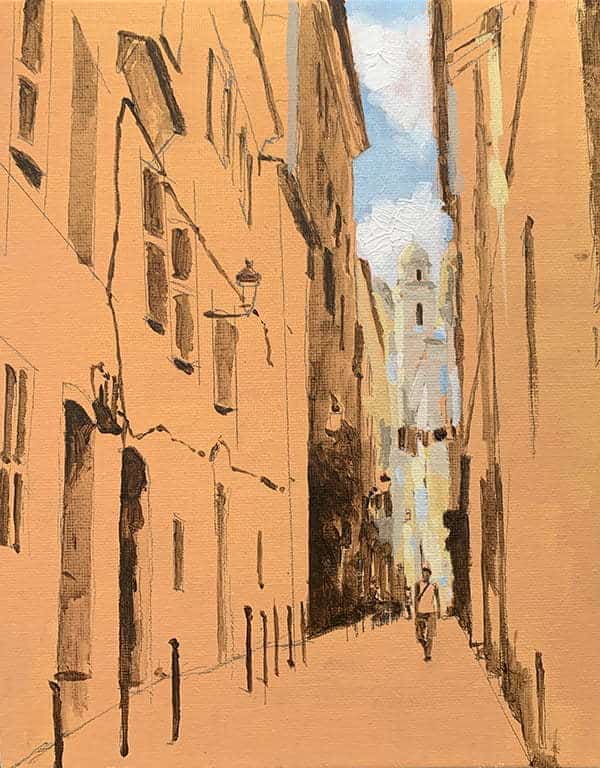
To help keep the colour palette harmonious, I’ve dotted in some of the pale blue from the sky. This helps to make the colours in the building appear warmer in contrast to these pale blue dashes.
Then I can start to look at the purple tones on the alleyway between the two building sides.
Step #7. Introducing complementary colours
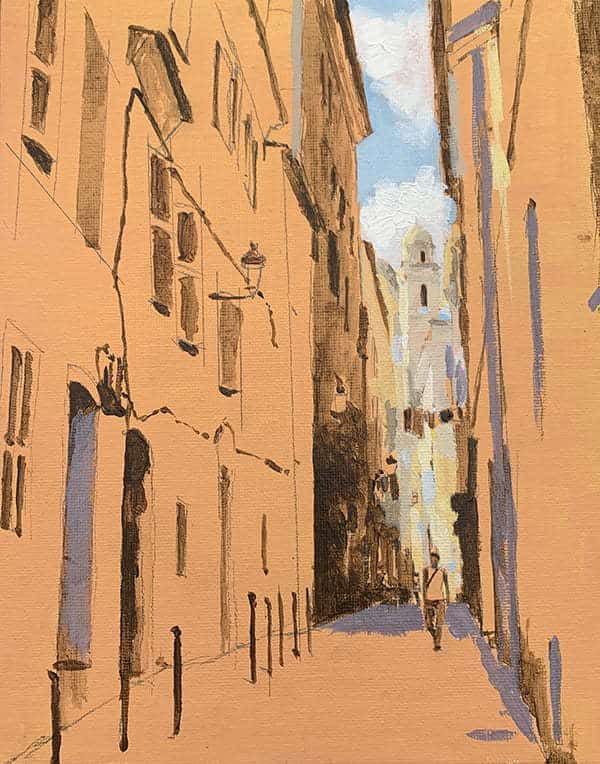
Now I can bring in the complementary colour to those yellows, by adding in a muted purple. This helps to join up those two shadow sides of the buildings around the figure. I’ve painted in a dark shade behind the figure too.
I mix a muted purple with Naphthol Red Light, Phthalo Blue – Red Shade, Titanium White and a touch of Raw Umber. I’ve brought the muted purple into the doorway to the left of the painting and added a few dashes on the right, to indicate where some window openings would be. Using the same mix, I paint in drainpipes and a few of the shadows inside the window edges.
Again, you’ve got the same palette of colours working across your entire painting to balance it all together.
Step #8. Adding purple to the foreground
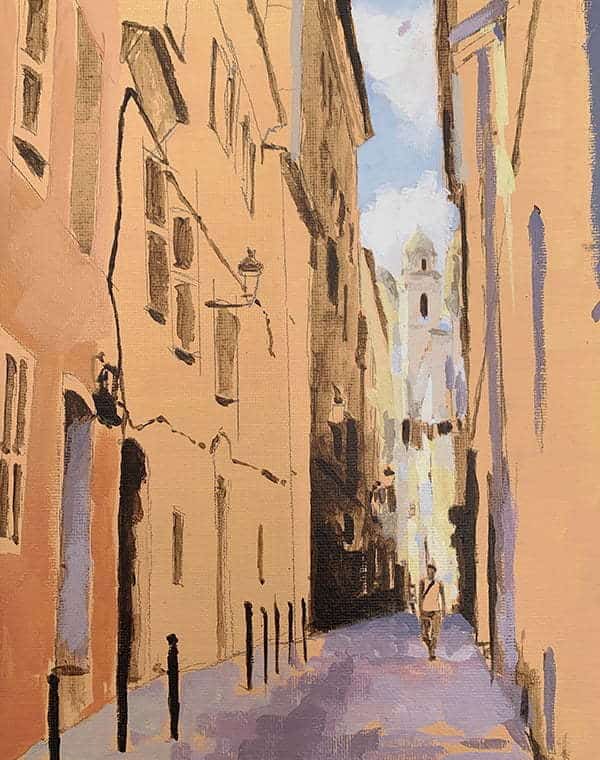
Adding a little more of the Naphthol Red Light into the mix to create a redder purple, I start to paint it onto the alleyway floor. Still keeping this quite dark but leaving elements of the ground colour showing, there are still these little orange dashes.
I vary the colours on the path by adding a little bit more yellow into the mix for the left-hand side, constantly altering the darkness, so it isn’t just one flat colour.
Then, with the Permanent Alizarin Crimson, and the Azo Yellow medium I mix a muted orange, reminiscent of those beautiful warm coloured buildings in Italy and start to block this in on the left-hand building.
Step #9. Blocking-in the buildings
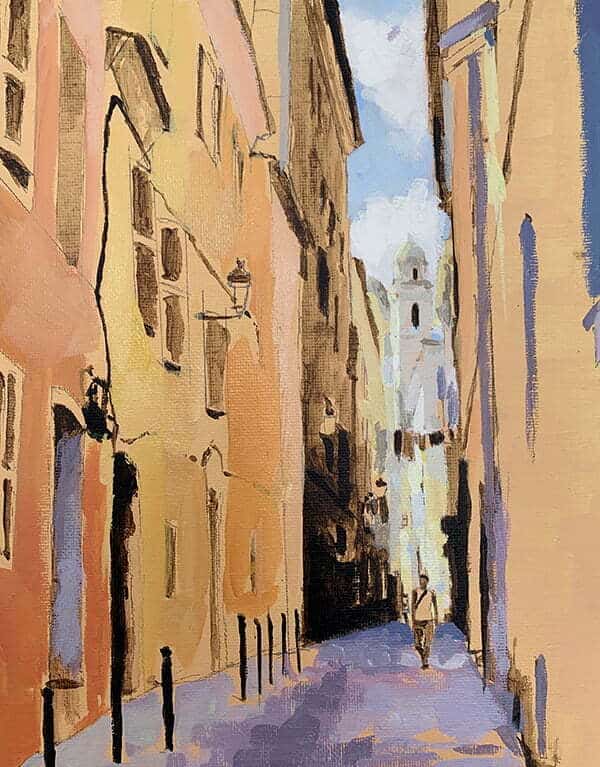
I continue working on the colours of the left-hand building, just varying hues of the yellows and the oranges by either adding some Titanium White to lighten them or some of the Azo Yellow Medium to make them more saturated.
Step #10. Painting cool shadows
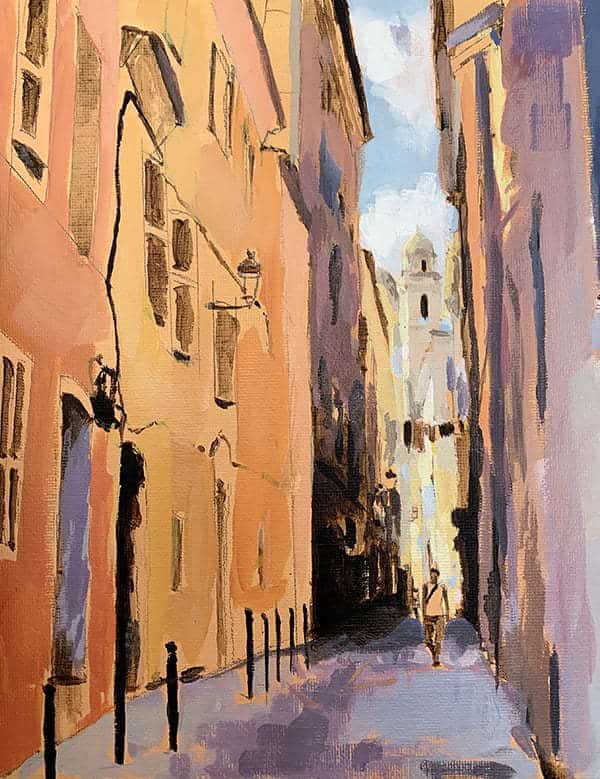
Once I’ve got the warmth in, I swap back to looking back at the shadow-side, and I can start to paint in muted tones.
I then change my focus to the buildings deeper on the right-hand side, with shadows all around now, it starts to really feel like we’ve got this lovely glint of light in the distance.
Step #11. Contrast of colour and value
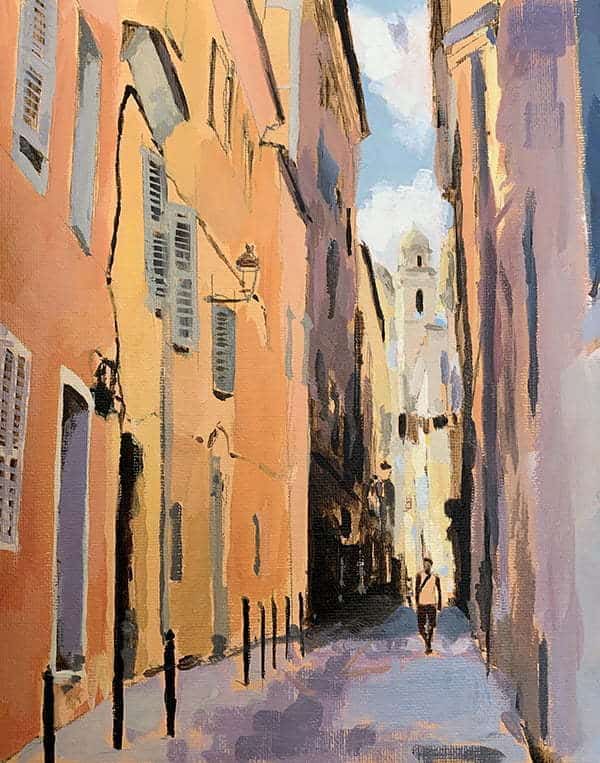
I’m now contrasting the warm colours on the left by adding muted greens and greys onto the shutters. Also adding small details with contrasting lights, such as the doorway on the left, now we’ve got in this fine white edge it really makes it look more like a doorway.
So we’ve got more of a tonal contrast, as well as a colour contrast.
If you flick your eyes back to the previous image. You can see how orange next to the purple but it doesn’t really pop as much as when you’ve got the orange, purple and the contrast of the white in-between.
To get a fine line on the shutters, I’ve just been using a flat brush. And because it’s quite stiff, I’m just kind of dabbing using the end of the brush. A bit like a potato print, if you imagine, just like dabbing it down along the edges of the shutters, and you get this fine one line, rather than trying to draw it with the brush.
Step #12. Adding red
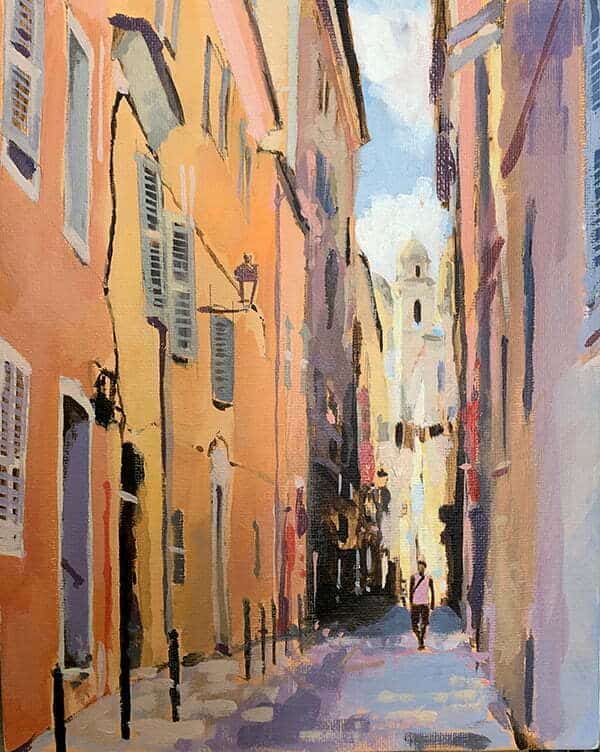
Now I’ve got all these colours in; I’m scanning the image to see where I want to add more intense colour. I introduce a warmer red and bring in some more of that lovely pinky salmon using Naphthol Red Light and Titanium White. Stronger red hues dotted around the buildings help to move your eye from side to side.
Step #13. Finishing touches
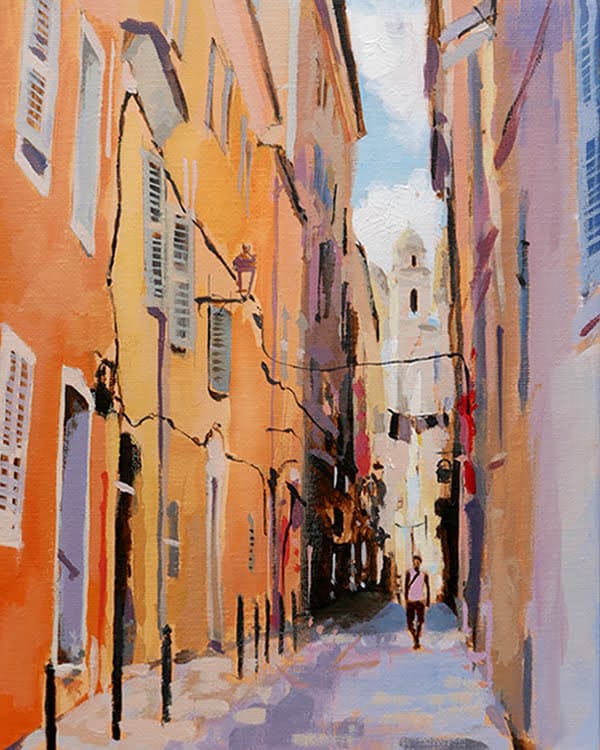
Will Kemp, Warm Shadows in Corsica, 8 x 10 inch, Acrylic On Board
The last thing to do is to bring the sides of the piece together by drawing in the dark electric cable lights.
They go down the side of the buildings and criss-cross across the alleyway. These wires are really key to capturing that atmosphere of the street; they also echo the washing line’s shape in the far distance of the scene.
The starter set did pretty well, there were a few materials I could have used to refine it a bit more but it was fun being restricted from my normal setup.
Things I missed:
Burnt Umber’s warmth as an underpainting and the control of a pen filled with acrylic for the fine line work. A little bit of Glazing Liquid for adding a glow to sections. The flexible bend of the RGM palette knife and the build quality of the brush. I may or may not have broken the head off halfway through! But the entire set was £7.25 so not bad.
Really hope you enjoy the tutorial, next time we’re going to look a little bit closer at that washing line in the distance.
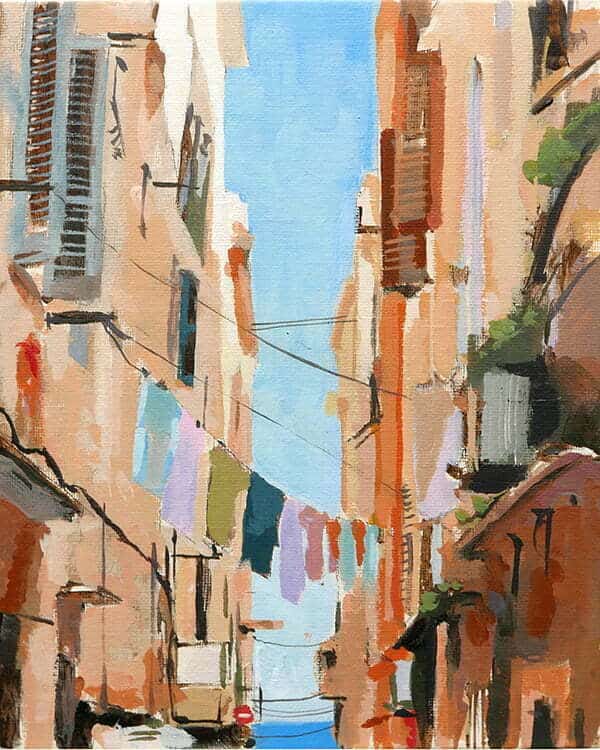
Will Kemp, Washing Day, 8 x 10 inch, Acrylic On Board
Starter Set Challenge: Acrylic Street Scene – A Mediterranean Washing Line



Will, Thank you so much, for all the work u put into this illustration. I will be giving this a go. M
My pleasure James, really hope it goes well.
Will
Hi Will, I have followed and appreciated your work for some time .
This exercise is just exactly what I need at the moment. I normally work in watercolours – which I love , but really want to learn to use acrylics .
So thank you for your expertise and enthusiasm.
Kind regards Sue
Sounds perfect timing Susan, it would work quite nicely as an ink and watercolour study could be nice to do a compare and contrast and practice between the two mediums.
Will
Thank you for doing this.I like your style and the way you teach. I hope I can keep doing this!
My pleasure Elizabeth, really hope you enjoy the lesson.
Will
This is fabulous as always. I love your work and your advice and tutorials are exceptional. I’m hooked. Do you do any workshops or events? I go to Cornwall quite a bit and it would be great to meet you in person. Have you thought re putting these written tutorials in a printed book ( it would be great if it could be bound in a way you can take sections out). I’ve ordered a few books .. most seem to be based in Cornwall) , but only a couple had any good demos ( some of them very twee and the work not that great tbh).
Thanks so much Michelle, I don’t run any live workshops at the moment but good to know they would be of interest, and thanks also for the note about a book.
Cheers,
Will
Hi Will, thank you so kindly for sharing this and i can’t wait to try it. Cheers!
Sandy
Really hope it turns out well Sandy.
Will
Thankyou so much can’t wait to start
Cheers
Good one Trish, hope it goes well.
Will
Muchísimas gracias Will, por compartir, por animarme a seguir, adoro tus tutoriales y me han ayudado mucho en mi proceso de pintura, eres un gran maestro.
Saludos,
Ange
Thank you very much Will, for sharing, for encouraging me to continue, I adore your tutorials and they have helped me a lot in my painting process, you are a great teacher.
Regards,
Ange
Es genial escuchar a Ange, me alegra que hayas encontrado útiles las lecciones. Will
That’s great to hear Ange, so pleased you’ve been finding the lessons helpful.
Will
Thank you very much, Will. After completing my drawing class I was planning to draw something to be painted in acrylic, so this tutorial is exactly what I need to give a try. Regards,
Marivone
Sounds great timing Marivone.
Will
Thank you for the painting instructions. Can’t wait to paint it. Love a great idea.
Cheers Virginia, hope you’re doing well.
Will
Hello Will
Thank you for sharing your art. You are a fantastic teacher!
Patricia
Thanks for your kind words Patricia.
Will
Thanks Will ,I’m learning a lot following your lessons thank you very much
So pleased to hear it Antonio.
Will
Thanks for the tutorial, Will.
Wish we all could go on holiday again. Ryanair seems a distant dream now
For sure Lauren, hope you enjoy the lesson.
Will
Detailed and helpful…and I appreciate the free content!
My pleasure Donna.
Will
Hi Will, this is extremely timely. With all the lockdowns and various other interruptions through COVID my artwork seemed to take a bit of a backward step. I thought I’d be inspired through this period but it seems the opposite has happened. Perhaps it’s all the negativity. Anyway, you’ve jolted the painting juices with this latest so thank you from Australia. I look forward to working through the exercise. Cheers, Kevin
So pleased you’re feeling inspired Kevin! good luck with the painting.
Will
So thank you for your expertise.I want to learn to use acrylics .
Hope the lesson helps Alvaro.
Will
Thank you for this great lesson. I’ve always admired your work, and your particular style of painting. I have painted very few urban scenes, but always admired the light and shadows in the lanes between buildings. Your tutorial has encouraged me to learn how to paint that.
That’s great to hear Prabha, yes street scenes can be a really fascinating subject.
Will
Thank you so much Will. I love all your tutorials. But this the tonic I needed now,during the COVID times. Colombo is getting out of hand. Learnt so much from you.
My pleasure Janaki, glad you’ve been learning lots from the tutorials.
Will
Would love to try this in pastel too!
Go for it Deborah, would tranlate well.
Will
Thank you, Will. It’s very generous of you to provide these free lessons. I love your work and will definitely try this exercise. I am also enjoying your water mixable oil course during this lockdown period. You provide such a wealth of information on your courses and lessons.
So pleased you enjoyed the water-mixable oil course Carol and found it helpful.
Will
You make it look so easy! Thanks for another great lesson,
My pleasure Pippin!
My wife gave me an acrylic painting set for Christmas ,so I am very new to painting and I am a little nervous of embarking on too ambitious a project at this very early stage . I do find your tutorials so useful for inspiration and insight to techniques ,helping me to gain the courage to get in front of a canvas to give it a go . At this stage I am still toying with ideas but this cityscape appeals to me so I think I will take the plunge and see what comes out at the other end
Glad you’re feeling inspired John, feel the fear and paint it anyway!
Will
The perfect subject on these dull grey days. Thank you so much. I have already made a start on the painting.
Chris
That’s great to hear Chris.
Will
Terrific lesson, so clear and detailed! Thank you very much Will!
My pleasure Bella, glad you foudn the steps helpful.
Will
Thank you, Will!
I love your process and color choices.
Thanks so much Geli, much appreciated.
I love cityscapes and like a pdf format tutorial. I can keep it handy and refer to it at my own pace without pausing. Thank you for sharing this with us. I enjoy all your tutorials, Will, and learn a lot from them. Thank you!
So pleased you found the format helpful Patty.
Cheers,
Will
Thanks Will, have really enjoyed following your lessons. Have been doing a lot of pastel work lately so really feel a change is due. I might try it in pastels afterwards too. In these very challenging times it’s so encouraging to have a great artist like you to fire us all up. I’m really not good with perspective but will give it a good try.
Thanks again
Hope it goes well Christine, yes, those buildings on the right-hand side can feel really steep, but once the scale of the figure is in you can judge the buildings against that.
Will
Hello Will,
I really enjoyed this step by step!! Picked up brushes 3 months ago…now can’t stop. Making progress, and when I feel discouraged I come to this website. You are keeping me going – THANK YOU for all you do. Truly remarkable teacher and an inspiration!
mae
So pleased you’ve been enjoying yor paintings Mae, really hope the lesson turns out well.
Will
Ay, ay, ay, que HERMOSA fotografía y pintura!! Will, eres un gran artista y maestro. Muchas gracias!
Oh, oh, what a BEAUTIFUL photography and painting !! Will, you are a great artist and teacher. Thank you very much!
Gracias Tamara!
Thanks Tamara!
It is amazing!
Thanks Haimi.
Thank you Will, you’re a generous soul. You made my day with this treat of a class! I’m trying it in oils.
Sounds good Katharina, hope it goes well with the oils.
Will
Great step by step tutorial, I have a cool reference picture which is reminiscent of this scene so I will give it a try – mine has trees either side and reflections on a wet from recent rain pavement.
I wonder if you have thought of (paid) zoom tutorials? I’m sure you’d get a great take up.
Sounds like your reference would work well Hazel and good to know zoom tutorials would be of interest.
Will
Thanks Will for these tutorials. They seem to come just when I need a little inspiration to keep painting. I’m looking forward to the next one as well!
So pleased to hear it Gail.
Will
Thank you for this Will! So interesting to see how you work and the stages you go through. I have felt so inspired to paint by your website and feel I have learnt loads. Thank you! Just as an aside I’d be so interested if you have any books recommended reading. I think on one of your videos you mentioned Michael wilcox and colour bias which I have found fascinating. Thanks again for this and here’s to spring around the corner now soon!
That’s brilliant to hear Esther, so pleased you feel like you’ve been learning lots. Good to know a recommended reading section would be of interest.
Cheers,
Will
Thanks for this and all the others tutorials. The colours are bright and the paint glows.
I tried to paint using watercolors and the size of a post card.Will you explain if is the same step-by-step, or we should start whith the light colours first.My result is not so good as I expected.Think that will try in guache, foi another post card.
Thanks a lot. Be safe.
Thanks Carolina, glad you’ve been enjoying the lessons. For watercolours i’d use a different approach and leave the white areas showing building up from a white base.
Will
Stay Strong Will – you have helped–encouraged so many people!!
Cheers Michael, and you.
Will
Loved this demo Will. A few years ago I painted a similar scene from a village in Andalusia but could never work out why it was disappointing. Thanks to all your tips about tone and colour, I will try again and hopefully be more successful.
Sounds a good scene to revisit Donna, beautiful colours in Andalusia.
Will
Hi Will, Thank you, once again, for your informative and easy to follow tutorials. I want to try paint a similar scene – waiting for enough courage to get going!! We’ll see!!
Go for it Rita! so pleased you’ve found it easy to follow.
Will
Thank you so much for posting this lesson, I love the subject and colours, I really admire your painting style. will certainly give this a go I have found your lessons so far to be really easy to follow not quite as easy as you make it look though but one day !
My pleasure Gail, glad you’ve been enjoying it.
Will
After some time of following your brilliant free demo’s, I treated myself to your water based oils course, which I thoroughly enjoyed. Can you tell me – would you varnish these as per an ordinary oil painting? Also would you ever have time to give us advice on mounting and framing – very scary for us non-professionals ! Am really looking forward to starting the ‘Street in Corsica’ in Acrylics. Thank you so much Will, your cheery face is always welcome but especially during this rotten time.
Good one June, so pleased you enjoyed the water-mixable oil course.
Can you tell me – would you varnish these as per an ordinary oil painting?
Yes, i’d treat the painting the same as a traditional oil painting when varnishing.
Also would you ever have time to give us advice on mounting and framing – very scary for us non-professionals
Good to know that subject would be of interest June.
Really hope your street scene goes well.
Cheers,
Will
Hi Will,
This is one of the best lessons that I have seen on your site .. love the explanations, directions, and all. Thank you so very much!! Being 77, step by step instructions are great for me.
God bless you and yours, C-Marie
That’s very kind of you to say so C-Marie, so pleased you enjoyed it.
Will
Hi Will, thanks for the lesson. Gave it a go today. Find it quite hard to paint loosely and I confess that I did end up adding black graphic lines in some areas. That is my left and right brain working at the same time
It would be interesting to see people’s interpretation of this lesson.
Hey Linda, so pleased you enjoyed the lesson. I haven’t got a student success page for this lesson at the moment, but good to know it would be of interest Linda.
Will
Is there a tutorial for the “Washing Day?”
There will be one coming soon, I’ll send out details on the newsletter.
Cheers,
Will
Just love your teaching Will. I will be having a go at this over next few days. Definitely a challenge for me as I haven’t down street paintings before. That you for your free guided step by step.
Really hope you enjoy it Bernadette.
Will
Hi Will,
Thanks for another fun, interesting and pretty art project. I haven’t made it yet, but am planning to do as you’ve shown in other exercises where there’s the acrylic underpainting and then painted over with water soluble oils .. really gotten into using them. Guess I’ll have to use my thinking cap to do this, but I’m going for it. As an aside, I’m going to have to do a better job at taking photos. Of course that’s a thing of it’s own, but I see how you capture a moment and where there’s some kind of depth to it or simplicity … depending on the subject. I pulled up some photos I took in Como a few years back and in short, they suck. I’ll want to do better. One thing about your photo for this project is the light at the time of day was perfect for capturing the warm pastel color! It’s fantastic. On the other hand I’ve also really gotten into night scenes too and like the way they pull me into their story. Perhaps at some point you can give us a tutorial for doing that and I’m sure I’ll hang on every word. In any case, thanks!
Cheers Laura, good to know a photo article for reference images would be handy.
Will
Will this is really going to challenge me but I will give it a go. I just love your work and have tried a lot of your free paintings. Did your colour mixing tutorial and drawing course. Just working up to buying your landscape course. Maybe next month. I would also like to buy your portrait course but somehow thing the landscape would be better for me to do first.
Good one Leslie, so pleased you’ve been finding the courses helpful.
Will
Hi Will
I gave this Corsica painting ago and was really happy about it. As a result I did my own painting of La Boca in Buenos Aries. very colourful and I like it a lot. I want to do your landscape course but when I went to get it I couldn’t find it. Did you take it down?
So pleased you enjoyed it Leslie, and great that it was the inspiration for your next piece. The landscape sketching course is here, was that the one?
Will
Hi Will,
I messaged you about this particular challenge at the end of February saying that I was planning to do it in water soluble oils. And I did and really enjoyed it! I had to do a lot more measuring than for many of your other challenges and be especially mindful with the color. This said, my art room has a window, and an unexpected lesson I learned was how quickly the light shifts. After a couple days of shifting my canvas so I could see the colors correctly I realized that at a certain point in the day I simply had to stop. Thanks again for taking us to Corsica.
So pleased it turned out well adapting to the water-mixable oils Laura.
Will
In Minnesota here! So glad I found your site! Drawing is a hobby that I love. I’m nervous to paint but now w not as much
Great stuff Amy, really hope you enjoy it.
Will
Thankyou so much Will. I am very new to painting, and have never painted a street scene before.
Mine is not great and needs to be looser and more painterly but I do like it. ( sorry couldn’t send my attempt)
So pleased you enjoy the challenge of a new subject matter Shelagh.
Will
I have just started a similar project but from a picture of Venice. This subject is new to me and oils are usually my medium. However I wished to tackle this one with acrylics and in a much looser style than I normally do. After the initial sketch I was scared to start so came to your site for inspiration and you haven’t let me down. Can’t wait to adapt this tutorial to my painting.
Great stuff Anne, really pleased you’re able to adapt the techniques to your Venice scene.
Will