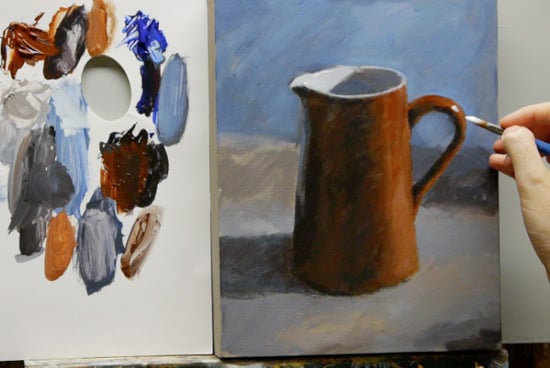
With only 2 colours
You know the scenario,
You decide to paint a simple study of a lemon; the painting starts out okay until you get to the fun bit, the yellow of the lemon.
As you begin to stare at the yellow to try and judge it’s the intensity you ask yourself – how yellow can you go?
The more you look, the more you convince yourself that this is most probably the most yellow yellow the world has ever seen, so only the strongest, brightest lemon yellow will do, straight from the tube.
You paint it on with enthusiasm, only to reflect on your handiwork and find the results are a bit disappointing, it looks too fake, dare you to say it, too lemon.
So what can you do?..
The power of a limited palette
This is Part 1 of a limited palette series using acrylics to paint a still life study with only two colours and white.
Working with a muted palette forces you to try and make the most of what you have got.
To try and create a mood or balance in your piece, you have to use the play of warm and cool rather than the allure of a brighter pigment.
After learning about the importance of contrast and tone, we can move onto colour.
This can be both a blessing and a curse.
Often the tendency to reach for a new tube of paint when your picture is going wrong is too much. You think that will solve the problem, but you can end up with mud.
I’m a great believer in less is more when you are first starting to learn to paint, so in this series, I want to look at a very limited palette, we will be using just:
Ultramarine blue, Burnt sienna and Titanium white.
Warm and cool
All colours are either warm or cool, so, for example, you can have a warm blue (ultramarine) or a cool blue (cerulean), and this applies to all colours.
Looking at the colour wheel, we can see that orange and blue are opposite each other. This means they are called ‘complementary colours.’
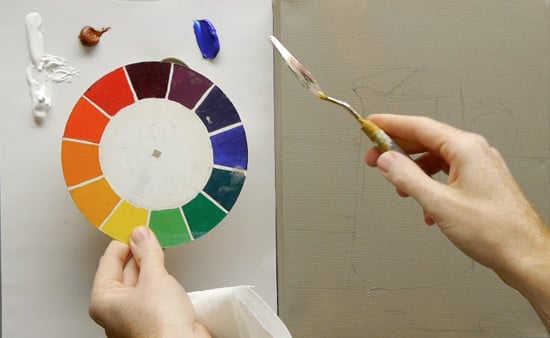
Ultramarine blue and Cadmium orange are a good pair of complements to look at – to understand the theory behind colour and learn about the range of colours you can get from two pigments.
However, Cadmium Orange can be too harsh when first starting to try and create a harmonious painting, so for this painting, we’re going to use Burnt Sienna.
Burnt Sienna is from the orange family (as are browns like burnt umber) but it’s a quiet orange rather than being too loud, so grab your brushes and watch Part 1 below.
Pro tip: if you are ever unsure of a colours family then just add a touch of white paint to reveal the appearance on the colour wheel.
A step-by-step Limited Palette Still Life acrylic painting.
I will be posting a weekly video on my YouTube channel to follow this 3 part series along at home. It’s free to subscribe to the channel so you can keep updated with the painting progress.
The image below can be ‘right clicked’ and ‘Save image as’, so you can use it as a guide.
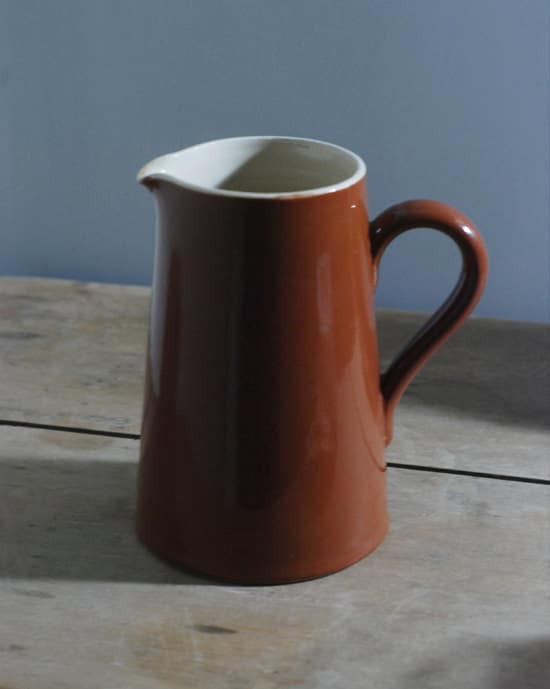
Materials you will need:
- 30 cm x 24 cm pre-primed canvas but any canvas close to this will do the job.
- Size 6 Isabey Isacryl acrylic brush – filbert
- Size 10 Raphael synthetic (8204) – round – (any medium round will be fine)
Paints
All paints are Golden Heavy Body Acrylics.
- Artist quality Titanium White. – Invest in this white even if you use student quality paint for the rest of the colours.
- Burnt Sienna
- Ultramarine Blue
- Acrylic Glazing Liquid (Gloss) – Golden Paints
- 3B pencil
- Kitchen roll
- A jam jar for cleaning brush.
- Small dipper for diluting paint
Step 1. Apply a coloured ground.

The first thing I do is prepare the canvas with a coloured ground. This can be made from a mid-grey mixed between the Ultramarine blue and Burnt sienna or a mix of Raw umber and Titanium white just as we have done on previous paintings – I’ve used Raw umber & Titanium white.
To see how I apply an acrylic ground See: How to apply a coloured ground.
I use a 2-inch decorators brush (made by Purdy) to paint the ground. Make sure to add water to the mix to cover the canvas opaquely yet isn’t too thick. If you look closely, you can see areas of my canvas that aren’t covered 100%.
Step 2. Draw out the image.
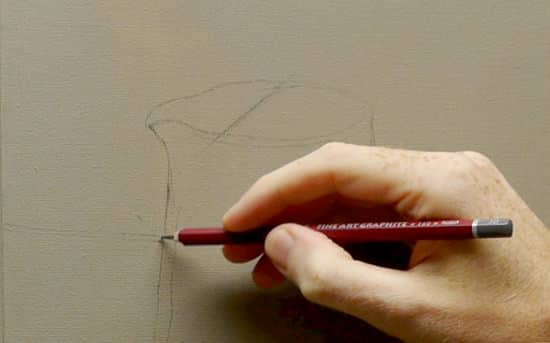
I compose a simple line drawing onto the canvas using a 3B pencil. Key points to look out for in the composition are the curve under the bottom of the jug.
Beginners tend to flatten the bottom of jugs as your mind knows that in reality, the surface is flat.
Also, note the sharp angle of the shadow line in the jug and the negative space used in the jug handle. This helps to bring the jug forward and create a contrasting angle to the verticals of the jug.
Assess the tones.
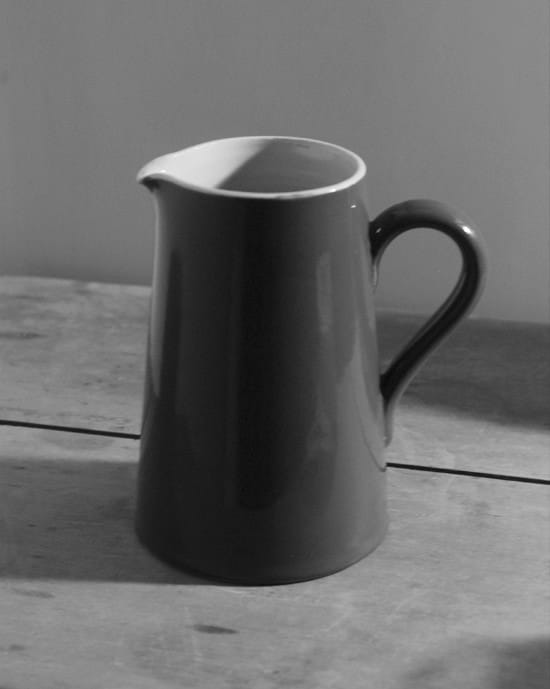
When we look at a black and white version of the jug, we can easily see the differences in tonal range. Notice how dark the handle and shadow side appears. When you look at the coloured version, the shadow isn’t as obvious.
I then mix a dark brown/black from the ultramarine blue and burnt sienna. You could make quite a pile of this as it’s handy to have when tinting down other colours as the painting progresses, also, if you are using student quality paints you might need a couple of coats to get a real dark opacity.
Pro tip: Although Burnt Sienna appears opaque, it can be quite transparent, so you will probably need a couple more layers compared to a Burnt Umber and Ultramarine Blue mix.
Step 3. Establish the darkest darks.
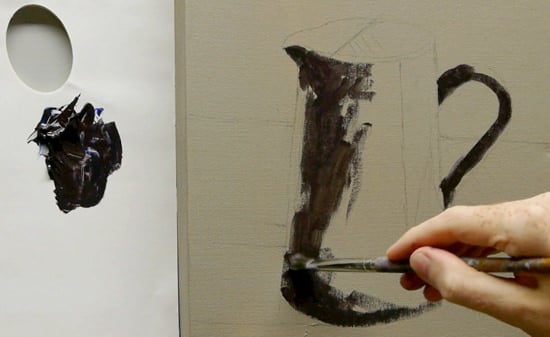
Don’t look into shadows.
When we are working on the shadows, be careful not to look too much ‘into the shadow’, this is when you focus on the shadow tone, and it appears darker. Try to look at the subject as a whole, concentrating on the main object and noticing how dark the cast shadow appears.
When you view a part of the painting in isolation, it tends to emphasise that part. This can give you a distorted view of the object. It seems counterintuitive not to look directly at a subject to view it accurately, but just as when we softened the edges in the portrait last time, it can help to echo what’s called a ‘persistent of vision’.
So build up the painting slowly, don’t go in too heavy to start with, that way you can see the painting grow and develop in front of you and create a painting rather than a completed section at a time.
On the dark side of the jug, the cool light from daylight has been bounced onto the side of the jug; I initially wash this in with a thin layer of the dark Burnt Sienna/Ultramarine mix.
Step 4. Adding the lights

I mix a touch of the dark Burnt sienna/Ultramarine mix with the Titanium white. I want to cool the colour slightly as it is being hit indirectly by the cool daylight (blue light) so I add a touch of the Ultramarine blue to the mix. This is then painted on with the number 10 round brush.
The one thing that I don’t paint at this stage is the highlights. They always go on last so they ‘sit on’ the object. Build up the form first, imagining that there isn’t a highlight, then when you add the highlight, the effect will be much more effective.
Tune in next week for Part 2, when we start to add the mid-tone greys mixing warm and cool colours using our limited palette.
You might also like:
1. Warm & Cool Jug Still life Part 2 (video)
2. Warm & Cool Jug Still life Part 3 (video)


Hi,
I have found your site particularly helpful and have tried your cherry (albeit a messy first attempt, I am still proud of it!). I want to try your landscape painting as well, although I first need to get my school project done. My project is a painting of an animal (any animal) and I was hoping that you could help me. I need to decide on the easiest course and go for it. There are quite a few tutorials but they’re all for advanced artists. What would you recommend starting with?
Thank-you
Sam
Hi Sam,
Great to hear you had a go at the cherry painting. For your animal painting you can take some of the principles used in this tutorial and apply them to your subject. Just find one of the tutorials that you think looks too advanced and simplify the colours used. You can always add a couple of stronger colours as the painting progresses, just try and do most of it with two. You’ll be amazed at what effects and success you can have by keeping it simple.
Thanks,
Will
Great idea! What do you think about an “advanced” colorwheel that contains on the outside the mixed color with the complementary color? And: it would be very (!) helpful to know the value of the primary and secondary colors… I´m looking forward for another excellent tutorial by Will Kemp :-). Btw: ever thought about a book?
Hey hyp0aktiv,
Thanks for the comment and suggestion on the colour wheel, and yes I have been working on a book.
Cheers,
Will
I have painted with oil, water color and now in acrylic. When I painted with oil, my teacher showed me how to use gesso to create texture underneath the oil. Can I do this with acrylic? My acrylic teacher didn’t show us how to put gesso on the canvas to prime it nor how to put a foreground coat on my canvases.I’ve been told that I have some nice saleable paintings but I’m sure they could’ve been much better if I’d known about gesso and foreground. Thank you!
Hi Susan,
Thanks for the comment, yes you can use gesso to create texture to your foreground with acrylics, in fact using textured gels mixed with your paint you can create a huge selection of different effects. They will be more stable, and dry quicker that working with oils. You can have a look at my video on using acrylic gels where I demonstrate using a pumice gel to add texture and also my post on using acrylic gesso.
Hope this helps,
Will
Hello Will,
I am back with more questions!
I would like to ask if it is OK to use fat brushes to make paintings like this?
http://www.youtube.com/watch?feature=endscreen&v=fYCUltZDOBE&NR=1
Thanks!
David A.
Hi David,
Nice to hear from you!
Yes, of course you can use larger brushes for blocking in skies etc.. in a lot of my demos I try to show how much can be done with one brush but that doesn’t mean to say if I’m doing a large scale landscape I would use a decorators brush (2 – 4 inch)
It’s just thinking what would be the best brush for that particular job.
Enjoy your painting,
Will
Thanks a bunch!
You’re welcome David,
Will
Just found you last week. Painted the warm/cool still life this evening. Lots of fun! You make it look easy:-) Your videos and articles have answered a lot of my questions. Can’t wait to try more exercises. Thanks so much.
Hi Rachel,
Really pleased you enjoyed the tutorial. And great that the articles are answering a lot of your questions. Looking forward to seeing how your get on with the other lessons.
Thanks,
Will
Hi Will
I’ve only been drawing and painting for six months now and when I signed up to your drawing course I was an absolute beginner. I attend a local art club but there’s no instruction really, through it’s very convivial. Your drawing course made me see more clearly and helped hugely. I am now finding your new videos really useful – I love your precision. Thanks for making your knowledge so available,
Melanie
Hi Melanie,
Thanks for the comment, great to hear that the drawing course has helped you to ‘see like an artist’ it really is so important when learning to paint.
Pleased you are enjoying the painting videos, this tutorial is a good one to start with after the drawing course as we follow alot of the same principles, looking forward to seeing your results.
Thanks again,
Will
Thank you so much.
I am a beginner. Last year I got myself the tools and have made only three paintings so far. Most of my time is being consumed by browsing for tips, lessons, instructions etc.
The majority contains only a fragment of information. But your site is what I have been looking for. The jug warm/cool challenge for today and I think it worked out okay.
http://www.flickr.com/photos/40131333@N02/8050612607/in/photostream
Your site banished a little of my fear to paint. Thank you!
Franklin
Hi Franklin,
So pleased to hear you have found this series of tutorials helpful. The drawing looks good on your painting and the colours have been well judged.
The cast shadow inside the jug is spot on.
The one thing that grabs my eye is the shadow shape on the table to the right of the jug. Because the curve has been slightly exaggerated it echos the bottom of the jug, and jumps the viewers eye.
If you flattened that shape on the table shadow the focus would be more onto the jug.
Thanks,
Will
Hi Will, thanks for the suggestion ~ yes, brilliant idea, I will do this! :) A quick question: I already have a Raphael 10 that I’ve used for oils ~ can I use the same brush for oils and acrylics or is this a bad idea?…. and …Do I still need the 6 Filbert or will an oil Filbert do?
Thanks :) Carol
Hi Carol,
In general this is usually a bad idea as it can easily cross contaminate the brush, also, the bristles will behave differently if they have been used in thinners rather than just water.
Cheers,
Will
Hi Will, thanks for getting back to me so quickly. Good to know ~ I have now got shiny new ones for acrylic use only :)
I really appreciate all of your help and advice~ thanks so much, Carol
Had a go at this one tonight. That little simple still life is harder than it looks. Greatly enjoyed the practice of trying to match what I wanted for each section, Started out with a lot of back-and-forth, too cool…too warm…too cool…but by the end was able to get to my target much more smoothly and quickly.
http://conniehurley.wordpress.com/paintings/
Thanks again,
Connie
Hi Connie,
Nice work on the jug, well observed drawing on the top of the jug and a nice balance between the warm and cool colours.
Watch out for the little ‘kick out’ of the jug at the bottom left side of the jug. the shape is slightly out, it’s only very small but puts the viewers eye out.
Cheers,
Will
Will,
Just to let you know that I am a big fan of yours. Your work, your web site are really great.
However and above all – your didactic style is fantastic and much apprecited.
On mixing colors – this is one of the most difficult part for a beginner. I hope you intend in your guide (in preparation or has been completed?) you include a comprehensive review of many color permutations – this will be very helpful.
With great esteem and appreciation for your work, thank you, Ed
Hi Ed,
Thanks for your kind words and glad you’re enjoying the website.
The colour course is the final stages of editing as we speak! So I’m planning to launch it in a couple of weeks.
To answer your question, the course teaches you how to master the art of mixing the colour you really want – every single time.
Understanding how colour theory works so you discover the possibilities of every pigment.
So rather than having sheets and sheets of example mixes in a recipe book, I want you to gain the knowledge so you can confidently mix any colour you want and put it into practice in your own paintings.
Naturally to teach this I do demonstrate a range of different colour permutations and colour mixes, alongside practical painting lessons.
I’m really excited about the course and I’ll post details on the Art School blog. (look out for the first week offer)
Cheers,
Will
Dear Will , It me again Sharack am write to say i got a new all-in one printer it a hp. Now that I have a new all-in one printer I can print out the image for the step by set how to paint with warm and cool colours. Wish me luck.
Am Will is there a place that I can post my art work up for you and other to look at? will hope you see this your truly Shadrack Rolle.
Hey Shadrack nice to hear from you, pleased to here you’ve got a new printer and are going to give this painting a go. I haven’t currently got a place for displaying students paintings but you can send me an email with your image, I’d love to see how you get on!
Cheers,
Will
Grazie per le tue lezioni di pittura. Hai un modo di presentarle semplici interessanti e efficaci. Bravo! Complimenti per i tuoi lavori – ritratti, molto belli.
Ciao Giuseppe!
Grazie per il tuo commento gentile.
Grande di apprendere che hai goduto il sito web e video.
Ho appena finito una commissione dipinto di Venezia quindi mi sento molto italiano!
Cheers,
Will
Estimado Will
Realmente muy agradecida por la ayuda con los tutoriales, tengo problemas cuando trato de usar las gemas de los dedos,
cuando trabajo con oleo, siempre me es fácil esfumar, pero cuando trabajo con acrilicos , en este clima tan calido , se seca casi inmediatamente.
Lamentablemente no dispongo en mi pais de las Pinturas Golden , que sé que permiten ,con un tiempo de secado mas prolongado, esfumar, tuve la suerte de probarlas en una convención .
Que me aconsejas solo como de linea alta esta la marca Amsterdan. Un beso grande desde la Ciudad de la Costa Uruguay
Translation:
Really very grateful for the help with the tutorials, I have problems when I try to use the gems of the fingers, when working with oil, always easy to blend, but when I work with acrylics, in this hot climate, dry almost immediately. Unfortunately I do not have in my country of Golden Paints, I know that allow a longer drying time, blending, I was lucky enough to try them at a convention. As you advise Pickup only this brand Amsterdam. A big kiss from the City of Costa Uruguay
Eres Welome Angelica, tan contento que estés disfrutando de los tutoriales, aplausos, Will
You’re welome Angelica, so pleased you’re enjoying the tutorials, cheers,
Will
Hi.. I am very much interested in painting.. At home i am not encouraged to draw or paint, so i couldn’t join any courses or buy materials.but by getting some of the videos from you tube i have tired to paint and draw pencil sketches. i am doing my Masters in commerce. i want to learn to paint. so can u please suggest me how to start and what are the materials should i buy.
Hi Divya,
The paints I use in this tutorial (Ultramarine blue, Burnt sienna, Titanium white) are really good simple starting point to learn about painting.
For a more extended palette, have a look at this article to give you an idea as to which colour palette would suit you best.
This cherry tutorial is another great place to start if you want to experiment with colour.
Good luck and enjoy it,
Will
Will, I am thoroughly enjoying your website! Explanations are clear, tips are extremely helpful and you’re addressing the very questions I have rolling around in my head. As a beginning, mid-life-aged painter, with no previous experience, I find I’m quickly over my head with all the info on techniques, mediums, colors and so on.
So, how would I tackle this two-color still life, if I were using oils instead of acrylics? What would you suggest doing differently? (I’m asking because I only have a starter set of oils; haven’t ventured into acrylics yet!).
Thanks, in advance!
Scott
Hi Scott, really pleased you’ve been enjoying the website. When using oils for this painting you can use pretty much the same techniques, just on the first layer when you tone the canvas don’t use white, just use a raw umber diluted with Odourless mineral spirit. This way you’ll keep the ‘fat over lean’ of the oil paint. If you have a read through this Oil portrait demonstration it goes through more in-depth about the different qualities and techniques to be aware of with oil painting.
Hope it helps.
Cheers,
Will
Will,
Thank you so much for your tutorials! A group of women (4) are learning to paint and I came across your youtube video and subsequently your webpage, which I shared with them. We decided to tackle the “cherry” We were so pleasantly surprised at our results. it takes our breath away actually. Thanks for sharing. Next week…the lemon.
Hi Brenda, lovely to hear from you and thanks for your kind comments. Fantastic to hear your painting group had success with the cherry painting, really pleased you enjoyed it.
Hope the lemon turns out well!
Cheers,
Will
Your pile of white in this video is a lot runnier than your other colors. Did you thin it out with water or maybe the glazing liquid before putting it onto your palette?
Hi Clint,
Usually the heavy body is a touch thicker. Different brands do vary and in oil painting I’ll often thin out the white first as it can be very stiff straight from the tube. Here’s a video demonstrating pre-mixing white for your paintings.
Cheers,
Will
Thanks Will. I learned a lot with this exercise. The jug reflections were a challenge and it was interesting to see how you ignored them until the finishing touches towards the end. I think you will be able to see my result with the link below.
https://drive.google.com/file/d/0B1PoFN6zaob5dmpsdkVRODFGOGc/edit?usp=sharing
Great to hear it Clint, the drawing and balance between warm and cool has worked really well. The reflected light on the left hand side of the jug could be warmed up slightly using a thin glaze of burnt sienna. Also, watch on the cast shadow as it should be darker closest to the jug and then get lighter as it moves away from the jug, currently your cast shadow is the other way around. A couple of tweaks and it’s be looking super!
Cheers,
Will
Hi Will,
I’m an absolute beginner in painting, have been looking at websites and videos online and I found yours is the best! Thank you so much I’m enjoying painting very much, have tried the apple and I’ll try the jug tonight.
Keep it up and thank you again!
Cathy
Thanks Cathy, good luck with the jug painting.
Cheers,
Will
Hi Will
I have started paying for one of your courses and I like very much how you present them. I decided to take up art and your courses help me to get the essentials of Fine Art painting and drawing.
The last time I did any art was 42 years ago when I was 17 years of age at school in an art class.
I watched your video on doing Still Life and I grabbed a coffee pot and cup to work on. I really struggled with the paining because I was trying to learn how to mix the hues and get the tones right. I kept redoing many parts of the painting because I had trouble in getting the tones to blend – I nearly gave it up. In the end I managed to do it but it was tough.
I have so much to learn in applying the skill and techniques.
Here is my first attempt on painting. I have a feeling it is wrong because the coffee pot and cup is done in the style of realism but the background is done with an impasto/impressionism style. I think perhaps it is incorrect to put two styles on one painting because it confuses the painting. I did this because I really wanted to learn the techniques in any case.
The reason I did that was first of all I was learning how to do realism, in making the metal look metal, and then I wanted to bring some life to the painting by adding colours and texture in the background to make the painting “speak to me” – make it more interesting.
I feel I need to learn the basics in knowing how to paint realism first and then once I can do that move on to combine realism with abstraction or impressionism like that of Tibor Nagy. God I have a lot to learn!
http://denniswrowntree.deviantart.com/art/Untitled-522266200
Hey Dennis, great to hear from you again, and what a fantastic painting to start your journey back into painting. You’ve chosen a tricky subject and handled it so well. Love the thicker impasto marks in the background and the silver reflections taking on the tones and hues of the backgrounds are all working really well.
Love the bright sheen on the bottom of the cup, it adds that glow to the image. I think you should be so proud of your work as you’ve chosen to jump in with both feet for your first painting. Really pleased you found the tutorials helpful Derek, a brilliant start.
Cheers,
Will
Will, I just started painting with acrylics. I am primarily an ink artist….I do a lot of stippling and sumi-e. I love your tips and your videos. Thank you for being so generous with your knowledge. All of us artists must share our knowledge so the love of art will continue.
Paulette
You’re more than welcome Paulette, really pleased you’ve been finding the lessons helpful.
Cheers,
Will
Hi – love all this. Its a great help!
Glad you’re finding it helpful Austa.
Cheers,
Will
Hi- I am really looking forward to painting this. I have to buy supplies and am wondering if I should get a regular palette or if a stay wet palette is better. Thanks for all of this great information!
Hi Tracey, I use both and alternate between them depending on the size/style of the painting I’m working on.
Hope this helps,
Cheers,
Will
Will, I stumbled upon your website and have read, re-read, watched, looked, and eaten up everything about visual art!! Wow. Thank you for sharing such thorough advice, wisdom, knowledge and experience. I am a 42 year old mother and musician who has visual art in my blood (paternal grandpa who was a professional painter, and maternal grandma who was an amateur) and it is finally my season to answer the call to learn to paint.
So as not to make mistakes in purchasing materials and supplies, I have been reading all I can about color, kinds of paint, etc–(again from your site). I am super frugal and have only bought raw umber and titanium white so far (professional quality acrylics–with coupons). My question is, do I need to purchase canvases for everything I do, or can I paint on paper or other less expensive surfaces (with acrylic paints)–and if so, do I need to prime them in some way? Ultimately I will paint on canvas, but since I am learning–and wondering if I’ll even want to keep my first ones–(I want to start out with the jug demo, the cherry, and the apple) can I just paint on a high quality art paper? I do want to take your beginners acrylic online course too, but thought I’d start out with these. But maybe I should do it in reverse order?
One more question, can I use brushes for acrylics that were possibly used with oils? (I inherited them from my grandma and I know she used both).
Thanks so much for this incredible site! Sorry for so many questions.
Hi Lorraine, really pleased you’ve been enjoying the articles and lessons, to answer your questions:
Do I need to purchase canvases for everything I do, or can I paint on paper or other less expensive surfaces (with acrylic paints)
No, you don’t have to, here is an article on getting your absorbency levels right with different surfaces different painting surfaces
Can I use brushes for acrylics that were possibly used with oils?
Yes, I often use oil brushes with acrylics, you can read more about different brush types here.
I do want to take your beginners acrylic online course too, but thought I’d start out with these. But maybe I should do it in reverse order?
On the new start here page there is a guide through the different free courses and here is a suggested guide through the paid courses. The cherry and jug paintings get great results and are a good place to start, then the beginners acrylic course will give you an overarching view to the properties of acrylics.
Hope this helps,
Cheers,
Will
Hello Will, I just bought all the materials to make this little painting. At least try. Normaly I paint watercolours but even that is a long time ago. My last visit to the house of Claude Monet in Giverny France triggered me. So I Googled “how to paint like Claude Monet” and “Impressionism” and I stumbled upon your website. You explain everything so well that all looks so simple. So I will have it a go and I will show you the results.
Greetings from Belgium.
Peter.
Hi Peter, glad you’ve been enjoying the tutorials and hope the Belgium spring is helping inspire your impressionist paintings.
Cheers,
Will
Hi Will, I recently started painting again (it’s been about 25 years since I’ve held a brush in hand). I found your online art institute about 3 weeks ago and just finished the “warm & cool still life painting with 2 colors”. It was great fun – so great that I’m planning on taking your intro acrylic course. I learned a lot with this lesson and am gaining confidence. I’m disabled and pretty isolated and unable to take regular classes. Your online courses make it possible for me to actually take a class. Your videos and excellent instruction bring a lot of joy into my life. I took some art classes as an undergrad and I have to say that you’re a great teacher. Thank you!
Good one Cara, really pleased you enjoyed the warm and cool study and thanks for your kind comments on the teaching, here’s to your next painting creation!
Cheers,
Will
Dear Will,
Thank you so much for this free video tutorial. I am actually over half way through your intro acrylic course but I really love this jug picture so had to give it a try:
https://drive.google.com/file/d/0B7Z4hjEl3IKNYjRZbTRlM3VQZ1U/view?usp=sharing.
I had a hard time with the final highlight on the jug’s handle. I ended up toning it down a bit because it seemed too stark when pure white. I loved the idea of just using these two colours. It inspired me to use them in an abstract painting as well: https://drive.google.com/file/d/0B7Z4hjEl3IKNVnhrR0xHc25QZjExbDFuLUx2THhhVVphazdR/view?usp=sharing.
Thanks so much for sharing your expertise. I am finding the videos both helpful and inspiring.
cheers, Pam
Hey Pam, really nice work on the Jug painting, yes those two colours can be so handy for working between warm and cools and lights and darks. Like how you’ve taken the tones into your abstract work aswell.
Cheers,
Will
About the gray background, is it okay if there’s a lot of burnt sienna in it?
I accidentally put to much burnt sienna.
Just add a little more ultramarine blue and titanium white to neutralize the colour to make it more of a grey tone, however, if you’ve already painted it on it will still work, just give a warmer glow in the background.
Will
Hi such a great teacher really enjoy watching you paint. Absolutely beautiful painting is the jug. Thank you
Thanks very much Sharon, glad you enjoyed the tutorial, hope your jug turned out well.
Will
Hi Will, can I use raw sienna instead of burnt sienna?
Just starting my first painting.
Thanks
Hi Mike, the raw sienna will be a little too yellow and make the mixes with the blue go a dull green, the orange hue of the burnt sienna neutralises with the blue to create more subtle greys.
Cheers,
Will
Thanks Will
Hi Will
I’m a Brit but live in the U.S. Do you know if brush sizes are the same here?
Really looking forward to working through all your helpful tips (accompanied by tea and bikkies of course!)
Hi Judy, the brush sizes are the same but vary from brand to brand, so a number 8 in one brand could well be different than a number 8 in another brand. Often, art supply stores online show the dimensions of the bristles so you can compare the number to the actual dimensions.
Hope this helps, and enjoy your brew!
Will
Thanks Will! I saw in your post about brushes that you indicate the actual dimensions you use in mm, which is very helpful.
Good one Judy, pleased it helped.
Will
Thanks Will for another great lesson! I plan to try this exercise in oils. I have read previous comments regarding the difference in under-painting. One more question is: do i need to get an oil glazing medium, such as “Winsor & Newton Blending and Glazing Medium”? Thanks.
Hi Ping, no you wouldn’t need a specific glazing medium for this tutorial, just a normal oil painting medium.
Cheers,
Will
Hi Will,
I’ve never painted before, and I wanted to give the water jug a shot. I have everything on the supply list except for the brushes. The ones you recommended are a smidge out of my price range at the current moment. Back when I was feeling overzealous I bought some value packs of brushes (Liquitex Basics) and I think there are some similar sizes in their. For someone who has never painted before, will these suffice or should I hold off until I can buy proper brushes?
Thanks!
Sure will Matt, I’d get started with those brushes so you can start to learn which style of brush you prefer. Then you can invest in other brushes later down the line, hope the painting goes well!
Cheers,
Will
Will
Thanks so much for these tutorials! I’m just back painting again and it’s fantastic to have access to such great tutorials. You’re an amazing teacher.
My pleasure Kim, really pleased you’ve been finding them helpful in your painting.
Cheers,
Will
Hello. There is a good alternative to “¿ Size 10 Raphael synthetic (8204) – round – (any medium round will be fine) ?”
Hi Luis, any brand that does a synthetic bristle, they’re often called a golden synthetic or a soft synthetic. Princeton Series 3750 Select Synthetic Round are very close.
Cheers,
Will
Hi Will,
This is my second tutorial, painting a Warm and Cool Still Life. I really enjoyed discovering how the jug in its perspective took form, presence and character with the sheer simplicity of using just two colours! However I was also able to detect subtle differences between brands, as the Burnt Sienna I used didn’t quite have the burnt orange-red hues for the contrasting effect. As able, I shall eventually try to replenish with the Golden paints. Meantime I’m glad that the jug still seems to glow with a serene warmth against the cooler colours. Indeed, the step by step instructions helped “paint away the fears,” to completion, easing out what would otherwise have been difficult decisions to make at various points. Thank you so much, I sincerely appreciate observing the learning curves that you have imbedded in the lessons.
Best wishes,
Carminia
Good one Carminia, pleased you enjoyed the lesson.
Will
I am so excited to have found your website! I painted a lot as a child with my grandmother and took lessons while in high school, but stopped when work and adult life took over personal time. Now 47, I want to get back to painting again. I have been reading through your acrylic book and gathering supplies and will start with the jug painting this weekend. I can’t tell you how much I appreciate you providing such detailed information and instruction for free. I live in a rural area, and I did look for an art class nearby, but didn’t find anything. Honestly I don’t think I could have found a class as comprehensive as your site.
Thanks again,
Aimee
That’s very kind of you to say so Aimee, really hope you enjoy the lessons.
Cheers,
Will
Hi Will. Thanks so much for sharing. I have never painted before and started very recently, this is only my 5th painting ever. I’m learning a lot through your videos. Would be interested to hear your thoughts, I need to work on my drawing next. https://www.instagram.com/p/BtblGYoHUXq/?utm_source=ig_share_sheet&igshid=10gge6kgkmpvr
Looks fab Chantal, lovely observation of the tonality of the cast shadow and the darker side of the jug, really well handled.
Cheers,
Will
Thanks for the awesome tutorial! Here’s my attempt: https://www.instagram.com/p/BxvCdx9H64c/
I did it in computer software, in Artrage5 – so I kind of “cheated” with the colours, I used 5 tones for burnt sienna and 2 tones for ultramarine to emulate the pigment undertone and base tones, but after that stuck to only colours I could mix with those.
So pleased you enjoyed the lesson Jasmine, I tried the link but couldn’t see your painting.
Will
Hello Will, I just painted the jug and I must say, I’m quite pleased with the result. Even my friends and family are amazed. After all it is my first attempt painting with acrylics. I’m more familiar with watercolour. How can I show you the painting ?
Great work Peter, so pleased it turned out well, you can email directly from the address at the bottom of the contact page and attach your painting there.
Cheers,
Will
What an encouraging and positive tone your tuts have!! What a treat!! Thank you so very much.
Most Sincerely,
Catherine
My pleasure Catherine.
Cheers,
Will
Thank you so much for this tutorial, I painted this jug and love the results of your clear and thorough teaching, thank you very much!!! I’m looking forward to send you a picture of my painting
Brilliant study Leonel, really pleased you enjoyed it.
Cheers,
Will
Hi Will, am just starting out. Been meaning to do this tutorial for a while. Can I just ask why we don’t paint the background first? I had always thought we had to paint the furthest thing away from the subject first. I look forward to hearing your reply.
Hi Ash, really hope you enjoy the tutorial, it depends on the subject you’re working on, but for this lesson I wanted to concentrate on the importance of the shadows and light in conveying the form of an object.
Cheers,
Will
I LOVED this lesson. I’ve completed this canvas and standing back, I’m guilty of a slightly too large ellipse for the mouth of the pot like many other beginners. Other than that I’m extremely proud! While reading your instruction regarding drawing, you wrote words that helped me immensely. They were along the lines of, draw what you SEE rather than what you think you are SUPPOSED to see. Many thanks for the way you instruct: organized, logical, backed by logic, and always explaining the “why.”
Looking forward to signing up for some of your courses.
So pleased you enjoyed the lesson Tracy and are proud of your results, great job! really hope you find the courses helpful.
Will
Loved this tutorial, and learnt a lot about making warm to cool colour strings of greys, as well as knocking back the blue with a little burnt sienna. I shall try another still life using these colours. I’ve emailed you my attempt at it!
So pleased you enjoyed it Kylia, your finished piece was epic!
Thank you for sharing very helpful.
Hi Will,
This is such a great lesson in using a limited palette. I’m just learning acrylics, and painting in general, and this has helped hugely. Here’s a link to my finished effort on instagram:
https://www.instagram.com/p/CWX6xSGLLsd328QaJ1sxYfQahRV9CbRVLSkPAo0/
I know, my jug is a bit tall and thin! I’m so grateful to you for making this free lesson! I’m on Art Tutor, so found you there originally.
So pleased you found it helpful Martin, pleased you’re enjoying your painting journey.
Cheers,
Will
This is a great lesson. I’m just beginning acrylics and this really helped. Thank you!
Cheers Martin
Really enjoying this lesson Will. I’m finding though that my filbert synthetic brushes are too soft to get that scrubbed in look to the painting as they’re applying the paint very smoothly. Do you use hog hair filberts?
Glad you enjoyed it Clive, I use a synthetic for this demo, the bristles are quite stiff and a shorter length bristle so you can achieve this scrubbing effect. You could use a hog swell.
Cheers,
Will
hi i love your art work and it inspired me to be come an artist!
Hi Will,
I’m a very new beginner.
You list Acrylic Glazing Liquid (Gloss) – Golden Paints for this piece of work, but I can’t find where you tell us what to do with it
Hi Jane, you mix it with the acrylics as an alternative to water that creates a thin application that doesn’t run.