
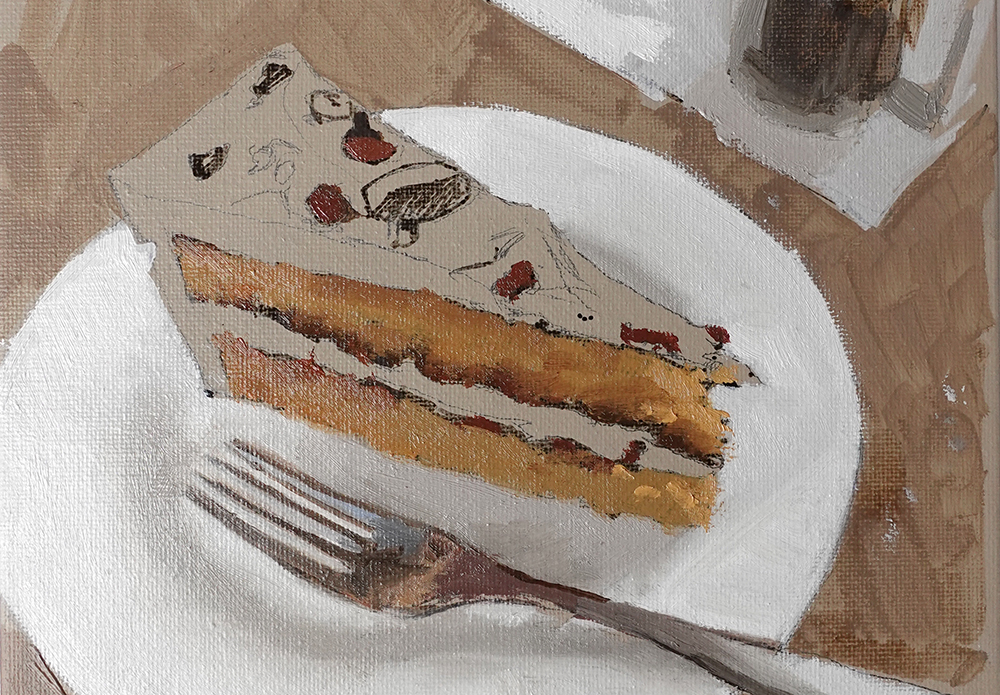
Oil on Board, 10 x 8 Inch, Will Kemp
I love cake.
I love paint.
Lets’s paint some cake!
This epic coffee and walnut cake is from Tate Britain café I sampled after the Singer Sargent Exhibition. Painted with the equally buttery cobra oil paint water-mixable oil paint, but the techniques would equally apply to painting with acrylics or traditional oils.
I hope it brings as much warmth to your day as the cake brought to mine!

Reference Image for the painting
Materials you will need:
Surface: 10 x 8 inch (20 x 25cm) canvas board
Paint Colours
For the foundational layer, known as the initial block-in, I used acrylics due to their fast-drying nature.
- Burnt Umber (Golden Acrylic Paints)
- Titanium White (Golden Acrylic Paints)
- Neutral Gray 8 (Golden Acrylic Paints)
Following the acrylic base, the rest of the painting was created using water-mixable oils.

Water-Mixable Oils
- Titanium White
- Titanium Buff
- Permanent Yellow Light
- Yellow Ochre
- Pyrolle Red
- Burnt Sienna
- Ultramarine Blue
These are all Cobra Artist water-mixable oils by Royal Talens.
Tools & Brushes:

- Jacksons Art, Black Hog, Size 4, Filbert.
- Small Round for details. This is from Winsor & Newton. The Ferrule has bend.
- Angled palette Knife for mixing colours
- Tear-off A3 white palette
- 0.5mm mechanical pencil, HB
- F & W Daler Rowney mixed-media paint marker
- Sepia Highflow paint in a paint marker
- Paper towel
- Jam Jar for water
Step #1: Paint the coloured ground & draw out

For the coloured ground, I’m using a mix of Burnt Umber & Titanium White diluted with water.
The wooden tabletop felt quite warm, a little too orange, so I wanted to mute that intensity down to concentrate on the cake so it stood out more.
It was diluted with water and applied thinly to allow the subsequent oil layers to grab on. You could also paint this layer with WMOs if you prefer.

I’m drawing with a 0.5mm mechanical pencil, HB

There is a simple triangular and circular shape to the composition, and I sketch out quite loosely. As long as your drawing is within those basic shapes it will read as a cake on a plate.
The reference image was in a square format but I felt the plate could do with a bit more breathing space. I also shortened the fork to include the end of a handle and added a top to the milk jug.
Step #2: Draw in the darkest value with a paint marker

Once the pencil drawing has been corrected here and there with a light erase, I draw over the top, just looking at the key dark areas, with an F & W Daler Rowney mixed-media paint marker.
The marker allows me to see the shadow shapes more clearly and get an idea of how the dark accents can be used to move the eye through the painting. The marker is filled with a fluid acrylic paint in Sepia.
The milk jug at the top was starting to take my eye, so at this stage, I decided to keep that quite sketchy and focus on making the cake more realistic.

F & W Daler Rowney mixed-media paint marker, with a high flow acrylic used as ink
Step #3: Block in the Lightest Values

I’m using Neutral 8 Grey from Golden Paints and a little Titanium White, diluted with water and then washed onto the plate. I’m not looking for any variation in application or tonal range. I’m not trying to get anything perfect; I just want a closer value to the reference image.
Step #4: Mix a Black with Water-Mixable Oils

Use 2/3 Ultramarine Blue to 1/3 Burnt Sienna and mix a Black using the palette knife.
Pro tip: You can check how neutral your mix is by adding a speck of white. Then add more blue or more orange to balance it out.

This mix is used as a base to mix a grey colour string for the plate and the fork.
Although the plate appears to have only a couple of colours, there are a surprising number of subtle shifts in the shadow areas on the plate and on the edge of the fork.

Colour string of greys used for painting the plate. Notice how the darker tones are warmer and I’ve cooled the lighter tones
For all my mixes, I use a palette knife. Due to oils’ slow drying times, I can leave these piles of paint out on the palette for the duration of the painting. They can be used to grey down colours and adjust the saturation as I progress.
There is also a sketchy, muted brown around the plate. This was applied using the size 4 black hog. The stiff bristles respond well to faster movements with the brush.
For the entire painting, water was exclusively used as the diluting medium.
Step #5: Block in the cake
Without buttercream, the cake falls apart.
This was the stage of the painting where it felt like nothing was going to work.
The cake felt blocky, the fork looked stuck on and the plate felt too simplistic. When self-doubt creeps in, you need to just ask yourself.
Q.Have I finished blocking in all areas?
A. No.
Ok..calm. Finish blocking in all areas then check again.
Step #6: Mix your buttercream

This looks like it moved on quite a bit, but interestingly, the fork is the same, the cake is the same, and the plate is the same. Just by having the lighter mixes of the buttercream, our focus is now on the top of the cake.

Colours mixed for the buttercream frosting
I mixed 3-values, so I can get a sense of light hitting the top of the cake. Once all of these areas are blocked in, it’ll be much easier to compare the values.
Step #7: Add a sprinkle of walnuts


I mixed a range of oranges using the Permanent Yellow Light, Pyrolle Red, Burnt Sienna and Yellow Ochre.
There are some darker values in the walnuts that almost have a purple hue, so I mix a little Ultramarine Blue in with the Pyrolle Red.
Step #8: Layer up your colours

I can now start overlaying colours onto the base mixes, breaking through some of those sharper lines to create a more impressionistic pattern of colours on the cake surface. The plate and the background remain unchanged.
I’m mostly using the filbert brush, but will occasionally swap to the round brush for fine details.
Step #9: Paint the reflections on the fork

When painting chrome surfaces, try to imagine the shape without any highlights or reflections. This allows you to concentrate on the different reflected colours that are showing in the surface.
Then the highlights can be painted on with Titanium White. I’m using the round brush for these details.
It’s always amazing how much the highlights bring the chrome to life! I’ve also added a darker cast shadow around the bottom of the plate to give it more solidity.
Step #10: Finishing touches
Coffee, Cake & Critique, Will Kemp, Oil on Canvas Board
I pushed the buttercream a bit by adding some more titanium white into the mixes. Also, a few more high saturation yellows on the front and edge of the cake.
Hope you enjoyed the lesson.
If you’re intrigued by water-mixable oils and want to delve deeper into how they stack up against acrylics, explore the most suitable mediums, accelerate drying times, master the technique of layering from ‘fat-over-lean’, and learn the art of glazing, then the Beginners Water-Mixable Oil Course might be perfect for you.
Cheers,
Will


What colors did u mix for the buttercream frosting in your walnut t cake tutorial?
Hey Sylvia, I used the Titanium Buff as the white and then added a touch of the greys from the initial grey colour string. For the darker value there was a bit of yellow ochre aswell.
Hi Will, enjoyed your painting a cake lesson very much. Looks absolutely delicious!! Made me drool. Must go get some carrot cake; my favourite cake. Yum, yum!
You made painting a cake look easy. Beautiful painting.
Thanks, Anne
P.S. Always enjoy your emails.
Good one Anne, carrot cake is indeed delicious and would make the perfect subject. I’ve found a larger triangular portion when cut makes for an easier painting!
Hi Will,
I had a sneaking suspicion you were targeting inspiration at the Sargent exhibition. This cake and coffee is satisfying to look at, and I imagine will be satisfying to create. You did something in the past with bottles and another with pink roses that used a ‘simple’ background like this. It provides a nice presentation. And then there’s that fork. I’m just kind of smiling about that because I don’t know what’s going to happen when I give it a go. No fear, right? So going to order some materials and may or may not be sending in an image to you … ;). Thanks.
Hope you enjoy it Laura, yes, with the fork, just keep calm when blocking in because it will feel 100% non-chrome like. The reflections will bring it all together.
Hi Will and thanks !
Please do we get the cake next ~ Have a great weekend !
Louise
This is absolutely brilliant! Thanks, Will, you’re a star.
My pleasure Jennifer
Thanks so much. Will definitely try this.
Good one Pam, hope you enjoy it.
Thank you for this free lesson Wills I cannot wait to start it . I have not had much time for painting so far this year and so still have a few of your lessons to start that I have enrolled in. Hope this finds you and family all. well.
Isabel
Thanks so much Isabel, pleased you’re keeping well.
Will
Thank you Will, I really enjoy your lessons, I’m looking forward to taking a crack at this. The reflection in the fork is just wonderful. Thank you for breaking down step by step, you make it so easy to follow!
That’s great to hear Michelle, really hope your painting turns out well.
Will
Delightful little tutorial, it keeps me on the fence of converting to water mixable oils , in the day I used Winton to establish consistency and technique , I’ve converted to Winsor & Newton , in the photos texture of Cobra looks smooth , hmmm
Another thought you’d do the cake ! Fabulous it is
Thanks Kim
Hi Will
An excellent study. Just to ay thanks again for your regular posts. I have purchased your Water Mixable Oils course and have benefitted enormously from it.
Always a must to open your emails.
So pleased you found the course helpful Charles.
I switched to water-soluble oils several years ago and I absolutely love how you can thin them down to a wash or layer them, mixing as you go. Thanks so much for the tutorial, Will, and if I had a sweet tooth I would be tempted to steal your yummy piece of cake.
cheers,
Grace
Glad you’ve been enjoying working with them Grace.
Hi Will, I, too, am so very impressed with the painting of the fork!! It seems that the cake will be easier, but the fork is reliant on reflections. Love your lessons!
God bless, C-Marie
Hey C-Marie, yes the little dings of highlight are the key to the fork.
Thanks for sharing with us your valuable knowledge.I have tried water mixable oils and succeeded in painting some birds
Glad you’ve been enjoying them Raphael.
Hello Will,
So great that you did this tutorial. A few weeks ago watching again your tutorials I was thinking that it would be nice to have a cake tutorial from you and suddenly came true. Specially the fork is a bonus. Thank you so much for all your tutorials all these years. You are a great teacher.
I will give a try with acrylics but white buff? Is it white with burnt sienna?
Be well
Hey Katerina, glad you’ve been enjoying the lessons. You can get a Titanium Buff in Acrylics from Golden Paints, which is a natural buff Titanium Dioxide pigment.
Will
Will,
This may not be an appropriate question for this forum. But here goes. I am considering switching from oil paints when I see how often you are using waterbased mediums. I have such an investment in oil paints and brushes but don’t want that to keep me from making a switch, if a switch may enrich my experience. Can you quickly share the fundamental benefits of acrylic, water soluble oils, and oils? And which you might recommend? Thank you, Tami
Hey Tami, if you’re using Oils and enjoying them, why would you be interested in switching?
You can see a few articles here that might help:
The 5 Key Differences between Acrylics vs Oil paints
Water Mixable Oil Paint vs Traditional Oil Paint
Will
As always, so much fun to paint with you. ;-) Happy Easter Will. c
I really enjoyed reading through this. What I love best about painting is how things take shape out of nothing. I also tend to be a fan of looser work/sketches and such. ! Something about the initial energy of a moment. Looking forward to when I have space in my life to be able to try this lesson out!
Great stuff Sandra, so pleased you enjoyed it.
Will
I will be painting this for my husband, he loves carrot cake. We can always look at the painting when we can’t get a slice.