
“Painting is drawing with the added complication of colour and tone”
Harold Speed – The Practice & Science of Drawing
In this light and shadow series, we look at the theory, drawing and painting of a simple form focusing on shadow, light and edges.
Part 1 we looked at the theory of light and shadow.
Part 2 we put pencil to paper and looked at practical drawing techniques with a simple pencil drawing of an apple.
This week, we’re returning to the studio to create the illusion of form with acrylic paint. I wanted to develop our sketch into a finished painting, using the same principles of light logic but having a more contemporary feel through the choice of colours, composition and context.
For Part 3, I’ve created a free video tutorial so you can watch every step and follow along at home…
Acrylic light & shade painting- Free video Course |Part 1
The video below shows the first steps I take to start the step-by-step acrylic light & shade painting.
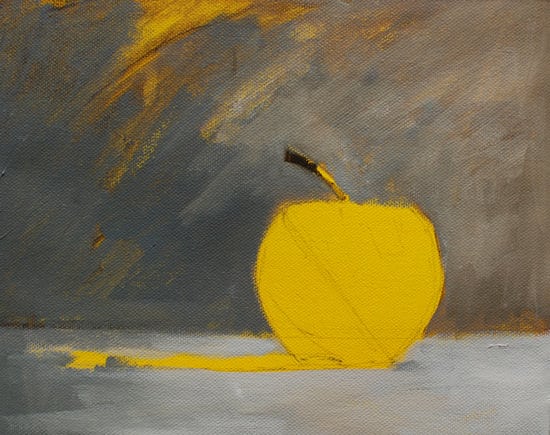
Reference Image

The image above is the reference image I use for this demonstration.
It can be ‘right clicked’ and ‘Save image as’, so you can use it as a reference for your painting.
Drawing the shapes
Drawing still life can be simplified into four main forms: the sphere, cylinder, cone & cube.
For this painting, we’ll be concentrating on a sphere.
If you think of the basic circle shape to start with, you can quickly set up the basic construct shape of the drawing.
I’m working on a coloured ground and am using a 3B pencil to draw out.
Materials
- 3B pencil
- Cranked Handle Palette knife (I use size 45 diamond shape by RGM)
- Tear-off palette (A3 Daler Rowney)
- 8 x 10-inch pre-primed white canvas (I have applied a yellow-coloured ground)
- Kitchen Roll (paper towel)
- Jam Jar & Water
Brushes
- Small round brush
- Rosemary & Co Ivory filbert brush Size 6 – Short Handle

Acrylic Paints
For the coloured ground:
- Yellow Ochre
- Cadmium Yellow Light
For the main painting:
- Raw Umber
- Ultramarine Blue
- Cadmium Yellow Light
- Titanium White
- Burnt Sienna
- Cadmium Red (for Part 2)
(Brands used: For this particular painting, I used a whole mix of brands including Golden Heavy Body Paints, Winsor & Newton Artist Acrylics, Liquitex and Daler Rowney Artist Quality Acrylics.)
7 simple steps to begin:
Step#1. Apply a coloured ground.
For this painting, I wanted to have a bright glow underneath the form of the apple, so I applied a mix of Yellow Ochre & Cadmium yellow light to a white pre-primed box canvas.

To see how I apply an acrylic ground See: How to apply a coloured ground.
Step# 2. Draw out the image.
I draw around a circular object (about 7-8cm in diameter) to establish the apple’s basic circular shape and the ellipse shape of the cast shadow. This is a shallow ellipse.
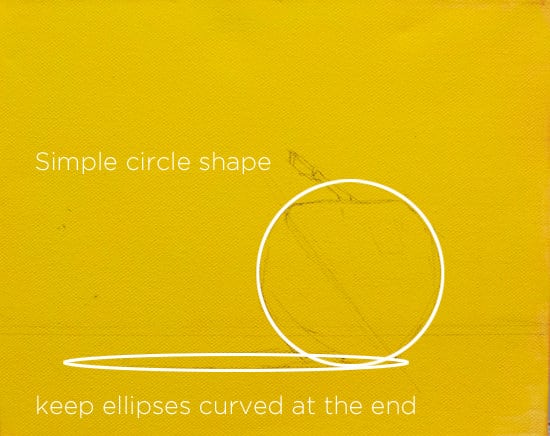
I can then draw in the form shadow line; this gives me a guide to working to when blocking in the form shadow.

Next, I square off the top of the apple and sketch in any angles of the outer edge shape.
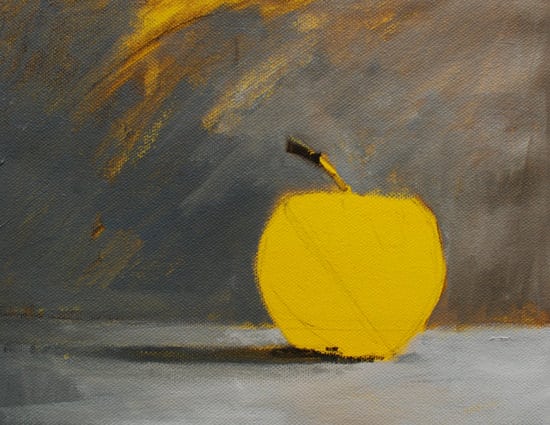
Step #3. Tone down the background.
Now I’m ready to start painting!

The first thing I do is tone down the background using a heavy body Raw Umber acrylic paint.

By varying the consistency on the paint with water, I can scrub in the background tone to give me a sense of the dark and light values within the scene.
I then add some Titanium White and Ultramarine Blue to paint a thicker application in the foreground.
I now work between the foreground and the background painting in thicker areas of paint to give a varied background, leaving some of the coloured ground peeking through.
Step #4. The Darkest darks.

Swapping to a smaller round brush, I can add some of the darkest tones into the stalk of the apple using the pure Raw Umber paint.
I then paint in the cast shadow.
Take note of how the line is darkest and sharpest under the apple and then becomes softer and lighter as it gets further away from the light source.
Step #5. Form shadow.

Painting in the form shadow using a mix of Raw Umber & Cadmium Yellow Light.
I use these two colours on the form shadow, lightening the tone slightly to indicate the reflected light.
Step #6. Softening the shadow line.

I then introduce a Burnt Sienna to add a slightly warmer tone to the transition line of the form of the apple.

Step #7. Halftone & highlight.
Then with the Cadmium Yellow Light and Titanium white, I paint the halftone and highlight.

I can then re-enforce the form shadow core and have a nice balance between the darks and the lights.
Below is the image in black and white – so you can see the changing of tones more clearly.

This gives a basic fall of light and three-dimensional form within the painting.
Bear in mind the three most common mistakes when painting three-dimensional forms:
1. Painting the cast shadow lighter than it appears.
2. Making the form shadow line too hard
3. Keeping the hardness/sharpness of all the edges the same.
Part 2
Acrylic light & shade painting- Free video Course |Part 2
This video below shows the finishing touches where I introduce Cadmium Red light and Burnt Sienna glazes.
The final 5 steps:
Step #1. Intensify the highlight.

Step #2. Adding & blending a glaze.


Step #3. Adding the red.


Step #4. Modelling the form.

Step #5. The final details


Will Kemp, Apple Study, Acrylic on Canvas
For a simple modern still life, this course gets amazing results.
You might also like:
1. A Beginners Guide to Light & Shadow : Part 1
2. How to shade a drawing Light & Shadow : Part 2
3. The 3 reasons why you can’t draw (and what to do about it)


Beautiful! I am thrilled to have this lesson. Thank you.
Hi Dinah, really hope you enjoy it,
Cheers,
Will
Thank you, thank you, thank you! I love the colors and the step by step instructions, as always, are excellent! Thank you for all your wonderful lessons. :)
Thanks Vickie, really pleased you found it helpful.
Will
It always feels like Christmas when one of your free video lessons appears in my email, and here is another gift! Who would have thought that painting a simple apple could be so much fun… and so beautiful! Thank you.
Very kind of you to say so Kathryn, looking forward to hearing how your apple turns out.
Cheers,
Will
As a beginner I appreciate all the tips you are sharing.
Thank you
Dianne
Good one Dianne, hope the lessons are helping your paintings.
Cheers,
Will
hello Will. thank you so much for your nice lesson i’m very happy
and enjoy with this lesson.
i wish you have a good health .take care
thanks. krittaya
Thanks Krittaya, hope you’re keeping well,
Will
Thank you Will –this is fantastic!
Cheers Sarah, thanks for your patience!
Will
I enjoyed this lesson as well as the other lessons, cannot wait to begin to paint this lesson.
Good one Virginia, pleased you’re looking forward to it.
Will
LOVED THE DEMO, HELPED ME SO MUCH IN THE BLENDING TECHNIQUE. LIKED HOW YOU SHOWED DOING THE HIGHLIGHT ON THE APPLE.
IF I HAD ANY BISCUITS WHILE DOING THE DEMO, AFRAID I MIGHT DUNK THEM IN THE WATER CONTAINER INSTEAD OF THE TEA. HA! HA!
THANKS SO MUCH FOR THE WONDERFUL PRESENTATION.
Thanks Cheryl,
Hope you’re well, so pleased it helped with your blending techniques. We’ve all been there with the biscuit/dirty water scenario!
Cheers,
Will
Thank you very much. All of your advice is excellent and encouraging.
Great to hear it Haylen,
Cheers,
Will
Thanks Will, for continuing to inspire me to put brush to canvas. This is such a nice little painting.
Martha
Thanks Martha, looking forward to hearing how your painting turns out.
Cheers,
Will
hello Will,you teach your students in the most understandable and the easiest way that somebody can… thank you so much , I really enjoy following your lessons..
cheers
Thanks Samira, so pleased you found the lesson is simple and easy to follow.
Cheers,
Will
satisfaction is invested interesting to follow your links, greetings great artist from Sarajevo
Thanks Nedim.
Will
Thank you once again. Found this useful for fine tuning. Sometimes less is more. So relieved that you were able to sort out your website problems so quickly. My inbox would never be the same without these generous painterly tips.
Thanks for your understanding Yeside, so pleased you’ve found the lesson helpful.
Will
Hi Will!
Thank you so much for all the free content you post. I find it extremely valuable and I sincerely appreciate your work!
I’ve got a couple of questions:
1- I currently don’t have Cad Yellow light, only the ”normal” cad yellow. What is the main disadvantage of using that instead of the “light” version?
2- I’ve been told (several times by now) not to use cadmiums for their toxicity. Is it true they are SO toxic? Are Azo colours a valid alternative?
Thanks again!
Cheers from Italy (Sicily)!
Hi Fabio,
Thanks your kind words about the articles, cadmium pigments are toxic, but I find they currently have the most opacity and cleanest colour mixing of any yellow.
Azo colours are pretty good, I find them slightly greener, and slightly less opaque in general, but paint manufactures have been making real jumps forwards in creating a high opacity – non toxic yellow.
This is from the Golden paint website:
So Hansa Yellow Opaque is a good alternative from the arylide family of pigments, but one note on the mixes:
Hope this helps, if you’re worried at all about the use of cadmiums these new pigments they can be a great choice.
Will
Hi Will! Thanks for your reply!
Well then, I will definitely try out hansa yellow!
You’re welcome Fabio,
Will
Will,
You are so nice and helpful. Thank you for your time and throughliness in encouraging your fellow beginning artists and restarters:) I have MCS and this info is very helpful to me also.
May you reap bountifully from what you sow. God bless. Ruthie
Dear Will,
thank you very much for your lessons. Since I work in oils, it will take a week for the ground to dry up. An alternative is to use a square canvas that already has yellow ground. One of your articles mentions that the canvas shape – rectangular versus square – does make a difference. Will the square canvas work for this painting?
Thank you,
Natalia
Hi Natalia, you can always apply the ground with acrylics and then work ontop with oils to help speed up the process for you. A square canvas will work just as well.
Cheers,
Will
Fabulous lesson again! Much thanks Will. I should mention, that here I was painting almost the exact yellow colored ground onto a canvas board just a couple days ago, with absolutely no idea of what it was I should or would be painting on this canvas. It appears I’ve read your mind! Or perhaps you’ve read mine! Haha. Well an apple it is sir. Can’t wait to start. Thanks again Mr Kemp!
Cheers,
Lex =D
Thanks Lex, great to hear you had a canvas prepped and ready to go! enjoy the painting.
Cheers,
Will
Thanks again Mr. Kemp! Love your website and teaching methods…plus the background music is always great! I often use Yellow Ochre to tone a canvas but I really like your idea of adding Cad Yellow for an extra punch…will definitely try that.
Good one Kathy, pleased you enjoyed the video, yes that subtle shift to a bit more punch can be perfect for certain paintings (can work really well for sunsets) Enjoy the lesson.
Cheers,
Will
Will I also love the music on your tutorials. Is it possible to tell me who it’s by? It’ s so uplifting and happy. Your presentation along with this makes your videos very relaxing and enjoyable.Thanks! Ruthie
Thanks Ruthie, pleased you’ve been enjoying it, the music was commissioned from one of our friends Aimee who’s a dab hand with the Ukulele!
Cheers,
Will
Hi Will,
Thank You For This Very Helpful Video.
It all makes such sense when you explain it!! :)
Great to hear it Adrienne!
Cheers,
Will
Really enjoyed this lesson. No matter how much I learn I keep coming back to your lessons for inspiration and clarity. Can’t wait to get a brush in my hand and start a new canvas.
Really pleased to hear it Bob, hope you enjoy the painting.
Will
Another thanks, Will. Love the way you simplify your message. Desperately needed that light and dark info! Cheers, Gaye
Great to hear it has helped with your painting Gaye.
Cheers,
Will
Hi Will
Thanks so much for this video. You always make it look so easy. Can,t wait to get started on mine.
Cheers Natalie, really hope you enjoy it.
Will
Hallo Will,
Could the same technique be applied to the use of oilpaint?
Best Marijke.
Hi Marijke, if you apply the yellow ground colour with acrylics you can then paint with oils ontop.
Cheers,
Will
Dear Will
Thank you so much for this excellent demonstration. Do you think we could have a similar demo for flesh tones please. Regards Lynette
Hi Lynette, I’m working on a new ‘colour mixing for portraits’ course at the moment, which should be available in the next couple of months.
Cheers,
Will
Hello Will!!
I am a self taught artist and come to your website to learn theories behind acrylic painting. Thank you so much for putting up such nice tutorials.
Just wanted to know can we use “yellow ochre” colored ground for any painting or is there any theory behind choosing a colored ground?
Also, for colored ground, is it okay to use student grade paint if i use professional grade otherwise?
Hi Shishu, pleased you’ve been enjoying learning about acrylic painting. You can read more about choosing a coloured ground here. Yes, it’s absolutely fine to use a student grade for the coloured ground.
Cheers,
Will
Thanks Will for all the interesting and very informative and useful demonstrations that you give. I have learnt a lot about art and your simple yet effective approach to most projects is very encouraging. I love all the demonstrations have watched. Thank you…
Great to hear it Chitra, thanks for your kind comments.
Cheers,
Will
Hey Will,
Your videos are awesome. I always wanted to paint using acrylics and your videos are single big reason I have started to do that. Thanks.
I am eagerly waiting for the part 2 of this video to finish this painting.
Thanks Madhur, should be live soon.
Cheers,
Will
It is amazing as always it is! Thanks for such a usefull videos:) xxx
You’re welcome Sanaz,
Cheers,
Will
Thank you Will. I’ll try this myself soon. I’ve really been struggling with blending acrylics (I have not used them much before but have admired those who use them so well). Watching your video has been a great help.
Pleased to hear it Jane, blending with acrylics can take a bit of practice, hope the tutorial helps.
Will
I am a true “beginner” and you make me feel like I can do this! So enjoy your calm, simple method of instruction and am always anxious to open each of your emails!
Great to hear it Carol, you definitely can! pleased you’ve enjoyed the series.
Will
Thank you Will , this really really helps, your lessons are great!!
Kind of you to say so Virginia, hope you’re keeping well.
Will
Learning so much from your videos, thank you so much.
Great to hear it Jaqui,
Cheers,
Will
Hi Will,
Thanks for another great tutorial. I have to confess that because I’m undertaking a fine art university course (double major) I don’t have much time to do the lessons. However, I am learning heaps and I’m able to apply the techniques and principles to my course work. Can’t wait to have some spare time to be able to actually paint along with you.
Thanks again, they are brilliantly helpful!
From SA, Australia
Janet
Thanks Janet, hope you can find time within your painting studies.
Cheers,
Will
I love the effect that the red creates. I will start practicing it tonight hopefully!
Just wondering one thing, I’ve run out of cad red – vermilion red can be used as alternative? They are pretty close…
And a huge thank for such a nice tutorial!
Hi Swapniel, yes a Vermillion would work nicely.
Cheers,
Will
That was very interesting, I liked how you moved and blended the colors. That helped a lot. I’m still working on my oils, I had to put it to the side for a while, I’m fixing to get back on it. Thanks again.
Pleased you enjoyed it Melva,
Cheers,
Will
Hi Will,
Thank you so much for the lesson! I found it so helpful and really enjoyed following along!
Thank you!
Hi Amy, so pleased you enjoyed the lesson, hope you achieved some fab results.
Cheers,
Will
As a self taught (would be) artist, I was most impressed by the importance of the minute variations of one colour, which I usually overdo, which perfects the blending on the apple and would be useful on shading or the folds on garments etc. Thanks for your excellent tutorials. Keep ’em coming. Regards David.
Hi David, pleased you found the painting tutorial of interest, yes the smallest of changes in colour choice can make a big difference to the overall effect.
Cheers,
Will
brilliant lesson, and so clearly explained and shown – well done and thanks very much!
Thanks for your kind words Sandy, pleased you found the lesson easy to follow.
Will
Hello Will,
Thanks for the very informative lesson. Always good to get your interesting lessons.
I have painted the apple, which I am reasonably happy with at this stage.
All the Best, Shirley.
Good one Shirley, pleased you’re getting good results with the apple painting.
Cheers
Will
Hi Will,
Thanks a lot for your generosity! I enjoy watching all your free demos and tips over and over, particularly about acrylic medium and portrait painting – they’re very informative and truly inspiring!
Best of luck and more power to you!
Cheers!
Ariel
Thanks Ariel, so pleased you’ve been finding the tutorials inspiring and informative, kind of you to say so.
Cheers,
Will
Thanks Will,
I really enjoyed this lesson.
Joe
Cheers Joe, pleased you liked it.
Will
Hi Will, I don’t have Burnt Sienna for the glaze, or Cad Red Light for the edge.. is there any way of mixing/creating these colours using something else?
Hi Tasnim, any warm red will work for the side and a burnt umber with a touch of red and a touch of cadmium yellow mixed in for the burnt sienna.
Cheers,
Will
Sorry, I forgot to ask in my previous question..did you apply the yellow ochre background first and then a layer of the cad yellow light on top…or did you mix the two colours together on your palette and apply it as one coat?
I had a yellow ochre first layer, then a layer of cadmium yellow mixed with yellow ochre.
Cheers,
Will
Deae Will,
Sorry that this is the first time I have responded with many thanks for
Your wonderful tuition. It’s been very helpful as I have only just started to
Paint at 77 years of age. You appear so young to me, but with such great understanding
On how to impart your great artistic talent. That is is a talent in it self.
Thank you very much
Tony king
Thanks Tony, nice to hear from you. 77 sounds like a perfect year to get started! hopefully you’re finding the tutorials shortening your learning curve.
Cheers,
Will
O this is just Fantastic. Thanks Will!
Good one Cynthia, so pleased you enjoyed it.
Cheers,
Will
Hey Will, the video was very motivating and makes me see where I need focus and discipline. I have no training but plan to get where I want to be with painting. Your videos inspire me to keep going. Thank you :-) Rosanna.
Great to hear the lessons are keeping you inspired Rosanna.
Cheers,
Will
Awesome..your video’s have shown me the way..thanks so much for sharing..
Great to hear it Johnny, pleased they’ve been helping your painting progress.
Cheers,
Will
I’d like to thank you for putting up this website and these vids, they’ve been helpful and inspiring. I’ve had sort of like a block or something lately and to see you working (and what’s more in acrylics with such classical techniques, which is precisely what I love) it’s been invigorating. Thanks again! :)
Hi Sarai, thank you for your kind words on the website and the tutorial videos, so pleased you’ve been finding them inspiring and helping to break through those creative blocks! Really hope you enjoy the Apple study.
Cheers,
Will
Dear Will,
So great to have this free class and video for instruction. I was very pleased with how the apple turned out for me. Inspiring again…..you have a gift for teaching art. Thanks, Audrey
Thanks Audrey, so pleased your apple turned out really well!
Cheers,
Will
Hey Will,
Praise. like all that have said before me..great content. (but you know Vanessa has got to be helping you with some of the responses) . quick question, is there not a spot for us to submit our renderings? Not necessarily random paintings we’ve done but particularly lessons that we have followed and results there of. We could have like a close nit /friendly comp. between those who follow your teachings etc… etc. anyways might be fun! i recently finished the Apple light and shade study… might have give ya run for ya money..
Ima fan! cheers
blake
Hi Blake,
Pleased you’ve been enjoying the lessons, you can see some previous student success’s with the Cherry painting here. Would love to see how your apple painting turned out.
Cheers,
Will
Thank you for a very informative video of the apple. Acrylics have always frightened me because they dry so quickly. My question is, once the one color is dry and you want to blend in the color next to it to avoid a rigid line? Do you just use a damp brush! Pls help with this regard.
Thank you
Bernice Frederick
Hi Bernice, with most standard acrylics, once the line is dry, its dry. You can’t blend the colour again.
There is a brand called Atelier Interactive, that are acrylics, but also have the ability to ‘re-open’ the paint for blending purposes.
Hope this helps,
Will
Thanks Will for the great tutorial! Love your teaching style & both the drawing and painting videos on light and shade have really helped me. Here’s how my attempt at the apple turned out. The colors aren’t as true as real life since this is an iPad picture with not so great lighting, but I’m pleased with it as it’s my first acrylic attempt. Cheers!
Hi Ed,
Nice to hear from you, and so pleased you enjoyed the tutorial. The cast shadow is looking great and the colour mixes are also working well. The shadow side of the apple could go slightly darker (try to look for the form shadow core) which will help to ‘turn the form’ and give a more 3-D feel. Great work though, as your first acrylic painting its a real achievement.
Cheers,
Will
Thanks Will and I really appreciate the critical look. Question on that… can I use the glazing technique that you highlighted in the cherry painting tutorial to darken the shadow on this? Would that be the appropriate way to correct the shadow side of the apple? I did the painting last weekend so it’s completely dry. I assume that I can paint more acrylic over it and correct it but wanted to get your thought on that. I also noticed on your blog that you generally respond to all comments. That’s quite nice.
Cheers,
Ed
Yes, that’s it Ed, just add a thin glaze over the top to darken down that side. You can paint over acrylics many, many times, infact that is really what happens in all paintings, you make your ‘best guess’ to start with and then redefine and refine as your eye becomes more in tune to the subject.
Cheers,
Will
Hi Will,
I’m building myself a small painting studio, not unlike yours, after years of practice as an architect in the US. My research into lighting led me to your site, and I’m curious about the dimensions of your new studio. How wide, tall, long, …sort of thing? It looks wonderful with those three large skylights and I’m sure you’re happy with it. Just out of curiosity, is there anything you might have done differently, or might alter? Storage and clean up facilities adequate? Hints?
Thank you for your advice/lesson on lighting. Very thorough and useful.
In a few weeks I’ll be taking lessons too.
-Jay S.
Hi Jay,
Great to hear you’ve found the article helpful for your studio build (very exciting!)
The studio is 6m x 3.25m x 4.5m (height). In terms of things I would do differently, if there was more space on the plot I would have gone for a larger build as you always seem to need more storage than you think! The light has worked out really well, and the underfloor heating is fab!
Hope this helps give you an idea of the space.
Cheers,
Will
Hi Will
Thinking of switching from Oil to Acrylic and this very informative and helpful video encourages me.
Great to hear it helped Lynette.
Cheers,
Will
Thank you!
You are also a very good teacher as well as a good painter!! I will come back and purchase some course from you!!
Thanks Pia,
Cheers,
Will
Ah, thank you so much for your reply! I’ve been battling with these acrylic paints for two years now and it’s quite hard to pinpoint where the problem lies, your tutorials have been so eye-opening because I can see your paint clearly behaving itself where mine doesn’t! I’ve tried using the Liquitex heavy body without any water and it still resists so I’m itching to test this out on canvas now!
Thanks again
My pleasure Sue.
Will
Thank you so much for this course. Yes, finally I took a moment to review it and feeling inspired to start a painting. You are an excellent teacher and thank you for sharing your talents. Kathleen
You’re welcome Kathleen, great to hear you’ve been inspired to start a painting.
Cheers,
Will
Hi will. Broadly speaking what changes would I need to make to the apple and cherry tutorials to try them in oils? Just longer drying times between layers ? And the whole fat over lean thing? Many thanks for yr generosity. Ella
Hi Ella, I would apply the coloured ground with acrylics, then paint with oils ontop. You could work either alla prima and build up the tones in one session, or follow with the layers and wait for the layer underneath to dry.
Hope this helps,
Will
I thought I read somewhere that you can’t paint oil over acrylic that over time the paint won’t stick. Is that true? Or maybe the other way around?
Hi Ed, the other way round, oils over acrylics – yes, acrylics over oils – no.
You just have to make sure that the acrylic paint isn’t applied too thickly. If you have thick impasto acrylics then it is harder to get a good bond with the paint underneath, using acrylic as a ground colour for an oil painting can work very well.
Cheers,
Will
Great series of videos! The only experience I’ve really had with acrylic painting before are those group classes where you drink wine and the instructor leads you through a painting step by step (those are very popular here in the US). They are much more simple and bold, less subtle and very little emphasis on mixing colors or adding shading.
So I figured I’d give your series a try, and it turned out much better than expected! I was missing a lot of colors you recommended (I didn’t have cadmium yellow, cadmium red, or ultramarine blue, and the only yellows/blues I had were fairly transparent), so I had trouble getting the colors just right.
Here’s my attempt: http://imgur.com/gca6VuN
Thanks!
Hi Jen, pleased you enjoyed the series of videos on the apple painting. The handling of the cast shadow has worked well, and the positioning of the apple within the composition, you just need to watch for the differences in the tone between the lights and the darks. At the moment yours are quite close so the apple appears flatter rather than having that 3D feel. If you darkened down the shadow side slightly it would help with the illusion of form.
Cheers,
Will
Hi Will. Great lesson on Light and Shadow. Could you explain where you let the acrylic paint dry and where you blended it still wet?
Hi Dulce, it would be easiest to see in the video, but blending only ever happens when the paint is wet.
Cheers,
Will
Thank you for the tutorial. Here it is… my version and first acrylic painting
http://pamorale.deviantart.com/art/apple-study-482139232
Great work Pablo, lovely colour mixing throughout the painting and you’ve really got that nice curve of the form by smoking in that glaze between the shadow and light. The cast shadow has been well judged, getting softer and lighter as it moves away from the light source and the whole piece has a nice balance to. As your first acrylic painting it is a real achievement, hope you’re proud of your work.
Cheers,
Will
Hi Will,
Thanks so much for your feedback on my cherry painting yesterday. I’m trying to do a painting a day and was wondering if these photo references are your own or do you have a place/site that allow their pictures to be used? I don’t have a great camera to work with so was just wondering. Here is the apple I did last night.
http://instagram.com/p/ubtt9ARSIb/?modal=true
Thanks,
Toni
Hi Toni, nice work on the apple, good paint handling and application of the tones, it really has a good sense of form and the way you’ve smoked out the cast shadow is spot-on. All of the still life reference images are from my own photographs. There are sites like http://www.photos4artists.co.uk that have royalty free images you can use for your paintings.
Hope this helps,
Cheers,
Will
Will,
I did your painting of an apple and loved the instruction and result. I had to struggle with shading. I’m using Liquitex Professional heavy body paints.
When I had painted the dark part of the apple and applied a lighter shade for reflective light, the dark paint lifted off the canvas. I tried keeping the first layer more wet then tried letting it almost dry. Your demonstration allowed the dark paint and the subsequent blending work fine. Any thoughts?
I love your teaching. Thank you so much.
Hi Aledra, so pleased you enjoyed the video, for the reflected light the paint underneath is dry and I’m just feathering the lighter colour ontop, just lightly blushing the paint over the surface.
Cheers,
Will
Various things prevented me from engaging in this instruction for far too long, but eventually I was able to attempt it. This was a revelation, or at least a confirmation of what I knew intellectually, but had not experienced beyond that. Thank you SO MUCH!
This helped more than you will know, both with my efforts to paint, and more importantly, my appreciation of artists.
Hi Scott, pleased you’ve found the lessons helpful.
Will
Awesome videos
Thanks Nicola,
Will
Hi there, just discovered your video. Wow, excellent! Question, the reference painting and your demo (both great) look different. The reference canvas/product is so nice and smooth, almost polished vs. the demo finished product which seems rougher. How did you get the smooth effect? Keep brushing the areas to blend? Is there a product used to blend to smoothness?
Hi Peggy, pleased you’ve been enjoying the lessons, the reference image is a reference photograph on smooth paper, so this will be the difference between the textured surface of the canvas and the paint. You can achieve a more photorealistic effect with your painting by working onto a smoother surface.
Cheers,
Will
Hi Will,
Just found you on the internet and painted the apple yesterday which I am really pleased with, can’t believe I have painted it.
Will be doing the cherry this week.
Thanks for such amazing tuition .
Vicky
Hi Victoria, nice to hear from you and so pleased you’re pleased with your results from the apple video, hope you enjoy the cherry.
Cheers,
Will
Wonderful. I am 70 yrs of age. Retired university secretary. Attend cont. ed. courses on art at glasgow uni. Just loved watching you paint an apple with acrylics. You make it look so easy . Ha wait til I try!
Thanks Dorothy, really hope you enjoy the apple tutorial.
Cheers,
Will
Hi Will.
Firstly many thanks for the lessons. They are inspiring and explain things superbly.
I’m currently attempting the apple study as my first ‘proper’ painting (I meddled around many years ago but never took it seriously) and I’m having a couple of issues. Firstly and frustratingly some areas of my painting are resisting further layers, so the paint lifts off and won’t spread evenly. I used acrylic gloss medium as a thinner in places (the background yellow ochre layer for one). Was that a bad thing to do? I saw online it was recommended to avoid over-thinning acrylic paint. I am painting on acrylic paper.
Also my colours look not much like yours. The cad yellow light looks much less lemony and vibrant. I guess it’s the paint quality and brand. Thanks for any advice.
Hi Dan, pleased you’re enjoying the lessons, to answer your questions:
Firstly and frustratingly some areas of my painting are resisting further layers, so the paint lifts off and won’t spread evenly. I used acrylic gloss medium as a thinner in places
The Gloss medium can create a glossy resist to the surface if too much is used to the paint will slide around onto the surface rather than grabbing on. In the video I dilute with water to purposely keep the paint lean and matte in the early stage. Because the canvas and gesso applied is absorbent the paint with hold onto the surface, if you’re using paper the acrylic will grab on just fine, just like watercolour. You only need to add a medium if the surface is very shiny and you’re using the very thin paint as the final finish. If this was the case I would use a high flow or fluid acrylic rather than the heavy body.
The cad yellow light looks much less lemony and vibrant. I guess it’s the paint quality and brand.
Yes, this is purely down to the paint quality, it’s more obvious in the lighter colours such as yellow in comparison to say a student grade and artist grade blue. You’ll find with a student grade yellow you would need quite a few more coats to get the level of opacity and vibrancy in comparison to artist grade.
Hope this helps,
Cheers,
Will
Thank you so much. I’m currently taking intro to painting at the university, and I’m reading your website and watching your videos purfusely to practice at home and when I came across this tutorial it helped me so much with my black and white still life. You made me understand it in such a incredible way!! My professor is impressed and I owe all those extra studying hours to you!!!!
Hi Cindy, really pleased you found the lessons helpful and they’re helping out with your intro to painting course.
Cheers,
Will
Hi Will!
Nice job and tutorial. I have a question about the brand of two colors: what brand is the Ultramarine Blue and the Cadmium Yellow Light?
Thanks!
Hi Angel, the Cadmium Yellow Light and Ultramarine Blue were both from Golden Acrylics.
Cheers,
Will
Dear Will,
I’ve just completed my first ever canvas and I’m thrilled… As if my mum who now has it in pride of place.
Thank you, for sharing this with us all. It’s made me truly happy.
Jen
Brilliant to hear Jennifer, so pleased you’re happy with your results and your mum has a new painting to admire!
Cheers,
Will
Hi Will
This is a really impressive course and it’s free!! But you will be pleased to know I will be buying one of your courses in the near future!
A couple of things, when I save the apple image to my desktop and then print it off using the Best Photo printing, the colours are a bit odd. The apple itself seems OK but the background surfaces have a pink tinge!
Also when you are preparing the background, I notice you sort if scumble the paint onto the surface? I prersume you do this to create an interesting background rather than just a flat one which you would get if you used a big brush and lots of paint??
Great stuff, this may be the time where I am happy with my work and keep going. let’s hope so, I’ll keep you posted.
John
Hi John, pleased you’ve been enjoying the lessons. Yes, you could swap to a larger brush for the background as you become more experienced. When you’re first starting keeping your materials to a minimum helps you to push what can be achieved with the minimum of colours and the minimum of brushes, it’s like karate kid ‘wax on wax off’!
Out of interest, what printer paper were you using? as some more affordable papers can cast a pink tinge.
Epson Photo glossy is a good brand for consistent colours.
Hope this helps,
Cheers,
Will
Thank you so much Will, mine came out superbly (in my own opinion!) and the colour mixing advice was invaluable! I’m not sure how to post up the results though. Thanks again, very inspiring.
Hi Cathy, really pleased your painting turned out well, You can send me a direct email with the painting, my email is on the contact page.
Cheers,
Will
this is very helpful for mixing and shading fire from a dragon breathing fire project im working on ;}
Well, who would have thought it Jacob, so pleased you found it helpful in your painting project.
Cheers,
Will
Will,
This is such a welcoming tutorial for painting! I am a graphic designer that has always been intimidated with painting, and has chosen to appreciate it from afar. All the invaluable information in your articles and the fun energy you put in your videos are so inspiring that I have the confidence to give it a go!
Thank you!
M
Great to hear it Maria, really hope you enjoy the tutorial and turn those Graphic skills into painting skills!
Cheers,
Will
i just want to thank you for your great way to teach .
i start painting with your guide and web and it is fabulous you make painting fun and understandable and for everyone / now i know that me too can paint
i love it
thank you
elizabeth
Good one Elizabeth, really pleased you enjoyed the tutorial.
Will
Will, Thank you for these great tutorials and an amazing site. I’ve been struggling with acrylics after recently deciding to move to them after working in watercolour. After less than a week of reviewing your articles and videos, It was time to work along with you. Talk about Night and day! My painting now has depth and my skills no longer look like a toddlers. Looking forward to downloading my first course
That’s fantastic to hear Jean, so pleased you’ve been finding the articles and lessons helpful in building your confidence with acrylics. Hope you enjoy the course.
Cheers,
Will
New to your website…70+ and never picked up an artist’s brush until I retired last year (but having a blast now!) So glad I found your site…all I can say is “Wow!”…and thanks!
Nice to have you onboard Roberta, really hope you find the lessons helpful.
Cheers,
Will
Wow thankyou for the tutorial. It really helped and I produced a painting I’m very proud of. You’re work is beautiful!
Thanks,
Perina
Really pleased to hear it Perina, glad the tutorial helped.
Will
Thank you Will for your excellent tutorials. As a former filmmaker I greatly appreciate your very well-made videos (a rarity on the web) and the care and logic that’s gone into all your material. You might like to know I am watching your lessons from a small town in country New South Wales, Australia, where the parrots are screeching and the winter sun is shining.
By the way, is your name really Will Kemp and if so did your parents name you for Shakespeare’s great clown actor – red hair and all that?
Hi Paula, great to hear from you and thanks for your kind comments on the videos, much appreciated. Yes, my real name is Will Kemp, but it wasn’t specifically after the Shakespearian clown actor, although my siblings would sometimes beg to differ! really hope you enjoy the lessons. Cezanne used to have a pet parrot when he painted so you’re in some brilliant artistic company!
Cheers,
Will
I can’t thank you enough Will for restoring my confidence to try out your acrylics study. I was at a point where I had lost all confidence in my artistic abilities. The apple turned out not bad at all – thanks to your clear instructions and excellently paced videos. I’m going to go back to basics to learn from your drawing course so I can get to grips with light and shade. I nearly gave up a lifelong dream but this has encouraged me to do some serious practise.
You’re a life-saver!!
Jacqui
Hi Jacqui, lovely to hear from you and brilliant to hear you’ve been finding the lessons helpful. Yes, getting the basic of the drawing right will really help all your next paintings, hope you enjoy the course and discovering your hidden painting skills!
Cheers,
Will
great tutorial Will.
Did my first acrylic painting in 2015 by following your instructions and it was such an enjoyable experience that my interest in painting has flourished profusely!
Here is the link my attempt:
http://sawant-saurabh.blogspot.de/2015/01/its-been-two-years-i-started-sketching.html
Thanks again Will.
Greets,
Saurabh
Hey Saurabh, great work on the apple. Love the way you’ve interpreted the tutorials, the background colours look brilliant and those thin glazes of yellow/green on the apple give it a nice freshness.
Will
A murky day in Scotland forecast for tomorrow but I don’t care…having watched your video I am going to spend it inside painting an apple!
Great to hear it Rosie, hope the apple painting goes well.
Will
Dear Will, Thank you for helping me to overcome my fear of painting. I have so enjoyed this tutorial. I’ve been challenged; but excited for the challenge. I have a lot to learn; but for the first time in a long time, I’m painting and excited to be doing so. I will continue your tutorials. Thank you, Cecelia
That’s great to hear Cecelia, so pleased you’ve been enjoying the lessons.
Cheers,
Will
Will, I discovered your videos by accident, searching for “how to” help on line. I have binge watched all but one of your free videos and plan to put paint and brush to canvas shortly. Also am looking forward to purchasing others. You mention that reference materials are available from your web site (I assume they are available for the free videos as well as for tutorials for purchase) but could not locate them. Please advise if they are available…I feel kind of lost without having them to refer to during your tutorials even when you bring them up in your left hand occasionally. I find myself looking for the reference material when I have a question about how to paint a particular item. Thanks for reply.
Hi Katherine, pleased you’ve been enjoying the videos, if you click on lesson one of any of the free tutorials it will link to a page that has a reference image and material list for that particular tutorial, as an example, here’s the page one of the cherry lesson.
Cheers,
Will
I keep working the apple but it’s like I’m just rubbing the pain’t off. Do you know why this would be? I’m so frustrated right now. :(
Hi Carla, this can sometimes happen if you’re working on a non-absorbent surface, are you working onto a canvas or board?
Will
Will,
Thank you so much for responding! I was painting on stretched canvas and using Liquitex Basics. I did not prime with gesso first. Do you always prime with gesso? Should I be using heavy body paint?
I just started painting and this is the first tutorial of yours that I tried. It was very challenging and I feel like I learned so much and am already a better painter because of it. Thank you for all that you do!
Carla
Hi Carla, if the canvas you’re working on is white then it’s already had gesso applied to it. For Acrylics, you don’t have to work onto a gesso surface but most painters do because it makes the paint application smoother.
Cheers,
Will
Hi again Will,
Thank you…I am still watching (mesmerised) your free videos and once I have made a start, I hope to purchase one of the courses.
Elizabeth
So pleased you’ve been enjoying them, Elizabeth.
Will
Will, thank you so much for this website. I have floundered around in the past, not knowing what I’m doing, but now I’m confident I’ll be fine because your lessons are so clear.
I feel like I can’t start this lesson without having a very large block of time, because the paint will dry and I won’t be able to do the blending that you do, particularly with the shadow areas. I’ve been all set up to paint for the last couple of days, but even though I have time now and then, I haven’t had enough time all at once. Are there tricks to keep the paint on the canvas wet?
Hi Mary, really pleased you’ve been enjoying the website, with acrylics the paints will always dry quickly when on the actual canvas as they dry by evaporation. You can keep your pants wetter by using a stay-wet palette but the drying time on the surface of the canvas will be the same.
Cheers,
Will
You are a wonderful artist and a great teacher! thank you soo much for every information you are sharing with us.
Pleased you enjoyed the article Samir.
Cheers,
Will
So grateful for…”Morning, class”. It always makes me smile.
Excellent instruction for this perpetual beginner. You’ve made me excited about painting again.
Morning Lori! that’s great to hear, so pleased you’ve been enjoying the lessons.
Will
Great tutorial. When blending my apple turned green. I decided I like the green. Actually I was so gobsmacked with what I had done I’m not going to finish it. I’m afraid I’ll mess it up. I’m working on the jug tutorial now. Thank you.
Good one Carolyn, really pleased you enjoyed it.
Will
Thanks Will! I am just beginning and I have a question on color mixing in this lesson. I see that Raw Umber is a dark brown and I would have expected it to turn light brown when you mix it with White, but instead it looks like a neutral (ish) gray (!) that you then use on the background. Can you explain this a little bit – what happened to the brown/warmth?
Hi Michael, any colour that has white added to it will go cool and the brown will be taken out, a brunt umber is warmer than a raw umber so this would retain more warmth when white is added.
Cheers,
Will
I love your website it’s helping me so much. I am 53 and this the first-time I’ve put brush to paper since A levels at 18. First time with Acyrillic too. Cant wait to do more. what do you think?
So pleased you’ve been finding the website helpful Ina.
Cheers,
Will
I thoroughly enjoyed your class “How to paint light & shade in Acrylics”. My apple is my best work to date. Thank you!
Good one Sheryl, really pleased you enjoyed it.
Will
I truly enjoy your lessons and want to thank you for the great site that offers so much good information. My husband purchased some of your video lessons as a birthday gift to me and it is the best gift that keeps on giving each time I sit down to paint.
I find myself perfecting my paintings to the point that it gets almost too literal, even though my goal was to do impressionism. (I wish there was a way to attach the picture of my painting)
How do you know when to stop?
Hi Natalia, so pleased you’ve been finding the courses helpful. You’ll often find that every artist has a natural tendency to paint to a level of detail, what you can do if you want to have a more impressionistic feel is to set your self either a brushstroke limit (see what you can achieve with 20 strokes), or a time limit (see what you can create in 10 minutes) as it will force you to make quick decisions and really capture the main essence of the scene,
Hope this helps,
Cheers,
Will
What a brilliant idea! Thank you for your advise, Will.
Hello Will,
Thank you so much for this wonderful tutorial on Light and Shade.
I had no Cadmium Red nor Cadmium Yellow in acrylics and but do have them in water-mixable oil colours so I used them on top of the acrylic colours which -eventually- blended quite well. However, the water-mixable oil Cad Red was too dark and missed the “punch”. So I reverted to the acrylic colours and tried to apply the lessons from some of your videos on color mixing, thanks to the free “Beginners-Guide-to-Acrylics-Will-Kemp-Art-School” PDF, through which I am now able to navigate the art school and to find a way to address questions that arise. The mixed colour may not be as ‘punchy’ as the Cadmium Red but is now somehow nearer the effect. I am certainly looking forward to learn and improve more. I truly appreciate how you have carefully designed the lessons to mitigate the on-line process gaps that enables and encourages continuous learning, whatever the starting point. For this once again, I am sincerely grateful.
With all good wishes,
Carminia
Thanks Carminia, so pleased you enjoyed the lessons and managed to adapt the lesson
Cheers,
Will
Hi Will,
I’m really enjoying your videos and feel like I’ve learnt a lot of useful techniques – thank you so much! There is just one problem that I continually come up against that doesn’t seem to effect your painting and I’m baffled as to why. My brushstrokes tend to wipe the paint off as I’m applying it! I’m using Liquitex professional heavy body acrylics for the most part, I have an Isabey Isacryl filbert brush and am paying close attention to match my water dilution to yours. In this tutorial, for example, I dip my round brush into the Raw Umber to paint the stalk, stroke it on and it just pushes out to the edges of the brush leaving a thin stripe of paint exposed to the yellow ground underneath. I can resolve the issue by letting the paint dry and then reapplying but it’s like your painting is magic and I’m wondering what I’m doing wrong! Could it be the Liquitex paint? Or perhaps working on acrylic paper isn’t helping. I’ve noticed it tends to be more of a problem with dark colours like raw umber, ultramarine and alizarin crimson – if I mix in a little white, it’s more likely to apply evenly. Why is that? I assumed it was a thing with transparent paints but it says on the label that raw umber is opaque.
If you could shine a light onto why this is happening, I would be eternally grateful!
Thanks
Hi Sue, nice to hear from you, yes it sounds like it might be a combination of the differences in paint viscosity and amount of pigment in the paint.
The Liquitex is slightly more fluid than the heavy body paint I demonstrate with, so I’d try with slightly less dilution to see if you get the same coverage. Also, the absorbency of the paper you’re working on can play a part, if it’s got a slightly shiny surface the paint won’t sink in and absorb as quickly so the paint can sit on the surface so when the next brushstrokes goes ontop the one underneath pulls off. If this doesn’t do the trick then swapping the paint.
So I’d try with less dilution to start with.
Then with some cartridge paper just to see the difference in absorbency
Then with different paint.
Hope this helps,
Cheers,
Will
Thanks, Will, I loved this video. I’m a total beginner and was able to paint a pretty nice apple (if I say so myself) thanks to your instructions. I’d love to send you a photo, if you would like to see what I did!
So pleased you enjoyed the lesson Jill, you can attach an email to my direct email address on the contact page (under the FAQs)
Cheers,
Will
Thanks Will for these videos. I also have a couple of courses, but I run into the following problem quite frequently. You seem to dilute your paint with a small amount of water once in a while. If I do that however, I don’t know what happens but it seems the paint doesn’t stick to the grounding anymore. Perhaps because I am adding it too late.
For example, I am working on a layer on top of the grounding layer (yellow ochre) and I applied a layer which is a bit too dark (burnt umber). I then want to add a bit of burnt sienna and it gets harder to add additional paint and I want to thin it a bit. However, instead of adding a small thin layer of paint on top the just painted layer, I actually seem to remove the burnt umber layer. This only happens when I add water. What do I do wrong? Should I work faster and is my paint already drying and because of the water I remove it? I can’t seem to tackle this issue.
Hi Kevin,
What surface are you painting onto?
Will
Hello Will –
Quick question – are you painting a layer of ocher and then a layer of yellow cad or are you mixing them together – and if mixing – 1/2 and 1/2 of each? Thanks!
Hi Karen, this was on a canvas that I already in the studio that had a ochre base, then I added some more cadmium yellow onto, but you could just apply one layer to a fresh canvas.
Cheers,
Will
Oh – and I have a cad med and a cad light (from the cherry painting) – would either of those work for the red – i don’t have one that is just a plain cad red–Thanks so much!
Yes, that would be fine.
Thank you Will for this wonderful step by step tutorial. It was easy to follow and got me my confidence back into acrylic painting. Can’t wait to try your other tutorials and masterclass on still-life
That’s so great to hear Shraddha, glad you enjoyed it.
Will
Loved this Will, you’re such a talented artist. It’s fair to say that I’ve procrastinated for many years over my creativity and sheepishly tried the exercise, I’m delighted that I did. Painting like this feels so dynamic which is wonderful! I’m looking forward to purchasing some of your more in-depth courses in the future. Many thanks
So pleased you took the leap Hilary! and are pleased with your results from the painting.
Will
You can teach an old dog new tricks. The apple turned out with an abstract feel not as real looking as yours but I love it. Cherry was easier I think it does look almost real. Great classes easy instruction so glad I decided to go from drawing all the time to painting as well.
Thank you for the free classes.
So pleased you’ve been having success with the lessons Gayle.
Will
Hello Will. Thanks so much for your tutorial. We had an a lovely afternoon all painting the apples in your tutorial. So we had 6 different apples in acrylic based on your tutorial!!!
Fantastic stuff Michele, and thanks so sending your images through, they all looked ace.
Will
Hi Will,
Just completed this second tutorial ( complete with two new filbert brushes purchased from Rosemary and Co ! ) . I have dabbled in acrylics for years but this is giving me a whole new way of looking at backgrounds etc. Really pleased I found your site and already referring friends. Great way to spend a wet Cheshire afternoon ! Onto the next .
So pleased you enjoyed it Bob and have been enjoying the new brushes.
Will
Hi Will, thank you for your lovely tutorials and engaging manner. I’m brand new to acrylics and have been painting in oils. I wonder if you could give some pointers on water control. I am doing something terribly wrong, as so often the paint I’ve just applied won’t stick or pulls up the layer below that I thought was dry. I’m using professional grade heavy body Liquitex. I try not to have my brush too wet. I can’t seem to blend beyond a few brushstrokes, and I find after those few, I simply must leave the paint alone. If I do go back to it, the paint pulls up. I try spraying a fine mist, not too often, but that doesn’t seem to help at all. What am I doing wrong? Are there some exercises to try to learn how to control the moisture?
Hi Helen, what surface are you painting on? it sounds like the paint isn’t absorbing onto the surface and sitting on it. One thing to check is that the canvas you are working on is ‘universally primed’ if it is ‘oil primed’ it won’t be suitable and will repel the acrylic.
Will