In this light and shadow series, we look at the theory, drawing and painting of a simple form focusing on shadow, light and edges.
in Part 1, we looked at the theory of light and shadow.
This week we’re going to put pencil to paper and see how the theory works in a simple pencil drawing of an apple…
Understanding your light source
The different characteristics of the light hitting an object can completely change its appearance.
For this demonstration, I’ve created a lighting set up using one single light source which gives us a predictable fall of light.
This set up demonstrates each distinct area to be aware of, exaggerating the widest tonal range, and when you’re a beginner, it’s the simplest way to see the difference between the tones.
My lamp has a diffuser on it called a Softbox.
The Softbox gives us the fall of light we’re after, yet slightly softer edges on the shadows.
Why?
One of the key lessons from this demonstration I want you to come away with is to understand the importance of soft edges in your drawings.

Softbox single source lighting set up in my studio
The importance of hard & soft edges
An edge is where two objects or two surfaces meet together.
The term a ‘hard edge’ can describe two very hard surfaces, such as a tabletop with a metal cube on top of it or most commonly in drawing, we talk about the hard edge being an area that has a sharpness to it or a focal point of the picture.
So, it could be a crisp line to indicate changes in shape or angularity.
Or it could be an area of high contrast (light and dark) to draw the viewer’s attention.
A ‘soft edge’ is more flowing or fluid and tends to be more low in contrast. Soft edges suggest the idea of roundness and a gradual transition.
In photography, lighting can often be called hard light or soft light. Hard light is harsh light so creates sharp shadows and harder edges.
Soft light is very diffused, creating softer shadows and softer edges. So if you wanted to photograph somebody in the most flattering light, you would have soft light. If you want to increase the dramatic quality of the scene, you would use hard light.
This one piece of information that can drastically alter your drawings and paintings.
So as we go through the next demo, I’ll indicate the areas to keep soft and the areas to keep sharper.
One of the biggest mistakes beginners make in drawing, is keeping all of the edges the same – most commonly, all of the edges are kept sharp and crisp.
If you can learn to alter the weight of line and to incorporate more soft edges in your drawings, it will make a massive difference to the realism and style of your work.
Shadow edge
Below are two photographs to illustrate the subtle differences in the shadow strengths when I altered the lighting slightly.
The first one used direct sunlight because it’s not diffused; it has created a harder, more solid shadow line and cast shadow.
Also, see how you can judge the angle of the sun via the length of the cast shadow and the bright highlight.

Low angle, hard lighting from direct sunlight.
The second one used a slightly higher lighting position with a softer light creating a softer cast shadow edge.

High, softer diffused lighting from a single light source Softbox
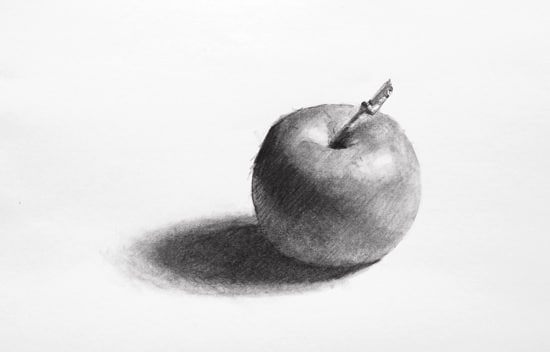
The image above is the final reference image I’ll use for this demonstration.
It can be ‘right clicked’ and ‘Save image as’, so you can use it as a reference for your drawing.
Home setup
A small table lamp without a shade is a good choice for setting up your still life at home, if you want to work from life, rather than the photograph above.
An opaque bulb will give you a light source in between the two examples above. O.k – you won’t have a diffuser to mimic a Softbox – but it won’t be as hard as direct sunlight either.
Simplifying your drawings by mapping the shadows
Before we get started on the main event, here’s a really quick way of practising looking for the shadow line.
Don’t underestimate its importance because of its simplicity.
It’s often the first sketch that is the most effective at conveying the sense of form rather than an overworked, detailed drawing.
However, working with pencil, subtleties can get added into the scene (that are there) too early on, and the simple distinction between light and dark gets lost.
During this exercise, you have to make a clear distinction between light and dark because you are using a pen – helping to prevent the separation from becoming muddled.
Pro tip: Working with a permanent marker pen is the best method I’ve found for practising this technique. It forces you to make a clean decision in your mind before committing pen to paper.

This sketch is based on the Cézanne painting from last week. I’m using a black, fine line gel pen. This one is 0.5 mm from Muji.
I sketch out the outline of the object and then put in both the cast shadow and the shadow line.

I can then indicate the shadow side by hatching lines with the pen.

I’m keeping the lines evenly spaced and changing the direction of them, depending on the direction of the form. Notice how all of the cast shadows on the table are hatched in the same direction.

I then draw in any darker accents on the bottom of the objects.

And once I’m confident with the general shapes and shadow patterns, I work with a thicker pen (this is a Staedler whiteboard marker) to indicate the very darkest cast shadows within the drawing.

So now I have three tones, the lights, the form shadows and the cast shadows.

This has just given me a really good idea of the shadow patterns within the scene. It can be a great exercise to do if you’re out in bright sunlight as you can get distinct shadow shapes.
So now your eyes are tuned in, let’s get on with the form drawing using a pencil.
How to draw a three-dimensional Apple
Materials you will need:
- White paper, either regular computer paper or cartridge paper
- 2B & 6B pencil – I use Staedtler Mars Lumograph
- Eraser – I use a putty eraser
- A round object to draw around (approx 7cm wide)
- A tortillion – I use a paper stump, which is very similar to compressed paper.

Find a circular object to draw lightly around; this helps to give you a starting point so we can quickly put into practice the theory of the sphere from last week. I’m using to 2B pencil (Staedtler Mars Lumograph)

I then make a mark indicating the furthest point of the cast shadow.

Lightly draw an ellipse shape to indicate the cast shadow. Notice how the ellipse cuts through the shape of the circle.

I now use a hard line and add slight angles to the circle, to represent more accurately the shape of the apple.

Lightly draw in the shape of the stalk.

And then the shape of the highlight.

Reinforce the cast shadow shape noticing – the darkest part that sits directly under the apple, the mid-tone that makes up the majority of the cast shadow shape while keeping a lighter line as you get towards the brightest, softest tail of the cast shadow.

Lightly draw the shadow line; it has a slight curve to it.

The curved line below the shadow line indicates a band where the form shadow core falls within. This will be the darkest area of the apple.

I then shade a mid-tone along this form shadow core. Even though it’s going to be darker than this eventually, it will help you to judge the different tones within the drawing.

Shade the apple stalk as dark as you can get it, it’s practically black on the reference image and it doesn’t need to blend into any other tones – so we can afford to go as dark as possible.

Now I swap to a softer pencil (a 6B) and begin to shade in the majority of the cast shadow. Notice how the angle of the shading is the same as when I hatched the cast shadow in the shadow mapping drawing using a pen.

Continue the shade over the edge of the apple, and this is called combining the shadow shapes.

I fill in the form shadow, working over the first, form shadow core band.

It’s at this point I swap back to the 2B and draw the hard, sharp line at the base of the cast shadow.

Using the softer 6B pencil, I reinforce the cast shadow depth of tone.

Holding the pencil lightly, I gently indicate the softer, lighter tail of the cast shadow.

Now I feel confident to go heavier on the form shadow core as I have both the dark cast shadow and the dark stalk to judge against.

Changing hand position, I can follow the shape of the form.

Lightly work across the whole of the light side to indicate the halftone.


Now we have established all the elements.

Using our secret weapon, our paper stump I start to blend the tones to achieve the soft transition between the light side and the shadow side.

Notice how when you shade with the paper stump, it slightly darkens the tone.

I continue to work between softening and sharpening and blending.


Using a putty eraser, I take back any of the shapes that have gone slightly out.

Soften out the tail of the cast shadow.

Pull back the highlight on the light side of the apple.

The finished drawing.
Whether you download and use the reference image or set up your study, take it a step at a time, look out for the soft transitions, and I hope you get some fantastic results!
Next time we’ll be back in the studio where we’ll develop this apple study into a simple contemporary painting.
If you’d like to learn more about sfumato and drawing techniques, you should have a look at the How to draw light & shadow online drawing course
You might also like:
1. A Beginners Guide to Light & Shadow: Part 1
2. A Beginners Guide to Light & Shadow: Part 3


Will
Thank you for making something rather complicated seem so simple and actually be something I am proud of completing. Your instructing skill is accomplished. Being retired and having the time to experiment in drawing is made so much more satisfying using your examples.
Thanks, again!
Patsy
Hi Patsy,
So pleased you’ve found the lessons easy to follow, and are enjoying your drawing time.
Cheers,
Will
Hello there, this is so incredible, such a great tutorial, this really helped me a lot and thank you very much
Really pleased it helped Varun.
Cheers,
Will
Will Kemp. You are a blessing. Thank you for breaking this down in simple steps. Thanks to you I now understand how to shade.
You’re too kind Mary, really pleased you found it helpful.
Will
Hi Will,
What’ s a great lesson! Thank you very much! It s very interesting, informative and so easy to follow.
Tania
Great to hear it Tania,
Cheers,
Will
Very helpful guide. Thank you Will
You’re welcome Greta,
Cheers,
Will
You have a real gift for explaining things in an encouraging way! This is a great lesson on shading. Thanks!
Thanks Carole, hope you find it helpful,
Will
I have enjoyed many of your tutorials and always look forward to the email notifying me of new content at WillKempArtSchool.com. You are my go to source for art instruction and this latest series just goes to show why. Your instructional abilities are a gift, thank you for sharing it to so many of us. Can’t wait to put pencil to paper!
Thanks Connie, kind of you to say so, good luck with your drawing.
Cheers,
Will
…Yeah, I must appreciate ur work and lesson or tutorials, it helped me a lot.
Thanks you.
Fab stuff Eze
thank you once again for a great lesson–well presented and simple to follow. You are a fabulous teacher!
You’re welcome Sarah, pleased you found it easy to follow.
Cheers,
Will
You explain things so well and give me the confidence to try things which might seem really difficult but you break it down into simple manageable steps. Thank you!
Good one Tasnim, great to hear you’re being inspired to step beyond your comfort zone with your drawings!
Cheers,
Will
How do you determine/measure the furthest point of the cast shadow?
Hi Tasnim,
It is subtle but it varies depending on the angle of the light source.
If you get your eyes tuned in you’ll be able to see the very softest part fade out.
Cheers,
Will
Thanks, I gave the drawing a go. Here’s a link to the image:
http://instagram.com/p/mdpDIIhB9i/
The top one is the first attempt, but I wasn’t happy with it so I did it again straight after – the lower image is the second attempt.
It’s the first time I’ve done a still life drawing and I’m seriously impressed with the result because although it’s not perfect it’s still so much better than I thought it would be. It just goes to show that practice is key!
Thank you once again.
Great work Tasnim, the second drawing is a great improvement and is working really well. The edges are nice and soft, the cast shadow is looking good and the contours of the apple are looking great, really good job Tasnim!
Cheers,
Will
Will your detail explanations are simply excellent. It forces me to perfection.
Cheers Vidhya,
Will
Very good information! Thanks !
You’re welcome Margarete,
Will
Thank you so much for your amazing tutorials, so so grateful for sharing your gift with us without asking for anything in return :)
You’re welcome Diana, hope it helps with your drawings.
Will
Nice will i like it,can you sometime give an example of how to draw a fallen object with its shade?
Hi George, you would just apply the exact same principles to the fall of light to the object.
Cheers,
Will
Thanks! Perfect
You’re welcome Gloria,
Will
thank you so much,i started to learn painting,so is very apreciate your help
Good one Betty hope you’re finding the tutorials helpful in your painting journey,
Will
Thanks for good information .
Cheers Maria,
Will
Hi Will, Thanks for an excellent step by step drawing instruction. Regards David.
You’re welcome David,
Cheers,
Will
Hi Will
Wow- what-a-step by step demo! …liked d paper stump effect :)
Many thanks
:)Sydney
Thanks Sydney, the paper stump can be super helpful.
Cheers,
Will
I like your amazing tutorials Thanks
Thanks Dinkar,
Will
Top tutorial Will! :)
Cheers Ali, hope you’re keeping well.
Will
Another beautiful lesson, Will, explained so well. How come your pencil has such a long lead? Usually it breaks off! Is it a special pencil? Thanks, Prabha
Hi Prabaha, no it isn’t a special pencil, just specially sharpened! I use a craft knife to have a longer lead rather than sharpening with a pencil sharpener.
Cheers,
Will
Hello Will,
This was very helpful. I practiced it. Apple Shading
What you think about it? Any hope? :D
Nice effort Swapniel, you could just make the shadow core slightly darker and erase the highlight shape line and it’ll be looking great!
Cheers,
Will
Okay I will do so.
Thanks a lot :)
By the way, tell me this thing – that different erasers make any problem? The eraser I use is called nondust eraser. It’s soft and doesn’t get dark after erasing even darkest lines. But I have seen many artists prefers kneadable erases or putty erasers (like you used it)- which I have no idea about. Do those have any different feature?
Thanks again.
Hi Swapniel, I prefer to work with a plastic eraser and a putty eraser. The kneadable eraser enables you to work with it much like a drawing tool, rather than just to rub out your mistakes.
Hope this helps,
Will
Dear Will,
Thanks so much, Very good and very helpful, and easy for beginner like me to pick up.
Cheers
Millie
Great to hear it Millie!
Cheers,
Will
I just love this tutorial….this is important
Thank you
Hey Katja,
Glad you’re enjoying the series,
Cheers,
Will
Dear Will Thank You Very Much , its very informative and Also easy to understand for a beginner like me … cheers
Josh
You’re welcome Josh, pleased you found it easy to follow.
Cheers,
Will
Always great Will, always great …
Thanks Sandomingo, kind of you to say so.
Cheers,
Will
Thank you Will. Amazing lesson. You make me feel like a real artist!
Great to hear it Marcia!
Will
Hi Will
What are your thoughts on angled drawing boards as an aid. I have one with variable degrees. I got it a while back but have been painting more than drawing. Doing these shadow studies has me drawing more and I was interested to look at what you were resting your paper on.
I assume it could be personal preference but any technical advantages would be useful to consider. I have always found the pics of yourself and another drawing the busts standing up with the paper at the vertical interesting.
Ta
John
Hi John, I’m working on a piece of MDF board that I’ve taped the paper onto (Pro tip: add a few sheets of blank computer paper under the piece you’re working on for a smooth finish) and then I can angle the board to the subject I’m working from.
This makes the plane of angle of the board closer to the plane of vision I’m viewing the subject from – so it is easier for you to judge the shapes/angles of the subject.
Hope this helps,
Will
Re drawing board….just to clarify. Does that mean when drawing an image on a table or bench etc, have the paper horizontal but if drawing something hanging on a wall have the paper more vertical? Which also might suggest drawing a standing figure on a more vertical board position
Also is it common for students do make a better drawing from copying the teachers/artists drawing than their attempt at the actual object itself?
Cheers
Cheers
If you have an object on a table, hold the board at an angle (about 45 degrees) as this is roughly on the same plane as your eye line. If you are standing up the drawing board can be vertical, as this is also on the same plane as the subject and your eye-line.
The less you can move your head (and just move your eyes) between the subject and your drawing the better. Try a few angles and try to notice if your head is moving or not.
Cheers,
Will
This has been very helpful. I have taken photographs on my phone and put them into black and white to get a clearer idea of shade values. All of your advice is excellent and encouraging. I am looking forward to the painting.
Great to hear it Carolyn,the first part of the painting video should be going live in a few hours time!
Cheers,
Will
Thankyou,always good to have another resource .Bill
Thanks Bill,
Will
Thank you very much. All of your advice is excellent and encouraging.
Thanks Haylen.
Good lesson, very clear, thank you for your teachings.
Thanks Maria, pleased you found the lesson easy to follow.
Cheers,
Will
Very helpful Will! Looking forward to the next lesson!
Thanks Margarete, you can watch the next lesson here.
Cheers,
Will
Thanx will. It was v helpful and understanable.
I really love the way u explained it…thanx
Looking forward for some more interesting lesson.
I ve worked with oil paint many years ago but nowusing acrylic
Paint , i really need ur advice on how work with them propey.
Thnx.
Cheers Moona, pleased you’re finding the drawing lessons helpful.
Will
Dear Will
I was very pleased and impressed with the shading steps , i have also learnt a lot that will definately also improve my teaching skills in drawing and both myself as a practicing Artist. I realised my ashadings were actualy half done and not complete. Thank you once more, I look forward to recieving more of your lessons.
Thanks
Janet
Thanks Janet, really pleased you’re finding your shading improving and have been enjoying the lessons.
Cheers,
Will
Super drawing exercise.
Your instructions are well written and offer an element of humanity—an understanding of the student who struggles to achieve what seems so difficult at times. You take these students by the ‘virtual hand’ and encourage them to try again. Love it.
You are a great teacher.
Thanks very much Jo, nice to hear from you, hope you’re keeping well.
Cheers,
Will
Thanks a heap for the easy to follow instructions, which I didn’t bother to scroll down to, initially, in my haste to start my apple drawing (oops!) but it turned out ok and halfway through, after eventually checking your post, the shading tips helped a lot!
You’re welcome Marion, hope your drawing turns out well.
Will
Hello Will, thank you for this guide, very helpful. My problem is that the acrylic lifts off if I go over work already done. What am I doing to cause this? I have tried a few different brands of acrylic paints with the same problem……
Hi Dale,
Pleased you found the guide helpful. Standard acrylics won’t lift off when you work out the top of them, regardless of the brand. What surface the painting on top of? Are they definitely standard acrylics, rather than the Atelier interactive acrylics or ‘Open’ acrylics?
Cheers,
Will
Thanks Will, for replying so quickly…..I use standard acrylic paints…..Mont Marte (too thin), Kaiser colour (also too thin), and both lift either when wet or dry. Have started to use Mont Marte Dimensions which is thicker but have the same problem, and I use a standard canvas already treated at the supplier. Maybe I need to change paints to a different brand altogether!!!!! Any suggestions???????
Hi Dale, when you say they ‘lift’ when wet, do you mean peel off, as in don’t stick to the canvas surface? or you paint a section, come back to it the next day, paint ontop and then the underneath colour lifts off?
Yes to the 2nd part…..when I come back to it to paint over more the new paint lifts off the older paint!!!!
Hi Dale,
Sometimes a ‘skin’ of the acrylic can move if you’re painting very quickly with thick applications of paint, but for thin applications this shouldn’t be happening.
Below is from the Golden Paints technical pages:
The Two Drying Stages of Acrylics
The drying of acrylic paints occurs in two very different stages, hence drying times must be thought of in two different time frames.
The first stage, a relatively short period of time, results in the formation of a skin over the surface of the paint. This is the time that it takes for acrylics to “dry to the touch”.
At this point, the flow of water towards the surface is no longer sufficient to keep the paint film wet. Very thin films can feel dry within seconds, while thick films may take a full day or more to skin over.
The second stage of drying is the time for the entire thickness of the film to be thoroughly dry. That is, the time required for all of the water and solvent to evaporate and leave the film.
This is a most crucial time frame, as the ultimate physical properties, such as adhesion, hardness and clarity, do not fully develop until the film is near complete dryness.
For very thin films, this time may be a few days, while films of 1/4 inch thickness or more will take months and even years to be completely dry.
Many artists are not aware of this more lengthy drying time. This is the reason that one may find that a rather thick layer of paint has not adhered to the surface when tested a day or two after application.
This same layer of paint will also seem very soft.
The skin may have dried sufficiently, but the paint in the center is still wet.
So I would try a few tests varying the thickness of the acrylics to help stop the ‘breaking of the skin’ of the paint film and see if the problem still persists.
Hope this helps,
Will
Hi, will i’ve seen your art it was beautiful. actually my problem in art are shading and the hard part is to shade hair can you help me?
Hi Sarah, You can use the same form principles with shading hair, just make sure you don’t lighten areas of the hair too much, often the tones in-between different strands are actually very subtle.
Cheers,
Will
Thank you for a great lesson. While shading the shadow, do the lines have to be in any particular direction or should they be parallel to the lines used to shade the object?
Hi Nima, pleased you enjoyed the lesson, there aren’t any strict rules on the direction of line, I find having them go the same direction as the form shadow helps to subtly indicate the fall and direction of the light.
Cheers,
Will
Very helpful, thanks Will!
Dear Will
It is very nice to have a wonderful guide like this. It is way much helpful than other sites.I really appreciate you for posting great and easy step by step guide. It is really helpful for my tests.
Best Wishes
Pleased to hear it’s been of help Brian.
Cheers,
Will
Hi will,
Its really amazing. hope we will learn from you more.
Pleased you enjoyed it Sam,
Cheers,
Will
Very Helpful walkthroughs of the how to of shading..Thank you Will
You’re welcome Rajendra.
Will
Thanks for the lesson it helped me with my shading skills alot. Thanks once more
Thank you sir, this, i dunno, shadowing technique? helped me a lot! i was completely lost when my teacher said : With SHADOWS . You really are a REAL teacher who actually “knows” how to teach.
Really pleased it helped with your drawings Sarah.
Cheers,
Will
thnx alot…. its been a great lesson.. :)
this has helped me understand lot about shading, thankyou.
Good one Emla, pleased you found it helpful.
Cheers,
Will
Hi, Will
Thank you, for your detail explanation it helped me a lot to understand shading..
Eager to learn more..
My pleasure Vineet, so pleased you found it helpful in your drawing progress.
Cheers,
Will
Thanks for the info, it was very easy to understand and to draw. Thank u very much…
Pleased you found the lesson easy to follow Simran,
Cheers,
Will
I didn’t know that shadows had so much affect on sketches. I would love to learn how to draw with pencil and sketch portraits. I think I’ll have to learn how to draw a solid shadow line first. Thanks.
Good one Annie, really pleased you found it helpful.
Cheers,
Will
Its very helpful especially to those who are beginner in doing portraits or using shadows
wonderful
WoWwwwwwwwwwww!!!!!!……..what a beautiful drawing I liked your course very much sir thank you sooooooooo muchhhh………
Thanks very much Nobe, really pleased you enjoyed it.
Will
Hi Will, great tutorial thanks for explaining it in such a simple way…. Look, my problem is: How do I shade with multiple light sources?? Please help … I couldn’t find any decent tutorials on the internet about that….
Hi Deb, you just need to think about the same logical principles of how the light is falling, observe the cast shadow to give you clues to the type of light source you’re looking at and then draw the tones. You’ll notice that a cast shadow is darkened where a second shadow falls onto it, but you still might be able to see a clear shape of the second cast shadow depending on the intensity of the light.
Hope this helps,
Cheers,
Will
Thanks for the lessons . Am looking forward to become a great artist like you. Much respect
Hi will thank for the apple demostration. Can I use the same methot on a portrait pencil drawing thank paul
Hi Paul, the same principles of the basics of a form apply so the method would work for the basic shapes of portrait drawing.
Cheers,
Will
Was a great lesson, thx a ton.
dear Will kemp,your step by step light and shade work is very fine.Thank you.
Pleased you enjoyed it Nagai.
Will
this is a great lesson thank you for helping me to make it
Pleased you found it helpful Nick.
Cheers,
Will
You are a great teacher and artist. Your tips really helping me make my drawings and paintings better. Thank you
That’s great to hear Gul, so pleased you’ve been finding them helpful.
Cheers,
Will
It is easy to follow. Thanks
very cool and awesome
Cheers Brandon.
Will
Hi will . I recently made a flesh tone chart to try to match flesh tones . I was wondering what was the best way to match skin tones .? At the moment I am trying without much success on my tablet but it’s very luminous with the screen .? Perhaps this is a no brained question but is it easier to copy from a portrait painting or a photograph or real life .? Many thanks
Hi Daniel, yes, you mixing and matching colours it’s much easier to start with to match a printout like on the acrylic colour portrait course and work with an image that isn’t back illuminated.
Cheers,
Will
Many Thanks
Wow, easy to understand, thank you so much.
Hi will I’m thinking of painting my palette board a different colour to try better to match tones . I like to underpaint in raw umber but not sure if to paint my palette board this colour or a mid tone grey .? Does it matter .? Many Thanks
Hi Danny, there will be a subtle difference in judgement, but if you’re often working on a raw umber ground it can work really well as a base.
Cheers,
Will
Thanks very much .
Thank you Will! Really easy to follow & fun. Keep it up.
My pleasure Nora, so pleased you enjoyed it.
Will
I am a high school freshman leaning about identifying shadows and lights worksheet and i’m having trouble figuring out the difference between cast shadow and occlusion shadow
Hi Dalton, the occlusion shadow is the darkest part of the cast shadow directly underneath the form. It’s the area that has the least amount of light.
Hope this helps,
Cheers,
Will
can i know which pencil did you use!!
Usually a 3B, either from Stadler Mars Lumograoh or Faber Castell 9000
Cheers,
Will
I won 1st poition in the national art competition by drawing this
That’s fantastic news Saadrisha, congratulations!
The title says 2 of 3 but I can’t find the link to the 3rd lecture/post?
Hi Phillip, thanks for letting me know, you can see part 3 here (I’ve also added a link to the bottom of the post)
Cheers,
Will
These three posts have become my readings before bed. Not gonna stop reading and re-reading the theory until I get it. That’s what you get when you put the cart before the horses, I started painting without learning the theory behind it. It’s not easy but it’s clear and fun. Thanks, Will!!
So pleased they have been helpful Cecilia.
Will
Hi, what do you mean by “sharpen”? You didn’t explain in the instructions what this is. I am a complete beginner and autistic so have no idea how to draw at all really. The instructions are great, just need sharpening explaining
Thanks
Hi Nathan, to sharpen just means, to take a blunt pencil and make it into a sharp point. Either using a pencil sharpener, knife or sandpaper.
Will
Hi Will, thanks for the reply. I wasn’t clear in my last comment, I meant how do you sharpen the image? As in “I continue to work between softening and sharpening and blending.”
Thanks :)
Ahhh gotcha Nathan . So i’m really referring to edge control. What parts of the drawing do I want to be more in focus and sharpen, and what parts do i want to smoke into the background and soften.
Will
Hi will I’m really struggling with softening the shadows, do u have any tips
Hey Emily, have you tried using a paper stump? this can really help to soften the edges.