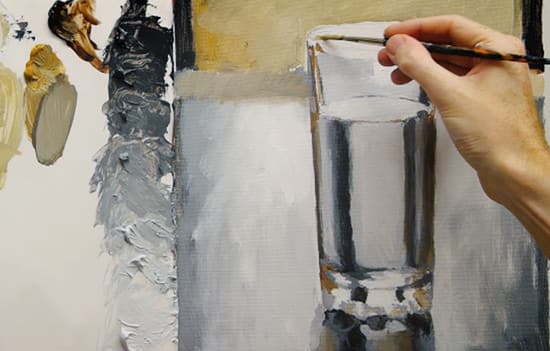
In Part 1 we looked at how to master the basic features of your digital camera, so you can emulate how your eyes see things in nature to give you fantastic reference photographs for your still life painting.
In Part 2 we saw how small incremental changes in your composition and lighting can instantly create a more dramatic and pleasing image for a painting.
So for Part 3, we’re on to the painting…
A step-by-step acrylic painting of a glass of water
The image below is going to be my reference photo to work from for this tutorial. It can be ‘right clicked’ and ‘Save image as’, so you can use it as a guide.

Here’s my pencil drawing you can also work from:
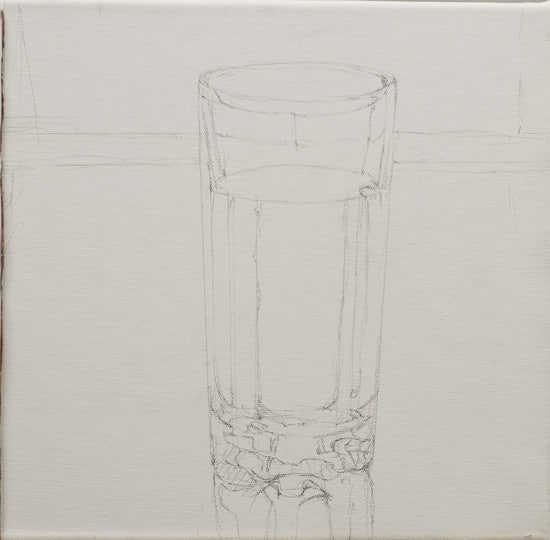
Materials you will need for this tutorial:
- 30 cm x 30 cm pre-primed white canvas.
- Size 6 Black Hog Oil brush from Jackson Arts – filbert
- Size 5 Kolinsky sable from Rosemary & co – round – (any small round will be fine)
Paints
- Artist quality Titanium white – Invest in this white even if you use student quality paint for the rest of the colours.
- Burnt umber
- Mars black or Ivory black
- Yellow ochre
- 3B pencil
- Kitchen roll
- Cranked handle palette knife
- Jam jar for cleaning brush.
- Small dipper for diluting paint
Step #1. Draw out the image
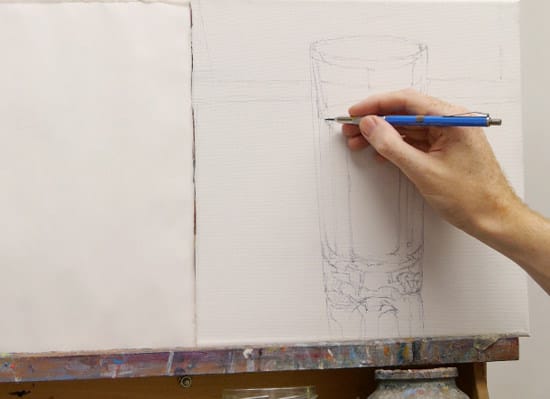
Using a 3B clutch pencil, I draw out the main shapes and lines paying special attention to the shape of the ellipses in the water, make sure the edges of the ellipses have a slight curve to them.
Spend some time checking the shapes before you begin the painting. Because it is quite a monochrome study, we’re going to be relying on the drawing to help us create the illusion of realism.
Also, notice for this particular painting, I haven’t used a coloured ground, I’m just painting straight onto the white canvas.
Why?
There are some odd occasions when if the subject matter you want to paint is very light in tone, you can use the white of your canvas to your advantage. Having the brilliant white underneath adds an underlying glow to the piece and a luminosity to the water.
Step #2. Establish the warm undertones
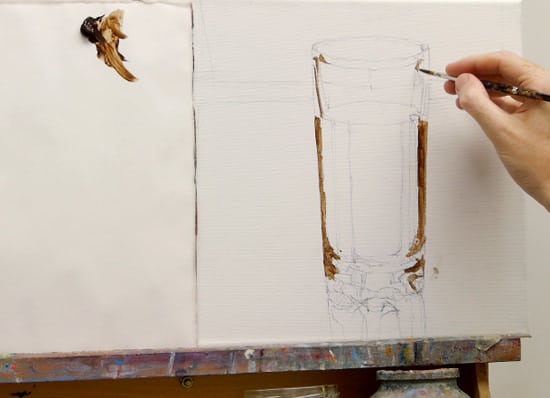
Just using Burnt umber, I wash in any areas in the picture where I can see a slight warm glow. There isn’t very much in this particular painting but it just helps to add a slight glow for when we add in the darker tones in the next stage. I’m using a round synthetic brush, dipped in water so it is quite a watery wash.
Step #3. Establish the darkest darks
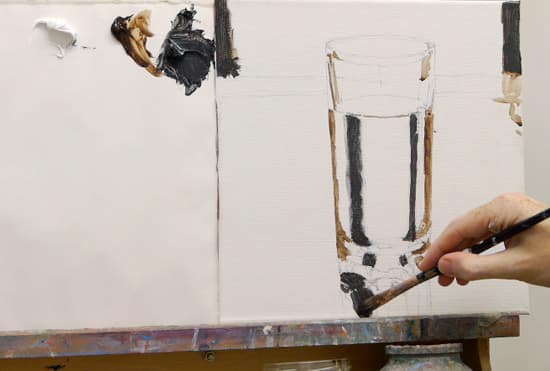
I now put out some Mars Black and using the hog filbert, start blocking in the darker tones to the painting. Using thicker paint than the previous application because I know I really want these areas to be dark and don’t want any of the white of the canvas shining through.
Step #4. Mix a colour string with your palette knife
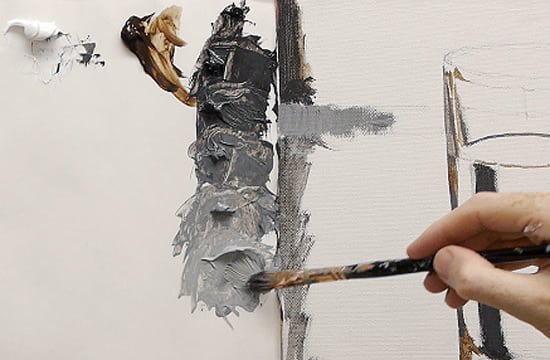
I now mix a colour string using Titanium white and the Mars black. I’m looking for small incremental jumps in tone, that aren’t too big but can still enable me to see a slight difference on the canvas. If you’re just starting painting, working with a stay-wet palette can help to keep the colour strings wet when you first mix them making your painting quicker after you’ve made the initial mixes. You can read more about colour strings here.
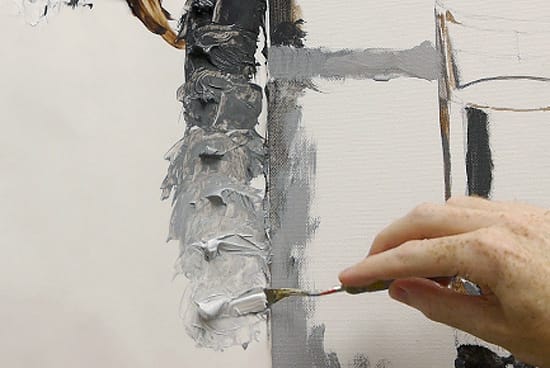
The colour string continues right down to nearly white. I don’t go to completely white, but am aiming for the lightest tone to match the brightest areas in the photograph, which in this case is the area in the middle of the glass and on the surrounding tabletop.
Step #5. Painting the mid-tones
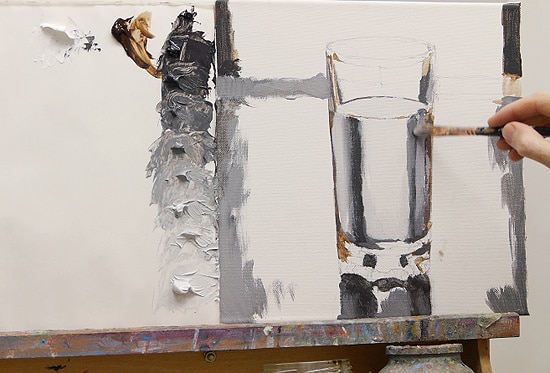
Now with the whole string of colours ready, you can paint quite quickly working between the tones and scrubbing in the greys. I’m keeping the paint at a reasonable thickness to cover over the white and to give me enough paint so I can mix it with the other tones whilst they’re still wet.
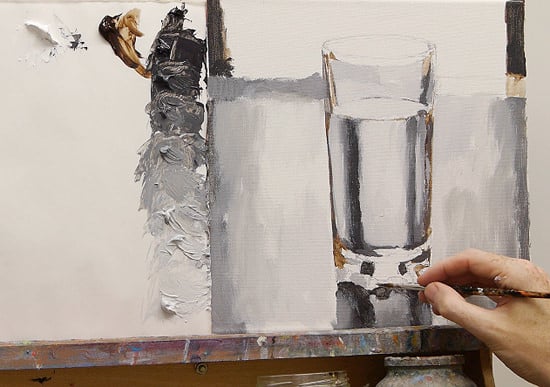
Step #6. Introducing Yellow Ochre
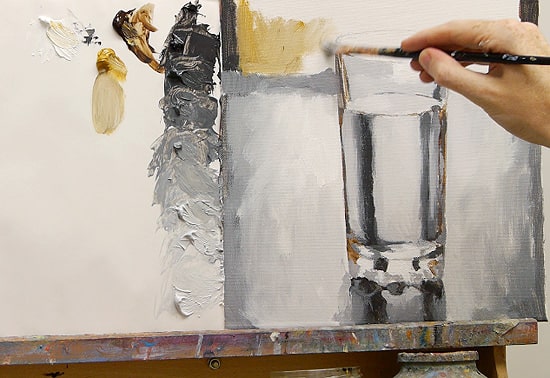
Using a mix of Yellow Ochre and a touch of Titanium White, I scrub in some of this yellow tone into the background. I’m not going to paint the green as bright as in the photograph, as for this study I want to keep it quite tonal and monochrome.
Step #7. A more muted mix
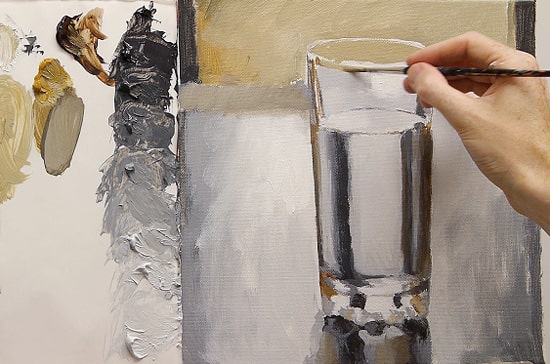
I make a more muted mix using the Yellow ochre, Titanium white and a touch of the black.
This very muted dull green will balance with the painting, yet give a bit of background colour to isolate the clear glass from the background.
Then I can start to use the smaller round brush to paint the spaces either side of the fine rim of the glass. This way by painting up to the rim it’s easier to create a smooth, clean ellipse shape. This superfine line will help to add refinement to the painting, even though a lot of the earlier painting is quite gestural.
Having this mix between fine lines and painterly brush marks really makes this style of painting work.
If we were to paint just using fine lines, you can run the risk that your paintings become too graphic and have an unnatural crispness to their finish.
Step #8. Finishing touches
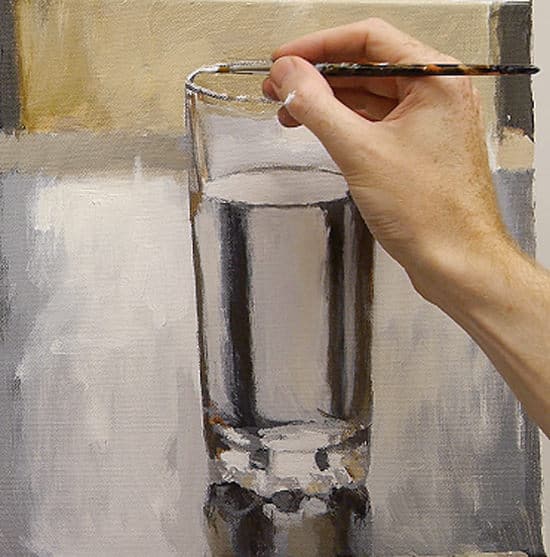
I now add some final white highlights just using Titanium White, also adding small subtle hints of the green/grey tone onto the very bottom of the glass.
This helps to subtly bring the background tones together with the rest of the piece.

This painting is quite straightforward and simple but painted this way really gives you an effective painting of glass and water.
The results are realistic, without getting too hung up on the details within the piece, I really hope you’ve enjoyed the series tackling a perceived tricky subject of reflections and water.
Now Available…
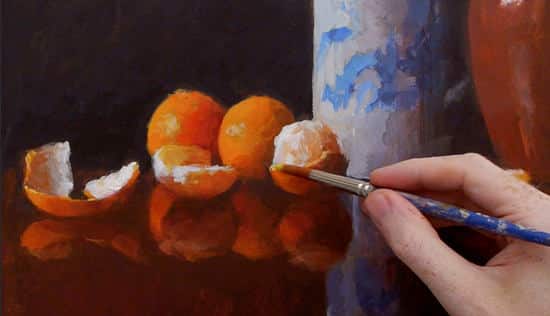
Detail taken from Reflection, Oranges – Still life Masterclass, Will Kemp, Acrylic on board
If you want to take your still life paintings further and learn how to paint more complex reflective surfaces (and discover how simple they can be) you should have a look at the Still life Acrylic Masterclass Course.




Thank you, Will.
This was an excellent lesson.
Best regards,
Theresa/Terry Erb
You’re welcome Terry & Theresa, pleased you’ve found it helpful.
Cheers,
Will
fantastic! i find that u give words to some things i intuitively know but cannot express and define ideas i have no concept of…what more cd a brand new painter want?
Hi Anne, thanks for your kind comments, so pleased you’re finding the decriptions helpful in your painting.
Cheers,
Will
Can’t find you on Face Book.
Hi Sharon, I’m afraid I’m #oldschool and not on Facebook at the moment.
Cheers,
Will
Wonderful another great learning experience with you Will. Cannot wait to paint the subject. I want to really get more involved in still life painting and reflections especially with bright colors of fruit and glassware.
You’re welcome Virginia, pleased you found the tutorial helpful.
Cheers,
Will
This was a good lesson. I’m just starting to paint and having trouble with the language of painting. For example, “gray-green tones”…I don’t see the “green”?? How can I better understand the language of color, as when I hear “green” I thing GREEN. I run across this often and did just recently when I was trying to mix gray tones (not with any black) and all the reference I could find online, when I was looking for gray tones, were “grayed” colors.
Thanks for your visual demo’s they are so much more helpful!! Love your enthusiasm the most!
Regards,
Sherrie
Hi Sherrie,
Usually when describing hues (red hue or blue hue) and tones (how light or dark) of colours the words used before it help to visualize the colour the artist is refering to.
For example, if I say think of a bright vivid green. The ‘bright’ and the ‘vivid’ help to setup the hue of the final colour, in this example ‘green’.
If I describe a colour as a ‘dull muted green’
Again, the first couple of descriptive words help to set the scene.
Try to image you’re mixing the colours as you read the descriptions.
For the example ‘dull, muted green’
‘dull’ I first think of either a dull brown, blue or black
‘muted’ makes me think I have added white to the mix and I have now imagined either a dull brown blue or black. ‘green’ I now imaging mixing in a touch of yellow to the dull blue in my minds eye.
Then I have an idea of the hue being described by the artist.
You’ll find the more you mix colours, the more you can start to decode and imagine the colour the artist is talking about.
As an experiment, try covering over the images of a step-by-step tutorial (or have someone else to cover them for you) and then, only using the descriptions the artist/teacher has used to describe the colours they’re using – try to mix the colour.
Then compare what you thought the mix should look like to the actual demonstration.
There will be a few hits and many misses! but you’ll soon be able to fine tune your colour mixing language.
Hope this helps,
Cheers,
Will
Thanks Will,
Your comments really helped me to better understand the language of color when artists speak of color! Your advise was also great. I know experience will aid me in this understanding, as I learn more about mixing my colors.
You are a great teacher!
Sherrie
Hi Sherrie, pleased it helped you to better understand the language of colour.
Speak soon,
Will
Thanks for another amazing lesson, your skill and the ease with which you explain and demonstrate each stage gives so much encouragement to us all to move forward.
Regards
Chris
You’re welcome Chris, great to hear you feel encouraged to tackle a new subject.
Cheers,
Will
Steve, professionally talented as ever. I am looking forward to your lesson that includes orange colour. I have used it directly from a tube and tried mixing with red, but never been quite pleased with the hues.
George.
Cheers George.
Great tutorial Will! I also saw your youtube, Impressionistic tutorial. Really loved that also. :)
Ada
Cheers Ada, pleased you enjoyed the impressionistic tutorial!
Will
Glass, thar elusive nothingness with substance! This lesson will be saved to review many times. Wish this had been available before attempting a wine decanter painting. Awful, mostly just white! Thank you, thank you. Your instructions are clear and concise, providing an “ahah” moment.
Hi Carolyn, thanks very much for your kind comments, so pleased it helped to provide a ‘ahah’ moment with your painting.
Cheers,
Will
Hi Will,
When composing the picture for this tutorial, was the symmetrical background intentional? Just wondering if an asymmetrical background draws attention away from the subject – glass of water. Also noticed that the table shadows to the left of your subject in your painting are played down in comparison to the photo, was this also done to draw the eye to the subject rather than away from it? I haven’t started to paint yet, but plan to and will be in touch. I appreciate all the information you offer. Thanks Lori
Hi Lori, To answer your questions:
When composing the picture for this tutorial, was the symmetrical background intentional?
Initially I was going for an off centre composition, but when I started the drawing I felt I wanted to concentrate more on the glass and make it more of a study.
Also noticed that the table shadows to the left of your subject in your painting are played down in comparison to the photo, was this also done to draw the eye to the subject rather than away from it?
Yes, that’s right, due to the tighter composition crop from the left, we have more mid-tones in the background on the left (rather than the dark) but this allows us a stronger, wider tonal range in the actual subject – concentrating the viewers eye.
Good luck with your painting.
Cheers.
Will
Thanks Will, excellent lesson. You are wonderful!!!
You’re welcome Tamara, kind of you to say so.
Cheers,
Will
It was an excellent class. Thank you very much Will.
You’re welcome Haylen, pleased you’ve found it helpful.
Will
thanks Will.I am a beginner and actually finding hard to mix colours and merging.havent used palatte knife or wet palatte.Pls suggest which is the best way to progress as a beginner.
Hi Prema,
Have a look at this tutorial on painting with a a palette knife
and this tutorial on basic colour mixing. For more in-depth look at colour mixing simple colour mixing course.
Cheers,
Will
Hi Will,
This is the best glass painting demo I have ever come across. Thanks so much. I have set up many still lifes with glass but never succeeded despite lots of research.
Regards,
Terryll
Thanks Terryll,
Kind of you to say so. Really hope it helps you achieve a new level of realism in your glass painting.
Cheers,
Will
Hi, Will,
greetings from Moscow.
There are no words to express the gratitude I feel. There is love in every painting and every photo)))) Thanks for your time and experience.
Irina
Hi Irina, great to hear from you, thanks so much for your kind comment.
Really pleased you’ve found the step-by-step photos helpful. Looking forward to hearing how paintings turn out.
Cheers,
Will
HI Will, thanks for the great website, I wanted to know when your masterclass still life course will be available, and will it include more than one demo painting?
Regards
Michael
Hi Michael, great to hear from you and so pleased you’re enjoying the website.
The still life masterclass should go live tomorrow morning, I’m just adding the finishing touches now! It will include a limited palette study and a more in-depth, complex still life painting.
Cheers,
Will
Thanks Will for the easy instructions to your paintings. I enjoy trying the lessons.
Dianne
You’re welcome Dianne, pleased you find the instructions easy to follow.
Cheers,
Will
Will;
This was great lesson. I would like to learn how to paint lace on a table for a still life.
Thank you for this great lesson.
Connie
You’re welcome Connie, pleased you enjoyed it.
Cheers,
Will
Hi,
In your previous tutorials, you taught us to establish the darkest dark first. And things like painting the background first so that it gives a shape to the focused object… In this painting, why things are not like that? I mean you painted the darkest dark in second layer after warm tone. and then painted the glass before the background. The way you did it, is it mandatory for painting transparent objects? a glass of water along with a bucket of fruit can be complex then….
Hi Swapneil,
I mention the use of white instead of a coloured ground in the article above:
So, it can depend if you have the rare occasion of a very white image you are working from that you want to achieve a luminous effect.
Cheers,
Will
Thanks Will, good timing for a great lesson that I can use now. (Sun flowers in a glass pitcher).
I have to say you are a really good teacher, you make it easy.
Look forward to the next lesson.
Best regards,
Bob
Hey Bob,
Thanks very much, pleased you’ve found the lesson easy to follow. Good luck with your sunflowers (I’m visiting Arles in France this week as it happens for some Van Gogh inspiration!)
Cheers,
Will
HI Will
I really enjoy your relaxed & laid back style of teaching, have been attempting to paint for a couple of years but find I’m still at the beginner stage lacking the confidence in my ability. I admire the way you explain & demonstrate your subject & make it look so easy to understand that it inspires one to actually have a go.
Felicia
Western Australia
Hi Felicia, great to hear from you, and so pleased you’re enjoying the tutorials and feeling inspired to create!
Looking forward to hearing how your paintings turn out.
Cheers,
Will
One just has to love you, Will. I am going to recommend you to my daughter. I wish you many blessings! You are such a generous person, and I can’t express in words how much I appreciate you. Thank you so much!
Thanks very much Alleen, very kind of you to say so, hope your daughter enjoys the site!
Cheers,
Will
Thank you so much !! Tomorrow is my final visual art exam and you have helped me save a lot of time! Thank you so much!
You’re welcome Su-Marie, pleased it helped for your visual art exam, good luck!
Cheers,
Will
Ahhhh, finding my way around finally! Just what I was looking for! Looking forward to experimenting with acrylics and exploring your site more! Thanks, Will for all the wonderful information you share with us.
Eileen
You’re welcome Eileen,
Cheers,
Will
this site is amazing.Will, you give us wonderful information.
Thanks very much Maria, pleased you’re finding the site helpful.
Will
This 3 part series was interesting and useful. Thank you very much.
Great to hear it Anna, really pleased you enjoyed the series.
Cheers,
Will
Hi will After taking your advice as written, I purchased burnt umber , ultramarine blue and titanium white . From these colours I have managed to paint some reasonable portrait sketches and feel i am now ready to add a color or two to my collection. . As I am only interested in portrait palettes I was hoping you may be able to give me some advice on what colors to pick ? . I was thinking of adding yellow ochre and cad red but not too sure ? . I love muted earth tones that can be readily purchased in student grade , and if possible be able to cover all skin tones with a limited palette ,? Any help and advice would be great thanks Daniel .
Hi Dan, have you had a read through this article about a portrait palette?
Yes I have but with so many choices of colors I’m a bit confused . I did look at using the portrait palette you suggested but the light red and English red are not available on Adler rowney system 3 that I use . Thanx
Hi Dan, if you want to stick with the daler rowney, just mix in a touch of warm red (such as a cadmium red) with your burnt sienna, then introduce the yellow ochre and you’re have a great palette to work with.
Cheers,
Will
Thank you will
Hi Will,
You’re simply amazing! You’re a genius. I now feel that painting is more a gift than a skill, how do you get that sense of colours and shades and how do you manage to give life to objects? I’m not a painter but it’s a great pleasure for me to scroll and scramble and try to reproduce pictures I like with no much success I confess and often with passion and a lot of frustration not being able to create and do something personal. Thank you for your dedication and pedagogy and thank you for being such an artist and for trying to instill in us motivation and sense of hope and achievement
Hi Saida,
Thanks for your kind words, and so pleased you’ve enjoying working through the lessons. It can often feel frustrating when you’re first beginning, but if you trust the process the techniques will start to fall into place, don’t count yourself out yet! persevere with your paintings and you can achieve some fabulous results.
Cheers,
Will
Well said, Saida. I agree. As a frustrated beginner I so appreciate Willl’s great demonstrations. I learn so much that I can use when I make my painting efforts.
Keep it up Will…..you are so nice to share your teaching with us!!!
Thanks Sherrie, really kind of you to say so.
Will
Thank you all for your kind and encouraging words, I will remember them while trying.It has always been my conviction that with motivation and perseverance nothing is impossible. Our yoga teacher used to tell us what is difficult takes some time, what is impossible takes a bit more.
i asked this question before, but never saw it addressed. i may have put it in the wrong place. i need to paint chrome arms in acrylic on a 50’s chair on canvas. my ” tries ” are awful ( i tried painting a bike too…..yikes ). the glass of water seems close, but where can i find instruction to paint these 1″ arms and have them look like chrome and not the mess i come up with. i end up really gloppy…..need serious help ! where to look ? really appreciate any direction you can point me……it is a gift. thank you, lu states
Hi Lu,
When painting chrome, if you use a palette of ultramarine blue, burnt umber and white you will be able to paint most of the colours, basically its white, greys and blues, and then whatever colour is reflected in the chrome. The first tutorial in the Acrylic Masterclass course</strong> looks in detail how to paint a silver goblet.
Hope this helps,
Cheers,
Will
thank you…..i’ll give it a try. your tutorials are great ! lu
Really enjoyed your tutorial. It’s the first for me and must say it is very kind of you to share your knowledge with us. l shall definitely be viewing again.
Pleased you enjoyed it Georgina.
Cheers,
Will
Hi Will, thank you so much for this great info – your website is brilliant, full of good tipps! I just tried this glass tutorial (hope it is okay to use your photo as reference) and think it was very helpful. Though I mixed ultramarine and burnt umber instead of using black because I still have in mind “never use black” from former art teachers….. Next time I’ll give it a try and use black, I promise ;)
You’re welcome Anja, hope your painting turned out well, yes black can be a great colour to paint with, very handy for subtle skin tones.
Cheers,
Will
Yes, everything turned out well, meanwhile I somehow …. fell in love with painting water glasses. ;-) Thank you, again!
http://anjaessler.blogspot.de/2015/07/und-jetzt-alle-zusammen-and-now-all.html
Wow Anja, they look really fab, love the variety and range you’ve captured within the constraints of the glass and water reflection, great work!
Cheers,
Will
I just wanna say thank you for making this tutorial, it is really going to help me with a gift I am making for my dad and for future projects. I really love art and have been looking all over for tutorials like these that I can easily understand and follow. Thanks again :)
Pleased you found it helpful.
Cheers,
Will
Hello Will,
Thanks so much for this 3-parter. I’ve been asked to give critiques to an art group. The attendance is usually too large for the time given, resulting in under a minute per submitted piece. It’s pretty much impossible to be truly helpful in such a time allotment. I very much like encouraging the artists and giving them some tips so that they will keep working rather than throwing in the towel in frustration because they don’t know where to go for specific help. So I’m taking your web address to hand out at the critique night. It’ll keep me on schedule and offer real steps they can take to grow their work. Thanks.
Thanks very much Clarissa, very kind of you, really hope the critique sessions goes well.
Cheers,
Will
thanks will for sharing your knowledge with us, i love the tone of your voice, your explanations full of kindness and patience, and above all you’re good looking !
Ha, ha, thanks Anne, pleased you’ve been enjoying the lessons.
Will
Hi Will,
Really liked this class ! Thank you so much for the great tutorial.
I would like to share my painting :
https://anyakomart.wordpress.com/2016/08/20/glass-reflections/
Thank you,
//Anya
Lovely colours in the reflections Anya, and love your loose brushstrokes on the yellow in the background, looks brill.
Cheers,
Will
Hi, Will! Many thanks for another well-designed project. I did a trial study as shown in the picture here (https://photos.app.goo.gl/nSJ0cnuL9ekkKRbp1). It’s done with student acrylic (including ivory black )on paper, and flat bristle brushes (an excuse for the terrible eclipse shapes, but right brushes are coming). Some questions occurred:
• Mars Black: I wonder why you use this black for this study? Is it because it is more opaque? Or more brown? One source describes Mars Black as “dense, opaque and with a warm brown undertone”, and I found contradicting descriptions about Ivory Black with one as ” a brown black”, and another “a blue black”. However, I found the images of both blacks look bluish to me (Mars Black: http://www.dickblick.com/items/00620-2043/; Bone Black: http://www.dickblick.com/items/00620-2103/). Can you please clarify this?
• Thickness of applied paints: I understand that you have emphasized in several lectures the importance of the right thickness of applied paints. I was struggling a lot in this study. It was either too thin and the paint was scumbled out by later applications, such as the darks on both sides, or piled up, such as the whites around the glass. How can I improve it? Are there any exercises devised in particular for practicing it?
• The correct way to load paints: This is another thing that I’m struggling with. I either load brushes with too much paints, then the paints pile up on the support; or too little, causing areas with under-coverage, such as the one around the rim in this study. What are your advices?
Thanks and look forward to hearing from you.
B.Rgds Ping
Looks brilliant Ping! yes just the tweak in ellipse shapes but the tonal range works well. In terms of the black, Mars black was the one I had on my palette at the time, it does have a nice body to it but Ivory or bone black would also work for the study. In terms of paint consistency it comes from practicing building up paintings in layers and learning how the paint feels under the brush. Try to imagine you’re loading your brush by just covering the bottom third of the bristles, that way you’ll have more control of the application rather than the paint building up and moving too far down towards the ferrule of the brush.
Cheers,
Will
I would like to see a demonstration video.
Hi Linda, I haven’t got a demo video of this tutorial but you might enjoy this copper pot painting that looks at reflective surfaces.
Cheers,
Will
I enjoyed the lesson on how you painted the cherry. Thanks for the lesson.
Good one Kelly, so pleased you enjoyed it.
Will
Really interesting tips here. Thanks – exactly what I was looking for :) I was wanting to paint a couple of glass bottles. But they’re light blue glass. So I suppose I should use a blue wash over the whole bottle? But not too opaque so as to still give the impression that it’s see-through?
Hi Natalie, so pleased the article helped. You can glaze over the blue bottle to enhance the colours but you don’t have to paint thinly to give the impression of see-through glass. It’s more of a case of looking at the abstract shapes from within the surface.
Will
I appreciate the sense of positivity and optimism that permeates your writing.
Thanks Ilan, much appreciated.