(I now have a 6+hr Oil Portrait Video Course that covers a distilled grisaille process and full-colour glazing demos for two portraits. You can watch a video intro on this page : Oil Portrait Glazing Course)
How to paint a black & white portrait in Oils
Have you been practising your portrait drawing for years, yet making the jump to oil portrait painting always seems to end in an underwhelming finish?
Or do you walk around portrait galleries in awe with the question, ‘How do they do that?’
Maybe you’re frustrated by your process and don’t know how to change it.
But you don’t want to draw anymore, you want to paint.
So, where do you begin?
A Step-by-Step approach
Materials
Why oil portraits?
They dry slowly, and for portraits time is essential.
Let us start at the beginning.
I’m going to keep things simple.
- 3 easy techniques to learn.
- 3 basic paints to use.
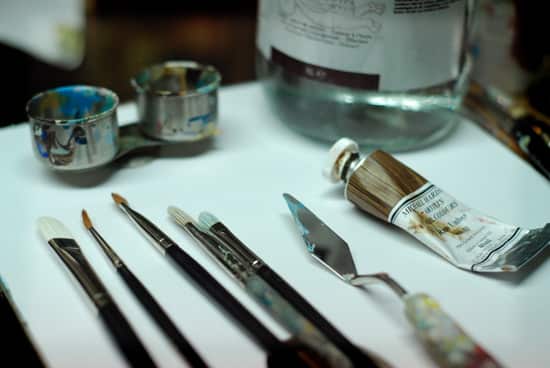
Oil paint – for this series of demonstrations I will be using Artist quality oil paints.
- Raw umber
- Ivory black
- Flake white (or Titanium White)
Oil paints are made by mixing ground pigment (the colour) with a drying oil. Most artist-quality paints are mixed with cold-pressed linseed oil. Whites often are mixed with a different oil, walnut or poppy oil, as they are less yellowing than the linseed oil.
I’m using Artist quality paints which have a higher pigment quality than student grade paints, you can read about the differences (see the 8 key differences between artist & student grade paint)
I am using a mixture of brands, including Michael Harding, Old Holland & Winsor and Newton.
Support – ( what you paint onto)
A 5 or 6-mm thick piece of MDF can be a great starting point. Prepare the surface with acrylic gesso, sanding in-between coats, see here how to apply gesso.
Pro tip: Make sure to give all sides of the MDF board a coat of size, especially the edges which can be very absorbent to moisture.
Many portrait artists prefer to work on linen rather than cotton as you can get a finer weave, but I am using a pre-primed canvas for this demonstration. The actual canvas is a Belle Arti Cotton Canvas.
Brushes – For this demonstration, I’ll be using:
- Rosemary & co Ivory Filbert – size 4, 2 & 10 (sizes 6 & 8 are also very handy to have)
- Rosemary & co Kolinsky Sable series 33 Round – size 3
- Rosemary & co Kolinsky Sable series 66 Filbert – size 8
To learn more about brushes, see a quick way to understand brushes
Coloured ground
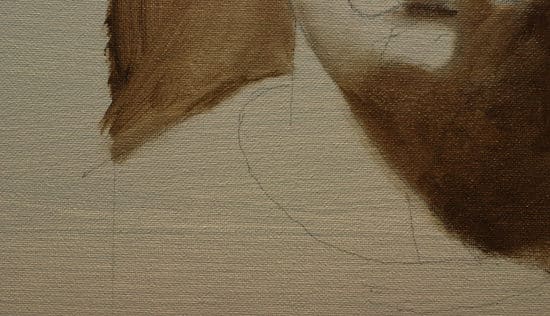
Oil paints increase in transparency with age, even thick opaque colours. To test for yourself, make a few pencil or pen marks on a piece of scrap canvas or board, paint over them opaquely and then take a photograph to see the coverage; check back the next day and then the next week to see if the opacity has changed.
For a tonal study, a coloured ground is a must, it helps you to establish the extremes of the painting, the darkest darks, and the lightest lights. It also makes it easier to judge tones and is much more forgiving than a white canvas.
Pro tip: you can experiment with a pure white ground to create an underlying glow to the skin. The Pre-Raphalite painters were fond of this method. Traditionally, the white ground has been used to illuminate the transparent layers of oil colour.
Acrylic or oil for the ground?
I have used acrylics in this example. It is a mixture of raw umber and titanium white, notice how it has been applied quite thinly, with some of the white gesso showing through. This is for 2 reasons:
- I don’t want to lose the ‘tooth’ of the canvas. The tooth is the grain and texture of the canvas and helps to pull the paint off the brush. If you paint on a smooth prepared board, you will notice the difference with the paint feeling like it is ‘sitting on top’ of the surface.
- You don’t want to create a seal with thick acrylic, you still need the oil to be able to adhere to the surface underneath, so always add water to your acrylic mixture.
You could also use quick-drying oil paints, which are sometimes called Alkyds.
Or establish a tone just with raw umber and turpentine (or odourless mineral spirits) or standard raw umber and quick-drying white.
White pigments dry more slowly than the raw umber, which is an earth colour and dries fairly quickly (which is why I recommend a quick-drying white above).
If you have an underpainting that has too much oil in it, you will be breaking the number 1 rule of oil painting – fat over lean
What is fat over lean?
A new Paleo diet plan?
Fat over lean is the expression painters use to ensure you prevent your oil painting from cracking.
It basically means that each succeeding layer of paint should have more ‘fat-oil’ than the preceding layer.
It’s all to do with how oil paints dry.
- Turpentine or odourless mineral spirit (OMS) dries by evaporation.
- Oil dries by oxidation – it absorbs oxygen
For this first stage, we will be using OMS or Turpentine mixed with the oil paint so it has a ‘lean’ underpainting which will dry quickly.
When we get to the next stages of the portrait painting, we will be mixing linseed oil with our oil paint, and these layers will be more oil-rich, hence ‘fatter’ and will take longer to dry.
Palette layout and tone
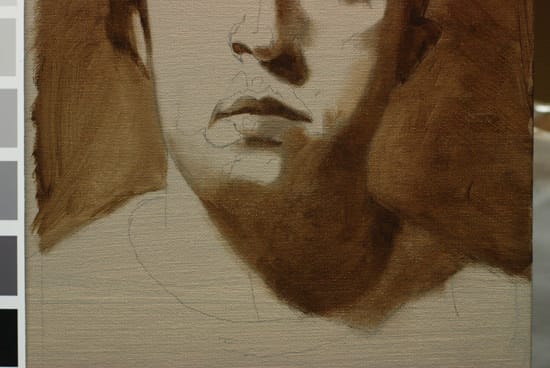
For this first ‘blocking in’ of the painting, we will only be painting with raw umber.
For further paintings and for a darker finish, a mix between raw umber and ivory black will be used, however, a great deal can be learned by just using raw umber and white.
The choice of palette colour can be a deciding factor in your success.
The image below shows the different optical effects that happen to the colours depending on the colour or tone of the palette they are placed on. If you were working on a very dark painting – a black palette would be very useful as beginners have the tendency to never go dark enough when they first start painting.
And when you see the raw umber on the white palette, you can soon see why – the raw umber looks black.

For this painting tutorial, I will be using the mid-tone option. A sheet of perspex (3mm thick) that I have just laid on top of the coloured ground canvas (raw umber & white).
Please note: Even though there is white on my palette, this is to illustrate the differences in using a tonal palette. I don’t use white at all in the first section of the painting.
Pro tip: When painting in the studio, I have a larger sheet of glass that I can adjust the tones underneath depending on the subject matter. The tones could be a sheet of grey paper, a piece of black card or a section of canvas painted to a mid-tone.
Reference photograph
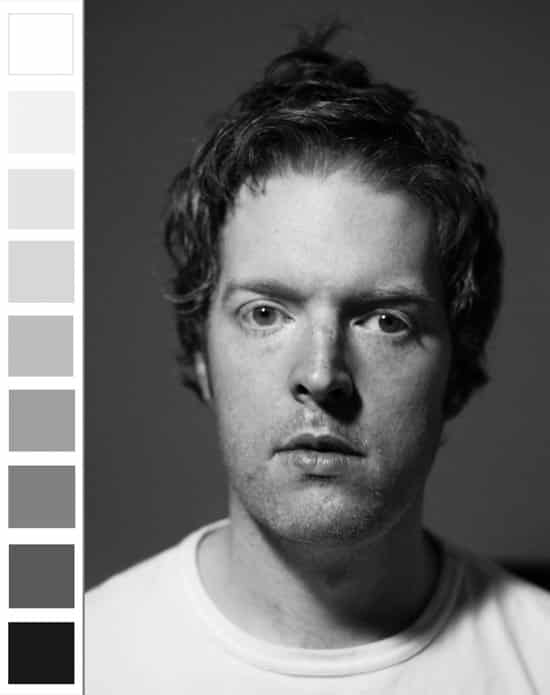
I have chosen a self-portrait, as when you’re first starting, you’re more forgiving of any mistakes on yourself.
The key points to notice are:
- a wide tonal range from the bright white of the t-shirt to the dark black of the hair.
- a single light source so you get a strong cast shadow this can help to create the illusion of depth and interest in your painting.
- a dark background so the lights on the face will stand out
Drawing out portraits
Accurately representing the human face has been an obsession with artists for years, and there is still something amazingly compelling about portraiture.
For this series, I will be concentrating more on the technical approach using Classical Painting techniques rather than using this as a series on a Portrait Drawing course.
Usually, the initial issues stem from a lack of knowledge of drawing.
If you have studied drawing or are aware of the powerful tricks your brain can play with you when trying to record something accurately, then you are at an advantage for the initial drawing-out stage – however, if are more interested in learning the painting techniques, then just take your time and sketch as accurately as you can.

I’ve drawn out the basics of the portrait painting onto the canvas with a 2B pencil and notice how I also draw in the shadow line.
The shadow line is where no direct light hits the subject, so the darkest darks. It should be a simple line drawing.
I gently rubbed over the initial pencil marks with a putty eraser to leave the faintest of lines. The less graphite you have to mix into the paint the better. Some artists prefer to draw in charcoal, or if you are working on a very photorealist finish a permanent marker with a fine tip can be used. Try to find a brown pen rather than black, as it is more forgiving.
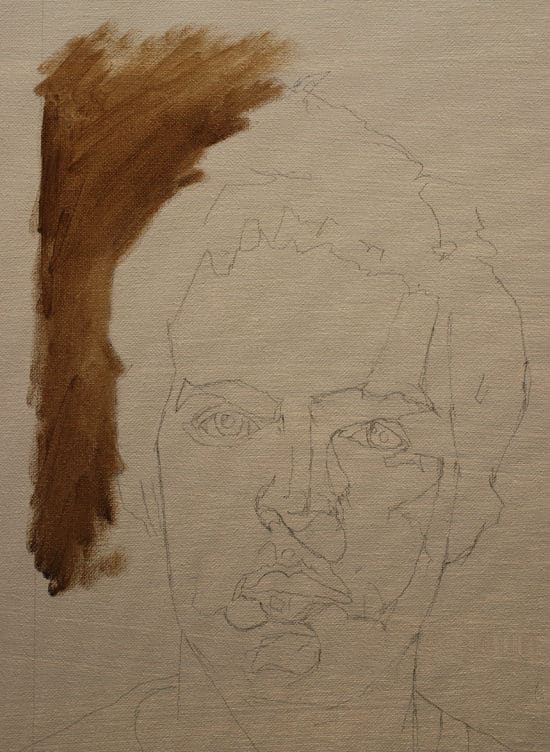
The first mix is raw umber diluted with the odourless mineral spirits – OMS. Pure gum turpentine is traditionally used and ‘cuts’ through the oil easier, but if you are working in a confined space with poor ventilation, then odourless mineral spirits are a great option. ‘Zest-it’ is also nice to use and has a citrus scent.
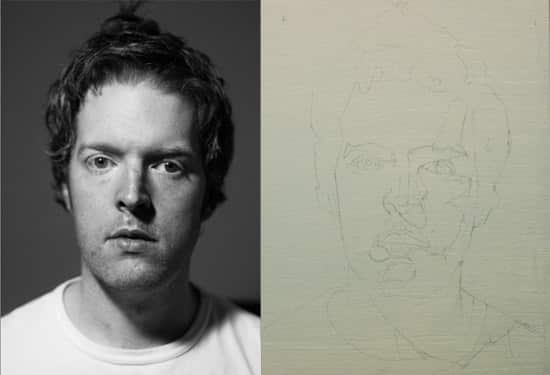
For this example, the reference photo is the same size as the painted image.
This approach and technique are associated with the sight-size method and can be very effective when you are first starting portraiture.
You don’t have to set up a cast or model from life, print out your reference image the same size as your canvas and practice working 1: 1. This way you can quickly and easily judge the tones and shapes in your painting, by flicking your eyes between the two images.
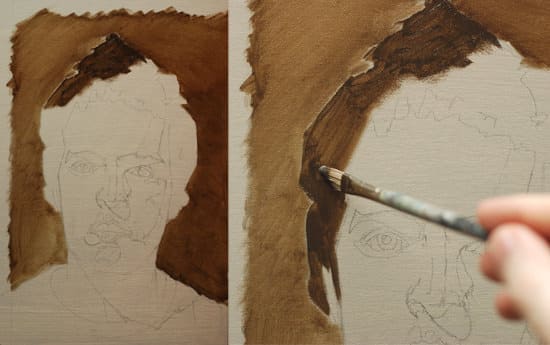
Step 1 – Block in the background
Working between a number 2 and number 4 (Filbert Ivory brush) I begin to block in the background. The paint mixture is thin, yet opaque. I dip my brush into the OMS, when I say dip, I mean 2 mm. Just a really tiny amount. I then squeeze the brush tip in some kitchen roll so the brush is damp but not wet.
I apply the paint with a scrubbing motion, working between the smaller brush for the details, then swapping to the larger brush for the larger areas.
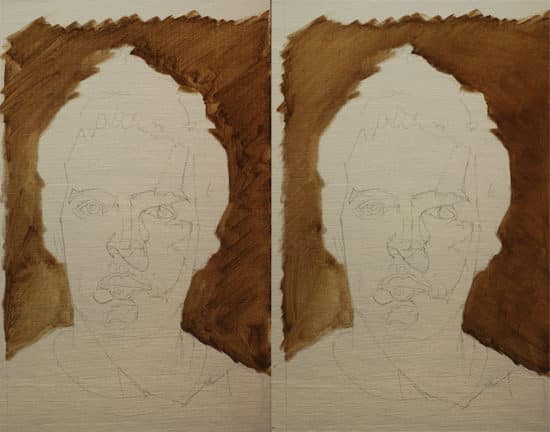
The initial ‘scrub in’ is quite loose, just to get a feel for the tone on the canvas. I then work over it with a larger brush to smooth out the tone. We are trying to keep the tones flat and simple so I work over any thicker areas of paint so the surface is more like a stain, rather than thick paint.
Step 2 – Block in the darkest darks
I now establish the darkest area in the painting, still just using the raw umber. As I know some of these areas are even darker than the raw umber I can feel the confidence to work with slightly thick paint. Again, not using too much of the OMS, it should feel like a dry brush effect and the more you ‘scrub’ the further the paint will go.
Areas, where the tones are very close, are kept as one single mass tone. The tendency will be to want to go in and add all the little subtleties and details you are beginning to see.
Like chocolate on a diet, we have to learn to resist!
Step 3 – Dry brush in the shadow line
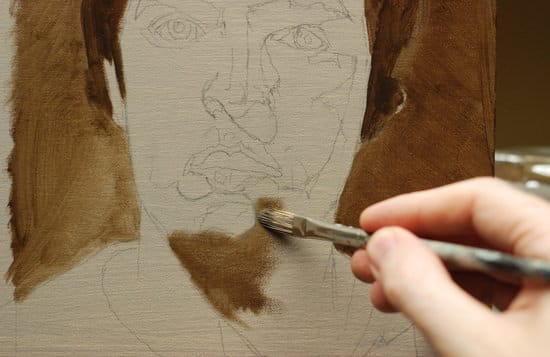
Notice how when I am applying the paint to the inner parts of the portrait I’m keeping the edges very soft. This is key when building up a portrait with this method. Hard, sharp edges are tough to cover over when you are working with thin layers of oil paint so try and keep your edges soft in these early stages.
The tendency now will be to try and grab some white and ‘get painting’ but again this is unwise- remember- start slow, so you can finish quickly.
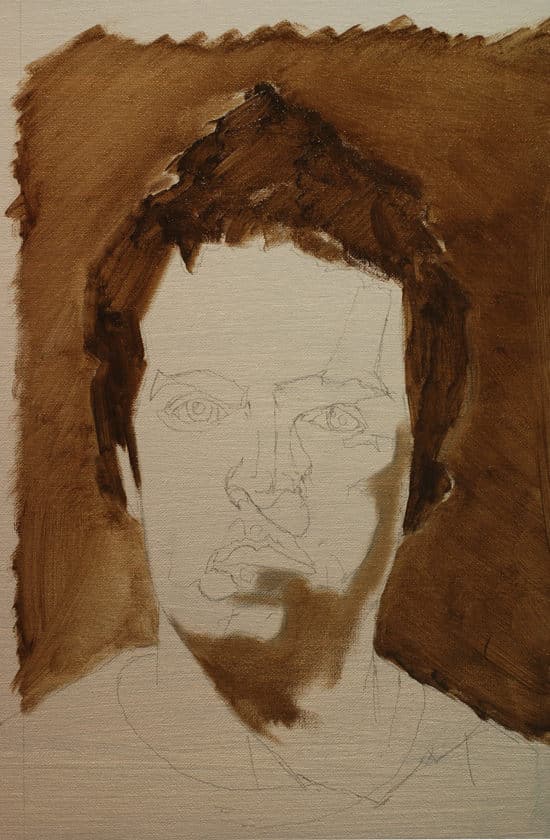
Check the drawing on your painting and check your tones are going along the right lines. You can squint your eyes at the subject which is a very effective method of simplifying tonal values.
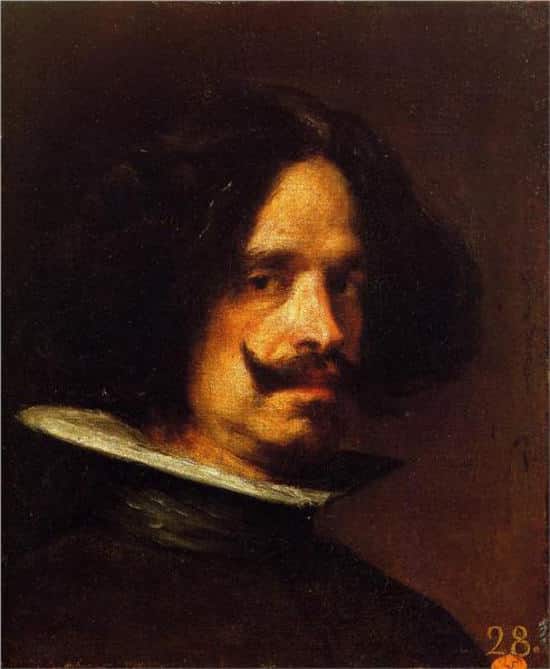
Now have a look at the edges between the background and the edge of the head, notice how the hair and the ear are blurred. The photograph as been taken to mimic how the human eye sees, so soften the edges.
If we look at Velasquez’s self-portrait notice how soft and blurred the edge of the hair next to the face is. They blend into each other so your gaze is focused on his gaze.
Step 4 – Soften the edges
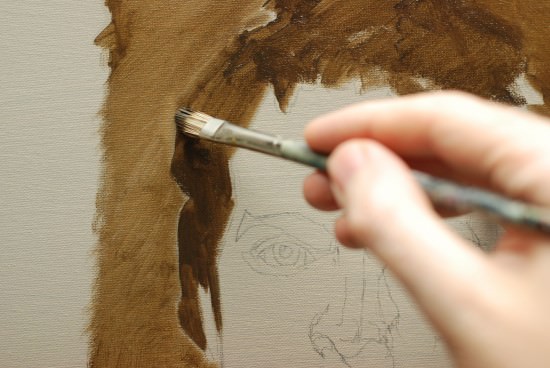
To blend an edge take a dry brush (or a brush with a very little OMS if the paint is beginning to dry and you still need to blend it) and gently brush over the line. I often use sables for this, as the softer hairs enable a smoother blend. The Ivory filberts are slightly softer than a pure hog brush so are still very useful when blending, you just need to use a lighter touch.
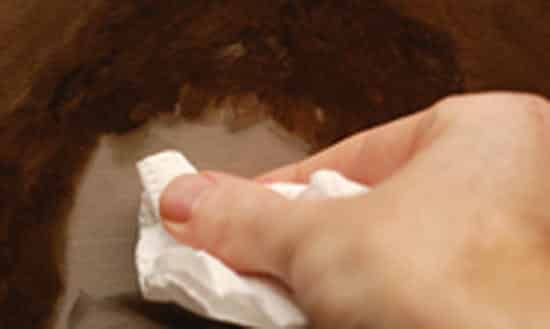
I sometimes also use a piece of kitchen roll (ideally lint-free) or a cotton rag to take the edge off. And sometimes only a finger will do just to get that subtle blend (If you like the effect of using your finger for blending, then make sure you apply barrier cream before you start your painting session. Be aware of washing your hands. I know I sound like your mum, but the lead used in some of the paints can be dangerous if persistently having skin contact.
Step 5 – Add more shadow detail
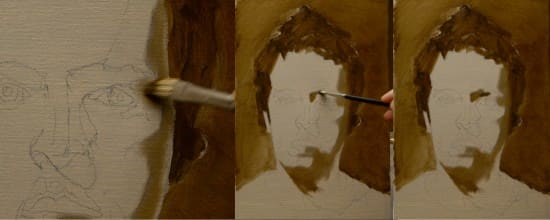
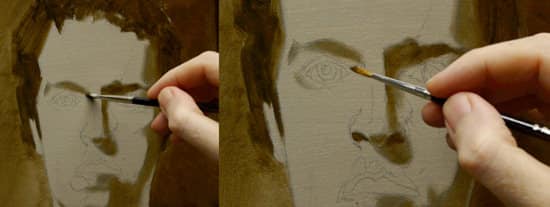
I now put some more of the shadows into the portrait using the smaller round sable, at this stage, I’m concentrating on the areas that would receive no direct light.
It is important to identify what falls into dark shadows and mid-tones; it is not as easy as it sounds. Really study your reference image and say to yourself:
‘If I could only paint in pure black and pure white, what would I choose ?’
Everything that falls into the black category is what we are concerned with at this stage.
So even though some areas on my cheek are dark, I don’t put those in yet because they are halftones and will come as the portrait progresses.
You want to try and keep your darkest shadows one dark tone so when you come to put in the halftones, you will have more scope to model the form.
I’m still keeping a flat tone and a dry brush so the effect is very soft.
Step 6 – Using a smaller brush

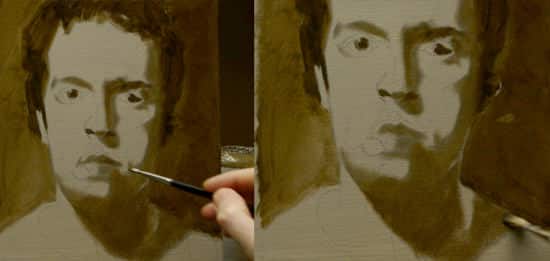
More detail, checking the drawing and adding dark to the eyes, lips and collar bone.
Step 7 – Refining shadows

I now step back from the painting and squint my eyes, I flick my eyes between the reference photo and the painting and adjust any hard edges and drawing.
Step 8 – Checking edges and having a cup of tea


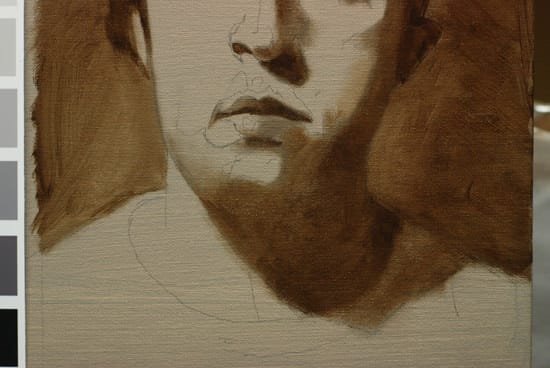
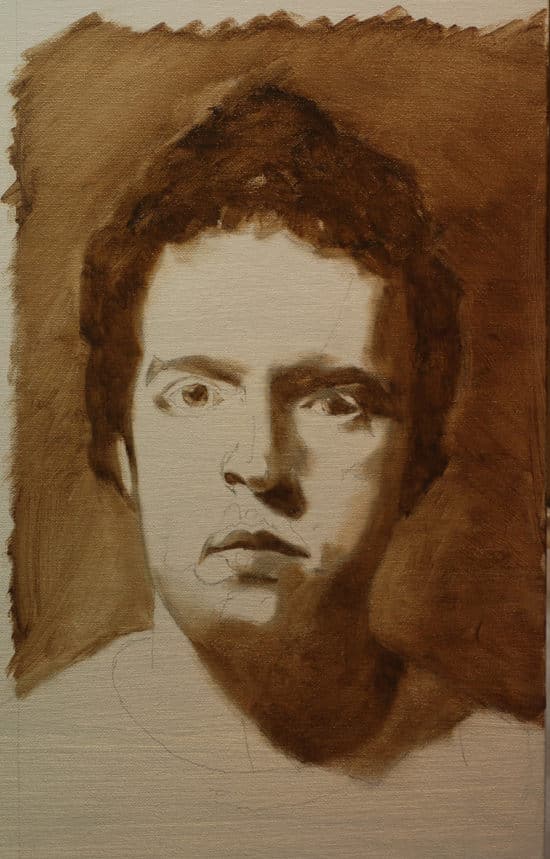
It is really important when painting oil portraits to give your eyes a break, go and have a cup of tea, come back and make your final tweaks and leave this stage to dry overnight.
Brilliant, our first stage is done.
Happy painting!
You might also like:
1. How to Paint a Portrait in Oil – Part 2




Will, what can I say, another great post!
I’m really looking forward to seeing how the painting develops. The source photo is wonderful – a work of art in its own right IMHO, and it will be interesting to compare the photo with the finished painting.
When painting portraits, is it your ambition to replicate the photo as best as you can, or does the process of painting allow you to ‘add something’ to the image? In other words, do you feel like you are somehow in competiton with the perfection of the machine-made process of photography, or do you consider that painting, with its hands-on human touch, has something extra about it which puts it in a different league?
Please forgive the amateur philosophy, but this is something I often ponder when working from photos …
All the best, Dave.
Hi Dave,
You haven’t been reading Walter Benjamin have you?
When painting portraits, is it your ambition to replicate the photo as best as you can, or does the process of painting allow you to ‘add something’ to the image? In other words, do you feel like you are somehow in competition with the perfection of the machine-made process of photography, or do you consider that painting, with its hands-on human touch, has something extra about it which puts it in a different league?
I never feel in competition with the photograph, for me a painting would always ‘win’
If you had 10 photorealist painters and the same image they would all come out differently, you can’t help your expression as a painter developing in the work.
When using a photograph, you’re working with it’s imperfection because all you have is a flat 2D image rather than a fantastic, living, breathing energy of a person.
When I paint a portrait from a photo reference it is a ‘guide’ albeit a good one, to develop a portrait that embodies the character of the sitter.
In a perfect world I would choose to paint from life but due to the amount of hours a sitting takes it is nearly always out of the question, however, I would always meet the sitter and take the reference photographs myself to try and capture what I’d felt when I met them.
Everybody has their own quirks, the way you hold yourself, the unconscious movements – that as an artist, you see.
The painting will always have an extra energy, something of the artist and the ability to hold the viewers gaze much more than the photograph will ever do as Walter Benjamin puts it, the artworks ‘aura.’
Having said all of this, when you are first starting to paint portraits, using reference photographs are a fantastic aid.
They don’t move or talk, the light is always constant, you can change the scale and make them black & white – as dealing with colour and skin tones is a whole new challenge!
Hope this helps,
Will
Will,
Very interesting to hear that even though you are obviously a great photographer you see painting as a superior way of making an image.
Unlike you, I often do feel in awe of photography, but find it too impersonal, since it could be said that the engineers who designed the camera are as much responsible for the quality of the image as the person who points and shoots (pro photographers may disagree!) With painting on the other hand I literally make every mark on the surface, good or bad …
Don’t think i’ve read the Benjamin book, must check it out.
Thanks,
Dave.
Hi Dave,
I love photography portraits, just check out Jane Bown’s work and I don’t necessarily see painting as a superior way of making an image, but when I am personally capturing the character of a sitter through a portrait then yes, for me as a painter, my painting will always express more than my photography can.
You can read Benjamin’s essay‘Art in the Age of Mechanical Reproduction’, it might interest you.
Will
I totally agree, its about finding a medium which works for you and gives you pleasure rather than one medium being inherently better than another.
Oil paint has a special status because of its long and distinguished history, but in the end its always ‘horses for courses’.
Okay, enough deep thinking for one weekend, where’s the easter eggs … ?
Cheers Will,
Dave.
Thanks Dave,
Bring on the eggs!
Will
I agree.. that’s so well said.. ”Everybody has their own quirks, the way you hold yourself, the unconscious movements – that as an artist, you see.
The painting will always have an extra energy, something of the artist and the ability to hold the viewers gaze much more”
Thanks for the great tutorials
Cheers Palak.
Will
Hi Wll
I started a portrait painting with acrylic, became embroiled with the tone changes, lost the weave and panicked! Two attempts later and I was making the same mistakes. Then I saw your portrait tutorials which are the only ones making sense to me. I am now starting a ‘trial’ following your instructions.
When painting on MDF, after sanding, I guess you don’t have a weave as this surface is (presumably) smooth. This confuses me!
I loved your acrylic classes but am still nervous around oils so will look at your web site to see if there is a class to suit.
Thanks Will
Maddie B
Hi Maddie, yes you can still follow along with the method painting onto a board surface, the paint will just come off the brush slightly differently in comparison to a canvas surface.
Will
Hello Will.
Excellent post.
I’m looking forward to start!
Thanks for sharing all your knowledge and for the task you are doing on this blog.
A greeting from Spain.
Hi Mario,
Looking forward to working with you, glad you enjoyed the first post.
Will
Looking forward to part 2!
Great to hear it,
Will
Hello Will,
I am a 12-year-old artist ,and have been reading your post for while now. They have helped me much.
Have a few questions about painting. I heard that the older and more beat up a brush is the softer it is. Does that make them better? If so how do you get them like that ,and what type work best like that?
I also would like to know if Princeton Art & Brush Co. is any good for brushes.
David A.
Hey David,
Great to hear the posts have been helping your painting.
To answer your questions,
I heard that the older and more beat up a brush is the softer it is. Does that make them better?
In my experience, if you’re working with Oils the older and more beat up the brush, the harder and more brittle it becomes. Due to working with the turpentine, it kinda eats away at the brush fibres so makes them shorter and less flexible, so harder to work with if you’re trying to get a smooth blend.
Even if you’re working with Acrylic paints the brushes as they age, still become stiffer due to tiny residues of paint building up over time.
The brush will be softest when you first buy it and the softness is dependant on the hair that is used. E.g: Hog hair from a pig is coarse and rough, sable from a mink tail will be super soft and springy.
This post about understanding brushes might interest you.
I also would like to know if Princeton Art & Brush Co. is any good for brushes.
I personally haven’t used these brushes but having a quick look at their website they look fantastic. The synthetic sable looks a really useful brush to have, are you working in Oils or Acrylics?
Hope this helps,
Will
Hi Will,
Thanks for answering my questions. The understanding brushes post has helped me.
I am painting with Acrylics but am very soon about to buy the Oil colors for painting black and white.
David A.
Hi David,
Glad the post helped,
Will
Hi Will,
in my ‘colour-quest’ (colour bias) I have stumbled across your videos on youtube and hence onto your proper site. What a blessing!!!!!! Many thanks.
I have my base in graphite (photorealism), want to move to colour, and have decided to give acrylics (Lascaux) a try. Am still sitting scared here looking at the still closed bottles but found so much on your site that all I can do is attempt to start. Since my love is the human face, a portrait it will be. I know that your portrait tutorial here is for oil but I think it might be helpful for acrylics as well.
Just wanted to thank you for your inspiration and help.
Cheers, Reinhard
Hi Reinhard,
Just starting is the best thing you can do, you really will learn loads through the process. Even if it is just a nose, or a pair of eyes!
You can apply similar techniques with the acrylics but might need to work on smaller sections at a time if you want that photorealist look.
The jump from graphite to painting can seem like a tough one as often the process can seem a bit back to front. There are some amazing painters that work in acrylics to get a photorealist finish. They often have a very methodical approach. Andrew Tift is a great example for inspiration of what can be achieved photorealist acrylic painter. Here is another post that looks at some of his methods Just take your time, with the same approach, and have a go!
Love to see your results,
Thanks,
Will
Hi Will.
Excellent advice on the brushes Rosemary & Co.
I am using the Ivory Fibet ones. And I love them.
In addition, the treatment of the company was excellent, and they sent brushes super fast.
Thank you very much.
Hey Mario,
Nice to hear from you, great to hear you are enjoying the brushes.
Thanks,
Will
Hi Will
Great Post
I have a question, I have never tried acrylic and I am wondering how do you make this tonal for the raw umber I mean darker umber for hair and lighter umber for the background? is it possible with water, or do you mix raw umber with white acrylic?
Thanks
Greetings from Turkey :)
Hi Rick,
To make the tonal background I mix raw umber with titanium white ( you’ll only need a bit of raw umber as it is quite light) dilute the acrylic mix with water and brush onto the canvas.
You can just use raw umber and water but the colour will be darker and warmer in tone.
As we are looking for a neutral black amd white the raw umber & white makes makes a calmer grey for the underpaintng.
Thanks,
Will
Hi Will:
Thank you SO much for putting all this together:)
I am done with Part #1. Can’t wait until it dries to continue tomorrow!!. This has been a very useful excercise in values which is something I have had a lot of trouble with.
I love painting portraits but struggle a lot with the colors and values. This course is awesome!!!!
Hey Wanda,
Really pleased to hear it.
Let me know how you get on with the rest of the course,
Thanks,
Will
OM to de G that is good
So interesting!!!!
At last, information I can understand
Just lovin your work
Addicted!!! Have already started to paint a portrait following your steps
Can see where I have been going wrong already
Only joined you on Friday ,
Thank you so much
Cheers Jane, really pleased you’re finding the articles helpful.
Will
Hi Will.
Fantastic tutorial. It’s answered so many questions.
Just a quick question though: I am using the oil raw umber for the first stage and it is looking quite different to your image at this stage. I have been using the raw umber straight out of the tube, without mixing it with any medium. I dip my brush in the OMS, squeeze it out on kitchen roll and then get a small out of the raw umber on my brush. Am I missing something here? Will it be “lean” enough?
Thanks again for the great tutorial.
Kieran
Hi Kieran,
Thanks, pleased you’ve found it helpful to your painting.
Yes, that’s right, just dilute the raw umber with the OMS, you can add quite a bit of OMS to the mix, to apply it as thin as watercolour if you want to, I just reccomend squeezing into the kitchen roll so it isn’t too liquid or the mix will run down the canvas.
Often, you’re aiming for the first consistency to be a bit thicker than milk and then the next layer similar to single cream is a good starting point.
Hope this helps,
Cheers,
Will
Thanks Will. That’s a great help. I may have further questions as I go, which I hope you won’t mind answering too ;)
Kieran
Hi Will,
I downloaded your Oil course videos and they are great, it helped me do big steps in my education.
I have a question: I want to slowly start introducing colours to my oil portraits, what do you recommend for a start? which colours to use?
Thanks
Nader
Hi Nader,
Thanks for dropping by, really pleased you’ve found the oil portrait course helpful. For starting to introduce colours it can vary depending on the model/lighting etc but a nice basic palette is Titanium white, Yellow Ochre, Light red, English red, Raw umber, Ivory black. You can read this article about a more extended portrait painting palette.
Cheers,
Will
What an instructive tutorial. I’ve been struggling with portraits for so long feeling frustrated and stuck! Now I feel like starting all over again.
Good one Joan, pleased to hear it,
Will
Hi will I was just wondering if there was a big difference between the cadmium colours, ? Say cad yellow light,? Cad yellow? Or cad red light or a cad red.? Many thanks
Hi Dan, not a great deal of difference, the Cad yellow light is brighter so is a good yellow because by adding a touch of permanent Alizarin crimson you have a colour that is pretty spot on for a cadmium yellow medium, and by being very bright you can always ‘dull’ it down. Equally, if you have a cadmium red medium and add a touch of cadmium yellow light your colour will be very close to a cadmium red light.
Hope this helps,
Will
I was also wondering about the cadmium lights. That was most helpful. Thanks.
Joan
Good one Joan
Thank you will
hi will, yesterday i began the painting woman beside sea, its the first portrait i try, i wish it would be what i want to be….:) tnx for your nice article
Hi Bahareh,
Nice to hear from you, so please you’ve been inspired to paint your first portrait, and really hope the article has helped.
Cheers,
Will
Hi, Will,
thanks for the info. I’m new and started a oil painting of Christ I read about the black & white,checked it out with my phone and it showed it in bw very neat. I’ve never drawn a portrait and I’m amazed of what I’ve done. All free handed. I just hope I can paint it to look perfect. Hope to keep up with your help. Thank you.
Melva
Hi Melva, really pleased the article has helped with your black and white painting.
Cheers,
Will
Hi Will. This is a great website. I am like so many others. I would love to do portraits but, I have only drawn them. I have used watercolors and acrylics. I have a set of oils for a bird painting book I have. When I draw someone, I erase and redraw to try to get the eyes, lips, etc. just right. How can I do this in oils? I mean, do I get the drawing just right and then proceed to the oils? I doesn’t look like you do a lot on the drawing itself. Being a beginner, I would like some advice.
Thank you,
Marcy
Hi Marcy,
You’re right, when I’m painting a portrait, I draw in the basic shapes and underlying form then build the painting from there but still rely on my ability to draw a portrait when I’m adjusting the oil paint further along in the painting.
Some artist’s do draw the portrait in more detail before starting, others do even less than me, it’s what level you feel comfortable with, try a few with the drawing at different levels and see how you get on.
Hope this helps,
Will
Hi Will,
Great tutorial, I will definitely be trying these techniques!
I was wondering how you care for your brushes; how do you clean them and where do you store them? Also, do you use the same brushes for acrylic and oils?
Thanks
Tom
Hi Tom, I clean my brushes using Masters brush cleaner, it also helps to preserve them. I try to use different brushes for oils and acrylics. I store them flat to start with after washing so the water doesn’t gather in the metal ferrule of the brush, then in an old jug, bristle up.
Hope this helps,
Cheers,
Will
Hi Will,
Thanks for the advice. I bought some Masters brush cleaner and it works a treat!
After a decent first stab at your self portrait tutorial I feel like I am ready to try and improve on my first efforts with a friend or relative, and was wondering about the use of oil or acrylic for grounds. Do you have a preference? I know that acrylic dries quicker and tends to be more opaque (if that is desirable), but are there any other considerations to take into account?
Thanks again,
Tom
Good one Tom, pleased the Masters worked well. An acrylic ground can work fine as long as you keep the mix thin enough so the subsequent oil layers can ‘grab’ onto the surface. I switch between the two depending on ground colour (for example I would use a acrylic black if I wanted a dark ground as ivory black in oil painting is a slow drying pigment)
Hope this helps, good luck with your next portrait.
Cheers,
Will
Hi Will,
You probably won’t remember me telling you I had started up an art group here in France where I live and we are all very long in the tooth but keen to learn. Anyway, we are two weeks in and I have watched many, if not all, of your tutorials and have started a portrait of my husband. First ever!! I have put on the raw umber layer and it is drying nicely in a quiet corner. I shall carry on with each stage and perhaps when it is finished – good or bad – you could take a look. I have joined the 21st century and opened a Flckr account to keep track of how I go and will try to figure out how to get the link.
Just one thing though….. hubby has seen me studying your tutorial – which I printed out – and has asked that I make him look as good looking and young in his portrait as you are in yours. Fat chance!!
Thank you for all the hard work you have put into your tutorials here and on YouTube. I am inspired.
Hi Kryssy, Yes I do indeed remember your email and really hope your art group is going well. So pleased to hear you started your first portrait and your husband sounds like a great choice for subjects (think I owe him a bottle of wine!)
Good luck working through the different layers of your portrait, looking forward to seeing how the final painting turns out.
Cheers,
Will
Hello Will Kemp,
I enjoy your free lessons
– but most of all I enjoy your good mood and happiness.
I am going to start a new portrait and as usually I go round and round not able to put the first paint on the canvas. What color to use and so on..
Then I find the artschool of yours and do something like that to start with…
Thanks for the artschool
Best regards
Sonja
Good one Sonja, really hope you enjoy trying a more methodical approach to your portrait painting.
Cheers,
Will
Morning Will!
Thank you so much for sharing your wealth of knowledge and personal perspective about how to paint, draw, mix paints, and so on. I’ve been hiding from my charcoal and paint brushes for years. I’m learning so much more from you than I did when I studied fine arts/studio painting 30 years ago at my university.
Back then, the focus was to paint in the abstract and only in oils. Acrylics were frowned upon (isn’t that strange since most painters then were using acrylics and even house paint!).
I can’t thank you enough for helping me get back to painting and drawing. Watching you paint made me really miss putting brush-to-canvas. Reading about how to paint and draw just isn’t the same as watching an artist work.
Warmest regards from the US to you!
Hi Sharon,
Great to hear from you, and thanks for your kind comments. Fantastic that you’re feeling inspired to get creating at the canvas again, so pleased you’ve been finding the articles and lessons of help.
Have a lovely day Sharon,
Cheers,
Will
I am soooo, so very happy that I came across your wonderful website! I’ve been playing around with oil paints at home without any real knowledge or direction and have been considering throwing in the towel (or oil rag) – but after reading through some of your helpful tutorials I feel the nag to keep pressing on and explore the medium further. Not giving up yet!
Thanks for sharing your knowledge with us all! :)
You’re welcome Dee, pleased you’ve found the lessons helpful.
Cheers,
Will
Hi Will,
Thanks for such comprehensive guide to oil painting. I really appreciate you sharing this knowledge.
After a lifetime of using watercolour and gouache, followed by ten years of working digitally, I was really struggling with oils. I just couldn’t find a way into the medium at all. This is exactly what I needed.
Is the full course in a format that I can save on my computer?
Oh, and the Rosemary and Co. brushes are excellent!
Terry
Hi Terry, pleased you’ve been enjoying the lessons, yes, the full video course is a series of downloadable videos (alongside a 10,000 word pdf guide) Pleased you’re enjoying the brushes!
Cheers,
Will
Hi Will,
The video course is excellent – a really good basis for getting into this deceptively difficult medium.
Just a couple of small small questions – I apologise in advance if the answers are much more complicated than the questions!
Having taken the painting to a finished stage in black and white is it possible to apply coloured glazes on top to create a coloured painting. Or is it wrong to apply coloured glazes on top of white? I’m sure I read this somewhere, but there seem to be so many conflicting opinions, on this subject. Would this involve a completely different process? Obviously, fat over lean is going to come into it.
There are a lot of techniques that I have heard of, but don’t really understand, like scumbling, for example. Would it be possible for you to explain this in a few words?
Thanks
Terry
Hi Terry, pleased you enjoyed the lessons and I’d be pleased to answer your questions:
Is it possible to apply coloured glazes on top to create a coloured painting.
Yes, you could add coloured glazes over the black & white portrait, but the lighter tones would probably be too dark. If you were aiming to create the black & white portrait as an underpainting for colour glazes you’d usually have the lights left a couple of steps lighter in preparation for the colour glazes ontop.
Would this involve a completely different process?
Yes and No, I’d use the same initial start to the portrait but not add as many subtle layers of glazes in the black and white, then go straight into the colour earlier on but then use different techniques, such as scumbling, (applying broken colour with a dry brush) with quite subtle colours. As a note of caution most beginners go in way too bright too soon.
There are a lot of techniques that I have heard of, but don’t really understand, like scumbling
You might find this Glossary of oil painting terms helpful
This technique shown is more for creating a finished black and white study rather than as an underpainting for coloured glazes, as getting your black and white painting right is 90% of the success of the painting.
Hope this helps Terry,
Cheers,
Will
Will,
Your five part black and white oil painting instruction is superb. It teaches!!! Thanks you,. One question: Why do you use raw umber as an undercoat, if the final objective is black and white?
Ron
Hi Ron, working with the raw umber means you can establish the form quickly and it adds some subtle warmth to the shadows, this is a key skill to learn if you then move onto colour portraits as the warm shadows will juxtapose nicely with cooler highlights. Also it is a fast drying oil paint in compared to ivory black and titanium white so you can work over the top of it.
Cheers,
Will
Hi Will, came across you by accident, I am loving your YouTube videos and now your website. I struggle with drawing, any advice for me so I am able to move forward ? Thanx Gerrie
Hi Gerrie, pleased you have been enjoying the YouTube videos and articles, the absolute beginners drawing course is the best foundation to understand how drawing works, and then you can specialise from there, but it depends what you are struggling with in your drawings.
Hope this helps,
Cheers,
Will
Hi Will,
I understand that in “How to Paint a Portrait in Oil – Part 1”, from Step 1 through Step 8, you used raw umber only, no black, no white.
But, at the end of Step 8, some areas are darker than other areas. For example, the hair is darker than the eyebrows.
How did you achieve different darkness with one color and medium, without black or white?
Thanks,
Sam
Hi Sam, its just a case of changing the consistency of the paint. The thicker the paint, the darker it will look in it’s ‘masstone’ when it is painted thinner the ground colours shows through and gives the appearance a lighter look.
Hope this helps,
Cheers,
Will
Hi Will,
I would like to follow your step by step guide to painting monotone portraits. Can you tell me what would be the optimal size of the canvas to use please.
Hi Sandi, when you’re first starting portraits having your reference image the same scale as your painting will make it much easier for judging shapes and tones, so depending on your printer size I would choose a canvas size to suit that.
Hope this helps,
Cheers,
Will
Hi,
Loved reading, looking and learning re portraiture. It certainly is captivating. I love to paint, but can’t particularly draw. Do you think it’s cheating to project a face to paint? I always think I am cheating and would love to draw well. I think above all, I simply enjoy it.
Look forward to any comments.
Hi Jody, I would always advise to learn how to draw first, as it will help so much in your portraits.
Will
Happy New year and thanks for taking the time to reply. I’ll have to keep practicing. Watched a prog on Caravaggio recently and they seemed to criticize his techniques and didn’t mention any freehand drawing. What a fab artist so ahead of his time. I do feel ‘awkward’ when I project an image but it’s the painting and finished result I enjoy.
Kind regards.
J.
Hi Will,
Excellent work. Could you please clarify to me from this post, if you have used Raw Umber “Acrylic” as the foreground, instead of Oils? As your post says so. And do you still use OMS mixture with the Acrylic? What would your general suggestion be, for best results – go with Acrylics underground colors or Oils?
Also – please could you tell me if it is a good idea to simply work with just1 layer of background – say, with a shaded effect of Raw Umber (Oil) with a pinch of Linseed oil? Or would i be wrong in this approach.
Would appreciate your response. Thank you,
Arch.
Hi Arch,
If you have used Raw Umber “Acrylic” as the foreground, instead of Oils? As your post says so.
Yes, that’s right, Acrylic for the coloured background.
And do you still use OMS mixture with the Acrylic?
No, just diluted with water
What would your general suggestion be, for best results – go with Acrylics underground colors or Oils?
With the acrylics you can paint the next layers within a few minutes, with the oils you can achieve the same result you’d just have to wait for the ground colour to dry for longer, usually the next day.
Also – please could you tell me if it is a good idea to simply work with just layer of background – say, with a shaded effect of Raw Umber (Oil) with a pinch of Linseed oil? Or would i be wrong in this approach
You could do that, as long as the next layer has progressively more oil in the medium.
Hope this helps,
Cheers,
Will
And another question.
The best proceudre would be to have the OMS / Linseed oil in a separate container and slightly use them to damp the brush and then touch on the paint?? Or Add the drop of OMS or Linseed Oil to the paint blob of squeezed out paint itself?
Again, you can do either, but its often best to start with the mediums in a separate container so you can learn about the different consistencies when manipulating paint.
Appreciate your responses soo much Will. Thank you. Have a couple of questions though..
So, if I have to devotedly follow your course, so, I would let the foreground colors dry overnight (as the post says).. and the following layers (Step 2 – Step 5), I could go ahead and keep painting.. So, I do not have to wait for any drying time?
I might sound dumb – but please tell me. Why do you dilute the Acrylic with water? Is it to prevent cracks again?? (I am concerned ‘cos most of my earlier works I used Artists Acrylics straight, without diluting. :( )
For Flake White or Titanium White, can I use Linseed oil?? (Or should I not use them in case of White?)
And is a siccative must for mixing with white?
Sorry for keeping you bothered with so many questions. And thanks again for the wisdom shared!! :)
Hi Archana,
To answer your question:
I might sound dumb – but please tell me. Why do you dilute the Acrylic with water? Is it to prevent cracks again?? (I am concerned ‘cos most of my earlier works I used Artists Acrylics straight, without diluting.
Acrylics are diluted with water to thin the consistency, just like mineral spirits and linseed oil are used to dilute oil paints. Your earlier works with acrylics won’t crack.
For Flake White or Titanium White, can I use Linseed oil?? (Or should I not use them in case of White?)
And is a siccative must for mixing with white?
Again, you can use linseed oil, but I wouldn’t advise it as this stage for this technique of painting.
The oil is the slow drying part of oil paint, at this stage I want the paint to dry quicker, so adding linseed oil would extend the drying time.
Hope this helps,
Cheers,
Will
Appreciate your assistance and you taking the time to respond, soo much Will. Thank you once again.
PS: Special thanks for including the tips and tactics, which we might not find in other web sites. Thank you :)
Will, last question. Sorry. So, I am using Flake White. I have only OMS (Turpentine Oil) and Linseed with me. I have not been able to buy the siccative. So, your advise would be to use Flake white just as it is, or mix with OMS?? (As you have advised against using Linseed with white)
Hi Archana, yes that’s right, just OMS.
Cheers,
Will
What is a siccative please? Sorry for my ignorance.
Many thanks.
Hi Jody, a siccative is a drying agent that speeds up the drying time of oil paint.
Will
Thank you very much Will. God bless you.
Hi Will,
Your work and time out with advice is fab-u-lous. Can you advise me if you sell portraiture DVDs? Do you think most people can draw a portrait in time ?
Regards.
Thanks Jody, I have a number of downloadable video lessons on the site, from drawing to portraits, just click on the thumbnail images on the right hand side of the side bar to learn more about each course. And yes, anyone can learn how to draw a portrait.
Cheers,
Will
Hey there Will,
Great work. The end result is just FAB!!! Keep going..
One Quick question – So through out your STEP 1 (all that’s containted in this page) you have used Acrylic, is that right?
and you have switched over to oils from STEP 2?
-Thank you!
Hi RM, for this section that only acrylic part is the coloured ground, the rest is all oil paint.
Cheers,
Will
thank you Will. I appreciate u taking time to reply to each one of us..
You’re welcome.
Cheers,
Will
Hi there Will,interesting stuff.I am working on a portrait now,Need some advice.
I have color charts that were mixed without linseed oil,
I’m using Photoshop to find my palette
The Computer shows a semi dark green shadow on the face because of the atmosphere the woman is standing in.
The color is a perfect match on the chart and when mixed in my saucer with linseed oil,it still seems accurate.
When i apply the shadow green to the canvas,it turns to a dirty mustard yellow.
Why is there a difference from the saucer to the canvas?
Hi Kenneth, the colour will appear different n the canvas due to ‘simultaneous contrast’ this is how different colours can change their appearance depending on what colours they are placed next to. Leave the colour as it is and mix a few more colours around it, then re-assess your first mixture.
Hope this helps,
Cheers,
Will
Hi Will,
This course has been invaluable to me. It gave me a method and a way into using oils. After a lifetime of using water based mediums oil paint has been a revelation for me. I find that I love the medium.
At the moment working in black and white has suited my purpose, but is there any chance that in the future you would take the course a stage further and create a course on using coloured glazes? I know this is a big ask!
Terry
Hi Terry, pleased you’ve found the lessons helpful, I haven’t got any plans for a coloured glazing series at the moment but I’ll add it to the list.
Cheers,
Will
Thanks Will
Thank you, thank you, thank you for this wonderful tutorial!! I made the transition from painting abstracts to more figurative work this year, and your guidance was just what I needed to get on the right track. Just excellent. I’ll be following from now on!
If you’re interested, I’ve been blogging about my experience, and my finished portrait is posted at:
http://rpalesca.blogspot.be/2015/03/portrait-of-isabella.html
Robyn
Hi Robyn, great work on your portrait, so pleased you found the tutorial helpful in making the transition to more figurative work, the burnt sienna underpainting has worked really well and love the vivid colours juxtaposed with the subtlety of the skin tones.
Cheers,
Will
Hello Will,
Such a great web site proving to be very helpful to beginners like me. A great service to Art !!! Keep it going…
I would also like to seek you for an advice. I had done a portrait with oils, about 2 months ago. I had not Varnished it (For reasons – lack of time and lack of material). However, i had let the paining get sun dried for a week, following which, was made to dry inside a room for close to 2 full months. Now, am back after travel and i see, dust accumulated on the surface of the painting when i closely observe. It kind of worries me deeply and wonder what should i do, to remove of those minute dust particle which has found its way, though the painting was preserved in a room. What would you advise me? Please, suggest. I look forward to hearing you response.. Thanks much in advance.
Hi Arch, pleased you’ve been finding the site helpful, the painting will be fine, you can clean the dust from surface by softly brushing over it with a soft brush and then using a moist lint-free cloth.
Hope this helps,
Cheers,
Will
Thanks for the help – it is so easy to understand.
Great to hear it Sylvia,
Cheers,
Will
Hi this is beautifully crafted articlE which I understood well and produced my own black and white painting that im incredibly happy with. My problem is moving on to colour. Every time I try I destroy what is a great underpainting and feel utterly overwhelmed. Please could you add to this a similar tutorial which is as logical and clear that deals with using colour without a massive palette or esoteric language and ill explained processes that so many books and videos seem to use. Thank you for what you have shown us here.
Hi Luke, really pleased you enjoyed the series, you might find the colour portrait course of interest that looks at developing subtle skin tone mixes with acrylics but can be easily adapted to oil painting. I demonstrate with a limited palette and then slowly introduce a more extending palette.
Hope this helps,
Cheers,
Will
Thanks Will I am watching the colour portrait series righ now and it is excellent! I’m learning a lot from it, thank you. I’m hoping to translate what I learn into oil painting. I know everything I’ve learned there will help me, im particularly excited by the Zorn pallete. So many books suggest wierd and wonderful colours that lead me to complete confusion. It is such a relief for me to find clear concise teaching that I can actually exactly follow.
Please consider a follow on from the Acrylic course to help translate this course to oils.
Also possibly a list of of uk suppliers that stock the materials you suggest. Neither of the two big art shops in Manchester have Golden Acrylics.
My main point is that I had got stuck and despondent and almost given up on using colour at all because I was ruining so many good paintings because I was overwhelmed, now i have a clear direction and I’m back on track. Thank you so much.
Luke
Oh good one Luke, pleased you’re enjoying the course. I’ve purchased Golden paints from Fred Aldous in Manchester, they’re on Lever street in the Northern Quarter (they’ve got a sale on Golden paints at the moment)
Just try working through the portraits with a super limited palette, even just a monochrome in burnt umber can teach you loads and build your confidence to slowly introduce more colours into the palette.
Cheers,
Will
Dear Will,
I am dumbfounded at the simplicity, clarity and the beauty of this lesson in oil painting. I wish to thank you for this. I have always enjoyed your tutorials immensely.
I know I am sort of a mixed up painter who gets pulled easily in all the directions and, consequently, gets no where.
I don’t know what exactly is my medium!? I seem to keep getting in and out of these. Whenever I see a nice painting or a sketch, I want to follow it, but soon enough, comes another nice painting that distracts me and I wish to follow that. And that is how it goes on with me. But, it is OK.
Kindest regards!
Chander
Pleased you enjoyed the lesson Chander, just concentrating on one thing in your painting is the best way to progress, working in black and white or monochrome can really help keep the process simple.
Cheers,
Will
Hey Will, I’m a 15 year old GCSE student and I just wanted to tell you how much this has helped me. I had no idea where to start with oils but this guide is brilliant, I have improved so much from when I first tried to paint a portrait a few months ago. Thanks a lot for helping me :)
Great to hear it, so pleased it’s helped with your portrait painting and you’re going to rock that GCSE art!
Cheers,
Will
I felt like your comments was about me, cuz it is exactly how I feel about being tired of making drawing and take oil painting as a new challenge. It’s hard and more complex than I though. But I will not give up=)
Thanks alot for all great advices!
Best,
Pacchiella
Good one Pacchiella, really hope you find the tutorial of help in making the transition to oils.
Cheers,
Will
JUST ABOUT TO EMBARK ON A PORTRAIT FOR OUR YEARLY PORTRAIT
EXHIBITION IN MY HOME TOWN AND YOUR TUTELAGE AS USUAL IS INVALUABLE. THANK YOU SO MUCH.
Good one Lynette, hope your painting goes well for the exhibition.
Cheers,
Will
Good day sir, i really appreciate all your post and this has been a blessing for me and also a great privilege for me to learn, for this i say a very big thank you. Please i want to learn more by receiving mail from you sir thank you sir
Thanks Joshua, pleased you’ve been finding the series helpful.
Cheers,
Will
This is incredibly helpful. Seriously. Thanks!
So pleased you found it helpful Mary, hope your portraits are going well.
Cheers,
Will
Hi Will,
I feel hard to paint shadows. In the edges my merging of shadows with the light shades is not working very well. what should? I do? :(
Hi Marina, try working the shadow tones and the light tones next together without blending at all to start with, and then just use one blending stroke with a dry brush, less can be more when blending oils to keep the tones separate.
Hope this helps,
Cheers,
Will
Thank you very much from the bottom of my heart,am not really a paimter but I love to learn the art,reading your article inspires me more,I hope I can learn more from it and really find it helpful.I will surely do my part from what
Ive read from.a huge thank you Sir.
You’re welcome Bella, really pleased you’ve been enjoying the articles.
Cheers,
Will
Hello Will .
marvelous tutorial here ! thanks a lot for sharing !
Could I please ask you about the tentative value (on a 9 step vale-scale) of the toning of the canvas that you have used here ?
I have seen some artists prefer a very light tone ,just to cover the white .
but some use a midtone- (step 5/6 approx) as their choice of toning .
Thankyou !
Hi Aaron, it’s about a step 4 on the scale I’m using.
Cheers,
Will
Hi,
I’m still in the process of reading this article but just wanted to make a quick comment regarding the opacity comment. I’m not sure as to how true that comment is but to find out, a test will have to be done with something other than a pencil mark to prove its waning opacity. Pencils and charcoal have a tendency to rise through the layers of paints above it through a chemical process. This is why it looks as though the paint is becoming more transparent. In fact, it is the graphite molecules working its way through the actual painting to the top and not our ability to see through the paint. Maybe this test will be better with an archival waterproof pigment liner?
Hi T Kim, you might find this article of interest about the refractive index of linseed oil affecting the transparency of oil paints over time.
Cheers,
Will
Dear Will Kemp,
I am 56 yrs scientist from mumbai India,, doing oil portraits on hobby level.Your demonstration is just excellent,, I have not come across more beautiful, clearer , step by step demonstration lecture than this.Though I was doing some of the things unknowingly now I have better understanding of the same and I am sure it will help me to enhance my work tremendously.
Thanks and regards,,
sarita
Thanks very much Dr.Sarita, so pleased you’ve found the lesson helpful in your portraits.
Cheers,
Will
Very good for me as I am learning oil painting!
Hello, Will! First of all, let me appreciate you for having so much patience in giving replies to all art lovers. I feel it is more tedious than painting a subject. Your article inspires me to paint a portrait but I lost touch in painting since I left it for 30 years from now. Now I am 70 years old and inspired by your above tutorial would like to paint a portrait. I am your subscriber and want to post my portrait for your critiques. Will you please do this favour to me, if so please tell me how and where to send my portrait. Thanking you in advance. God bless you.
Hi Sundaram, lovely to hear from you and so pleased you’re feeling inpspired with your portraiture. I’m afraid I don’t currently offer critiques on students personal projects but am always hapy to see creations from the tutorials.
Cheers,
Will
Dear Will:
I love your website! Am coming back to painting after having been an art “minor” in my twenties. Having a blast.
So: I love portraiture, and am wondering which course would be worthwhile if I work with Water Miscible Oils…SHould I purchase the acrylic tutorial, or the oil one?
Many Thanks, From Sullivan’s Island, SC, US. Mary
Hi Mary, if you’re working with water mixable oils, the oils course will be the closest in working time (open times of the colours) however, the acrylic courses are based on classical oil painting principles so they could also be adapted, but the oils would be closest.
Hope this helps,
Cheers,
Will
Will, can I mix raw umber with an oil gesso to create a color ground?
Hi Rick, yes you can, the hue will be a more muted brown as you haven’t got the glow from the white underneath but it would still work great.
Will
Thanks for answering my question. Just an FYI, I haven’t painted since I left college with a BFA. Now as I’m nearing retirement I have decided to go back to the thing I was best at in school portrait painting. It’s been 40 years since I last painted so over the last year I have been looking for resources to help me reacclimate to painting. I looked at and read over thirty sources most of which contradicted each other. Then I came across you on the web. Your courses are hands down the best I’ve come across and I’m looking forward to the journey. Thank you
Thanks Rick, very kind of you to say so and glad the courses and articles have been helping with your portraits.
Cheers,
Will
Hi Will, I have always loved drawing people but never painted before. I joined an art class when I retired last year, figuring it’s never to late to learn and absolutely loved it but I really want to improve my skills. Your website looks brilliant. I have already drawn a rough sketch of my subject and will be starting on the first stage this week. I can’t imagine I could ever be anywhere near as good as you but I’m going to love trying.
Great to hear it Barb, really hope you find the tutorial helpful in your portrait.
Will
Thanks for the tips!
Cheers Cindy, pleased you’ve found them helpful.
Will
I’ve been painting since I was a child, but am willing to start all over again — the right way. Your technique seems to be the right one for me. I have always had trouble with portraits, but your example has stirred up my imagination and my ambition to do it well. Thank you.
Good one Cayuqui, really hope you find the techniques helpful in developing your portraits.
Cheers,
Will
Will, this is an extremely helpful website. I have picked oil paints (rather painting) after about 28 years. Hands are trembling and not sure if I’ll be able to mix colors properly or not. Your website has infused that confidence back…not sure that will translate back on to the canvas or not :)
Thanks Abul, really pleased you’ve been finding the lessons helpful and feeling confident to get creating.
Cheers,
Will
Awesome. Great technique. Easy to understand.
Thank you for your precious time. I am just three years into oils.
Thanks Bernadine, pleased you’re enjoying your journey back to oils.
Will
I appreciate it. I’ve been looking for a good tutorial.
Thank you!
Hope you enjoy it Liz!
Will
Great tutorial. thank you will
Pleased you enjoyed it!
Will
Hi Will,
Thank you for the detailed yet simple instructions. I’ve been wanting to paint using oil for years, yet I never dared too!
I will start now!
Thanks
Good one Nancy, hope you find it helpful in your portraits.
Cheers,
Will
Now I an just painting for learning the various skills to make great portraits. I find hands hard to set up the hand positions angles and ( number of fingers etc.), blending. Vincent
helpful website!
Glad you’ve been finding it helpful Mohsen.
Will
Hi Will , what should U download from you further my portraiture work , 2 years in from starting by I’m a bit “all over the place “ from taking bits from all sorts of online help !,, can you give me basic structure and process fir me to carry on in the right direction ??,, Greg Chichester – Auckland NZ ,,, bit grumpy ( just list to Ireland ha ha ) !!
Hey Greg, if you start with the black and white method it can teach a lot about building up form and structure of the face and then slowly start to introduce colours.
Cheers,
Will
Hi Will,
I noticed that your canvas has a raw umber colour background even before u started painting, but in my case I have a white coloured canvas so if I was to use titanium white for the light tones it won’t look like yours will it?
Hi Leo, yes you just need to apply a coloured ground of raw umber and white acrylic paint to the surface to start with then you’ll be good to go.
Cheers,
Will
Hi Will,
Firstly, what a fantastic set of guides! Really very useful and I’m enjoying them immensely.
I was wondering if you could use the same techniques (light, shadow etc) that you use in a portrait when deciding to try a full figure or even a landscape painting?
Many thanks,
Alastair
Hi Alastair, pleased you enjoyed the series, yes the same method would work equally well on full figure, landscapes or still lives.
Cheers,
Will
Hi Will,
I have a lot of unopened jars of golden mediums/products, but am focused on oil painting. Could any of those jars be used for sizing,gesso, or grounding my canvases for oil painting? Hate to waste…
Hi Linda, yes, you can use acrylic as a ground for oil painting, just make sure to tighten the canvas after you apply the ground.
Cheers,
Will
Hi Will,
Your Series guide has been fantastic, clear and simple for a beginner like me. Glad that I found this site, after struggling to get some clarity on portrait oil painting. Thanks for sharing this knowledge.
I have started a small portrait using this guide and my reference has white/grey beard and hair So do we need to apply the same raw umber mix as underpainting, and then apply white strokes once dry? Is this approach correct?
Thanks.
Good one Gayathri, so pleased you’ve been finding it helpful, yes that would work, having the raw umber base and then building up the white beard on top of that, good luck with your painting!
Cheers,
Will
This post has been so informative, so thank you so much for that. I love the format and how succinctly you relay so much info.. Like everything I need and nothing I don’t. Anyway, I have I’ve question.. I’ve landed on using either no medium to using only walnut oil when needed. I have young kids around my studio and it just seems like the most straight forward way to paint without fumes. Anyway, I’m not sure if you have any experience painting that way, but I guess what I gleaned is to pay attention to my pigments drying time, and then just maybe hold off on adding any walnut oil until the last couple stages. Would you agree? Or have any other suggestions?
Hi Casey, so pleased you’ve found the article series helpful.
“I guess what I gleaned is to pay attention to my pigments drying time, and then just maybe hold off on adding any walnut oil until the last couple stages. Would you agree”
Yes, if you’re just using walnut oil as a dilutant that would be the best approach. Without cuting the oil to make it leaner you would only be able to vary drying time using leaner pigments or thinner applications.
Will
Can I apply the same general principles with a portrait using acrylics?
Hey Mike, yes you could try a similar approach with acrylics.
Will