
Will Kemp, Fishing Boat at St Michael’s Mount, 10 x 8 inches, Acrylic on Board
Acrylic Step-by-Step Tutorial
Are you looking for an easy acrylic painting tutorial for beginners?
After posting photos from my recent trip to St Michael’s Mount, the most popular request was to create an acrylic step-by-step tutorial of the little blue boat. So here it is, a new free acrylic lesson!
Grab a brew, maybe a biscuit or two (now the weather’s turning a bit more autumnal I’ve got a piece of particularly good ginger cake from the local farmers market) and let’s get painting, I really hope you enjoy it.
(p.s Students have had some fantastic results with this lesson)

Downloading the acrylic step-by-step reference
You can download the photo below as a reference image, print it out, and follow along.
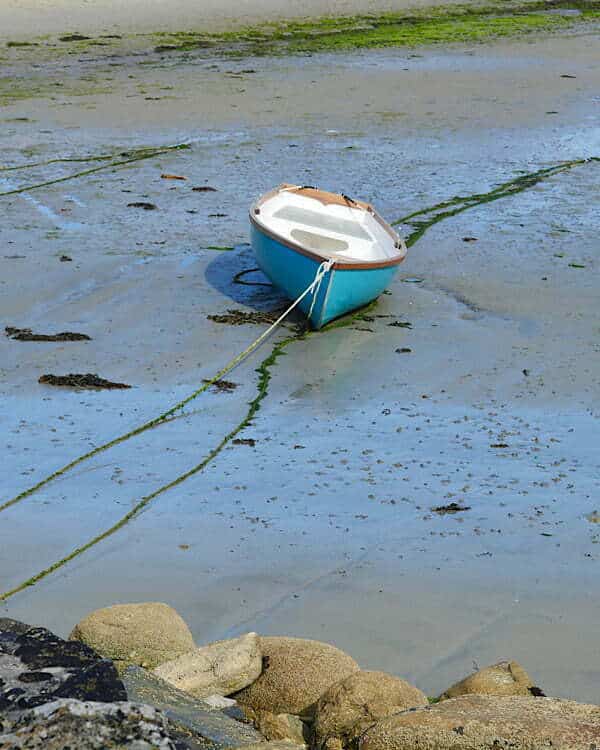
You can download a larger version of the image here.
(The size of the image is 1:1 to the size I painted, 10 x 8 inches)
Acrylic painting tutorial materials:
- 10 x 8 inch (25.4 x 20cm) canvas or board
Acrylic Paints
I use a mix of Golden and Winsor & Newton Acrylic Paints, these were the ones I used for the demo, but they could be interchanged between other brands and still work well.
Heavy Body Paints from Golden
- Titanium White
- Ultramarine Blue
- Yellow Ochre
- Raw Umber
- Burnt Umber
- Green Gold
- Phthalo Blue (Green Shade)
Winsor & Newton Professional Acrylic
- Naphthol Red Light
- Phthalo Blue (Red Shade)
Brushes

Round Synthetic – Rosemary & Co, Series 344. Designer Golden Synthetic, size 4
- Filbert – Isabey Isacryl size 6
- Small Round Synthetic – Rosemary & Co Designer series 344 size 4
- Round Synthetic – Princeton, Aspen 9000R, size 4
Mediums/extra tools

0.8mm Daler Rowney mixed-media paint marker filled with sepia high flow acrylic from Golden Paints.
- F & W Daler Rowney mixed-media paint marker
- Tear-off palette
- Palette Knife
How do you choose a colour palette for your acrylic painting?
Before I begin selecting my paints for any painting, I ask myself, what can I see?
What colour palette is going to be most helpful for this scene? What’s the feel I’m going for and what colours do I like?
Importantly what colours don’t I need? Am I going to paint impasto or in glazes? Do I want an opaque or transparent pigment? And if using oil paints, what’s the drying time of those pigments?
I work my way around the scene, scanning for colours. If you look at our reference photo, you can see a warm muted yellow at the bottom, so I’d ask myself, are there any brighter yellows than this in the subject? Not really, so a Yellow Ochre for this piece would work well.
Now my eye has jumped to the warmth on the front of the boat, I’m going to need a red so I’m going for a Naphthol Red Light (a Cadmium Red would also work fine).
Then I’ve also got cool tones, specifically the blues.
Within the boat, you can see a turquoise blue, so I’ll use Phthalo Blue (Green Shade) for that, in the reflected light, it’s slightly warmer, so I’m selecting Phthalo Blue (Red Shade) and for the warmer shadow under the boat, Ultramarine Blue.
For the dark areas, I can mix Burnt Umber with Ultramarine Blue to create a black.
There’s almost a vivid transparent yellow-green for the green areas so that you could use a bright lemon yellow, but I’m going to use some Green Gold to give that lovely glow.
Step #1. Coloured Ground & Drawing Out

Line drawing using a high flow sepia acrylic within a mixed media pen
How do you paint sand without using yellow?
Our perception of what colour sand is is largely based on memories. Golden and bathed in sunlight, but when you look at the sand in our image, it’s a very muted colour, and that’s even with dappled sunlight over it.
Mixing a muted sand colour will feel greyer than you think it should be, but this will help with our approach to the rest of the colours in the painting. I want something that goes towards a cool hue because I can add warmer glazes in the later stages of the painting so I’ve chosen a mix of Titanium White and a small amount of Raw Umber.
Slightly dilute it with a few drops of water to move more smoothly and is easier to apply. Brush it over the whole canvas using a decorators brush or a flat synthetic brush, making sure it covers the canvas opaquely yet isn’t too thick. I don’t want to make it thick because I still want to be able to draw on top of it. Also, you don’t want to lose too much of the canvas texture.
If it isn’t flowing smoothly, dip the tip of your brush into a bit of water and continue applying, and if you do apply it too heavily, you can use the edge of your palette knife to scrape the paint off.
Okay, now we’re just going to leave that to dry before drawing out.
Drawing the s-curve

Look for the underlying s-curve made by the seaweed and ropes
I’ve drawn out using an acrylic marker.
It’s a mixed-media marker from Daler Rowney, with a really fine 0.8mm tip which makes a lovely line. What I like most is you can choose whatever medium you want to go into the empty marker. I’m using a high flow acrylic from Golden paints in a Sepia, designed originally for airbrushing, it’s already been thinned by the manufacturer.
So the drawing is actually pretty simple.
The main objects are the curve of rocks in the foreground which helps to frame the view and gives us that sense of depth from the boat. Then just a slight indication at the top where the seaweed is coming in, and also the shape of the ropes on the sand so you have this nice diagonal S-curve that sweeps through the composition.
Finally, just some very simple shapes on the boat, putting the cast shadow in and just an indication of shapes on the interior of the boat that will be lighter whiter areas.
Step #2. Burnt umber block-in

Looking at the rock on the bottom left, there’s this warmth to the surface, so having that in first will provide us with another good base. Initially, I wash in with diluted Burnt Umber to give a warm glow underneath. Brush wise; I’m using a small round synthetic brush (size 4 Design Series from Rosemary & Co series, 344)
Then, using a mix of Ultramarine Blue and Burnt Umber I mix a lovely deep, rich, cool black. I paint that very dark tone on top of the warmth, which will help us to judge the value range within the painting. If you notice there is a little dark area around the base of the boat to indicate the shadow cast onto the sand, this will help it feel like it’s set in, grounded and give the impression of some solidity.
Once you’ve made that black mix, take a little bit to one side and add some white and a bit more Burnt Umber to get a nice grey tone. You can use this for the rocks in the foreground a little later on in the painting.
Also, there are a few tiny rocks painted in, I’m always looking for these underlying areas which might break through shapes, and these little rocks are so important to add interest to what might usually feel like a very flat surface.
Step #3. Painting warmth in the sand

Before painting the greys over the rocks, I apply a thin glaze of Yellow Ochre diluted with water.
Paint this over that entire area, just like a stain to add some warmth to the rocks in the foreground first. If you look back at the reference image, you can see underneath that grey rock bottom or left; there’s a lovely yellow warmth.
I’m using a filbert brush from Isabey Isacryl range, size 6 for this section.
Also, I wash in the back of the boat edge and the brim at the top where you’ve got warm wood, a little bit next to the right-hand side of it where the sun’s hitting it, and top left. So it’s now created this underlying pattern of dappled sunlight. If it goes on a bit too strong, you can take a paper towel and pull it back.
I take a tiny bit of the black mix and white for the foreground textured rocks to give us a range of greys and apply them thicker, with broken marks.
Okay, nice, that Yellow Ochre has really added that sunshine feel to the piece!
Step #4. Adding colour to the rocks

Now I’m layering up the colours on the rocks to add more form, using Titanium White, Yellow Ochre and a touch of Burnt Umber to darken the mix; I paint a diluted base over the Yellow Ochre and vary the intensity for the darker shadows within the rocks.
Take a tiny amount of this brown mix and add white to create a warm light for some of the highlights on the very edges of the rock.
I’m using a round brush from Princeton, the Aspen range, 6500R size 4.
These little highlights help bring that a sense of light; again, just on the top of the rock brings it to life.
Step #5. Adding reflections in the sand

For the blue, I’ve mixed Ultramarine Blue with a bit of Phthalo Blue (Red Shade) and Titanium White to create this reflective light in the foreground. I’ve also used Raw Umber so that I can knock back the blue if it becomes a bit too intense.
I’m varying the thickness of the application, depending on how much of the ground, acting as the sand, I want to show through. Here I’ve swapped back to the filbert brush.
I’m just adding a bit more white where I’ve got a sense of light coming in on the right-hand side by the boat.
Leaving elements of the ground colour showing through gives us that illusion of the sand underneath. You can add a bit of the Raw Umber to mute it down for some of the more muted blues; at the very top, with the dry brush, drag it over some of these areas to give this reflection on the sand.
Step #6. Adding our lightest light

Now we’ve got these blues in, it’s going to be handy to paint in the boat, so we can then judge all the hues together to see if we need to adjust anything. Start with pure Titanium White. Paint the very widest area on the boat, and then add a little bit of Raw Umber to darken it slightly for painting in the shadow areas indicating the seat void.
Step #7. Balancing blues

Next step in the tutorial is balancing the blues.
I put out a tiny bit of Phthalo Blue (green shade) and mix it with Titanium White. This pigment has very high tinting strength, so you don’t need very much paint at all. Add a little bit of Raw Umber, so it’s not super intense, and you’ll get a lovely turquoise colour, perfect for the light side of the boat. Once that initial colour has been blocked in, I can lighten it or darken it, to give a bit more form to the hull of the boat.

I use Phthalo Blue (red shade) mixed with white and Burnt Umber for the shadow side, and then a bit of Ultramarine Blue and a tiny touch of Naphthol Red Light for the cast shadow made by the boat.
Step #8. Altering intensities to the painting

It felt like when the boat was painted in, and the more intense pigments were introduced, the reflection of the sky on the sand was competing with the boat a bit too much.
I wanted the boat to be the main centre of focus. So, I glazed down the areas of bright reflections with a mix of Raw Umber, a touch of Ultramarine Blue and a touch of Titanium White.
This knocks it down a bit so that it’s darker tonally.
Step #9. Painting pebbles in the sand

Now it feels like the boat is the main focus, but I’ve lost a little of the darkness around some of the actual initial drawing.
What I’m going to do is re-emphasise parts so that we’ve got a nice contrast.
What I do like is the cast shadow blue, which looks great. And the lightness in the background, where there’s light sneaking around the corner.
We are now adding a few small random dashes to indicate pebbles on the beach. Vary the tone of these slightly, so they don’t all feel the same.
Step #10. Adding warmth to the boat

With a bit of Naphthol Red Light, Yellow Ochre and Titanium White, mix a warm brown orange and paint around the edge of the boat; the addition of these punchy oranges suddenly make the blues look so much bluer.
I also reinforce some of the drawing and some of those darker lines around the boat.
Step #11. Refining the edges

So the last thing to do here is add that very fine rope on the front of the boat, which ties the whole composition together, grounds the scene and adds a bit more definition to it. Also, notice how the boat is more in focus than some of the more painterly marks around it.
Step #11. Adding a Green Gold glow

Then glaze over all the areas of green with the Green Gold, adding that bit of seaweed glow to the painting.
Finishing touches – painting dappled light
Will Kemp, Fishing Boat at St Michael’s Mount, 10 x 8 inches, Acrylic on Board
To break up the background, I brought in reflected light with these dots; I also felt the highlights on the rocks were competing too much, so I blocked them in more solidly to finish.
Really hope you enjoy it!
Cheers,
Will
p.s you can see more acrylic painting tutorials here and this Cornish Seascape Video Course


What a beautiful subject, Will! I really love your painting. Thanks for the instructions!
Thanks so much Lisa, really hope you enjoy it.
Will
This is great! Thank you for the tutorial and colour mixing “recipes”!
Hope they help with your mixes Nancy.
This is wonderful!! I love how you talk through the process and the logic behind each step… thank you!!
My pleasure Mae.
Thank you So much! Your work is so beautiful!! I really appreciate your sharing yourProcess. God has blessed you mightily And in turn you bless us with your gift as an educator.
Will study what you have shared. Please know that your warmth and God given talent come through your work so beautifully. Warmest aloha, Kathy
You’re very kind Kathy, glad you found the explanations of the process helpful.
Will
Very nice !!! following your instructions I’ll try it !! Thank you Will !
Good one Margarita!
Really enjoyable! I have never fancied using acrylics? But this painting of yours together with the detailed guide you give makes me want to have a go?! So good! Thanks again.
Cheers Des.
Will, always look forward to your generous sharing. This is lovely and I would like to try it in watercolor. Thank you.
Yes, it would translate well to watercolour as well.
Thank you so much Will. You’re very kind to make all this available to subscribers. I totally agree with all the above comments. Explaining the logic behind your choices & methodology makes the whole learning process so much easier for me, a complete novice, to grasp. Your emails, videos, all the info on your website are much appreciated.
Hey Yuen, so pleased to hear that you found the explanations helpful.
Will
Hi will, I already attempted the blue boat when you first posted it as I thought it was such a lovely subject. I used oils, tit white, burnt umber, cobalt blue, yellow ochre and a touch of viridian. I was quite pleased with my attempt, but now having seen this post with your instructions I’m going to paint it again, maybe still using oils, maybe acrylics. I’m sure it will be much improved this time!
Good one Brenda, hope you enjoy it the second time round!
So helpful thank you
Thanks Cathy
It is very helpful and fun.
Thanks for the guiding steps !
I enjoy it very much
Thanks Vivian, pleased you enjoyed the steps.
Absolutely beautiful – I’m inspired!
That’s great to hear Joanne
Thank you, Will! I was one of the people who requested a lesson from this photo, and here it is! I always learn so much from your discussions and such a beautiful final result! I will start it today! How is the remodel coming along? . Enjoy your day!
My pleasure, really hope it turns out well Nancy. Remodelling is coming along well.
Will
Another great tutorial. What is interesting is that the light in the painting is more like the brightness you see here in Australia. Must have been a particularly sunny day in Cornwall.
Thanks Stewart, yes, it was some pretty special light that day.
Cheers,
Will
Thank you, Will…for sharing this tutorial. You are amazing! Can’t wait to do this one…it is one of my favorite of your photos.
Thanks so much Ruth, really hope your painting turns out well.
Will
A gorgeous picture! And thank you for explaining it so clearly.
Glad the explanations helped to understand the thought process behind the painting Chirin.
Dear Will, I always come back to your lessons because they are clear and calming in this chaotic time. This lesson, it helped that you differentiated between the phthalo blues used to color the boat. Very insightful, as usual.
Glad the Phthalo Blue section helped Linda, yes, a little tweak in blues can really help to push a colour range.
Will
Thank you! How do you keep your brush strokes so varied and lively?
Hey Matt, If you swap brushes throughout the painting it can help to get used to trying to capture a section within the confines of that particular brush. So try a decorators brush for a detailed part, or a round brush for a block-in. By working within a constraint will force a creative response.
Will
Thanks so much for your tutorials.
The step by step explanations are fantastic.
You are making the most of your beautiful part of the world.
Question: do you paint outdoors much?
Warm wishes, Syl
Hi Syl, glad you enjoyed it, yes, I do paint outdoors for landscapes.
Will
Hi Will,
Thank you for taking time out of your busy schedule to put together this latest tutorial for us. The blue boat painting is just charming and I can’t wait to try it out. I’ve been meaning to send you feedback about your water mixable oil tutorial and now ten months have passed. The course was spot on from beginning to end and I learned a lot. The Vermeer vignette was especially instructive and fun to paint. I don’t know how you do it but all your courses are terrific. Also thank you for your generous free tutorials. Best regards from California!
So pleased you enjoyed it Karen, and glad that the water-mixable oil course was of help. There are quite a few considerations to balance so really pleased that the Vermeer series helped.
Will
Thank you for sharing this beautiful painting and most of all the detailed process notes. I paint mostly in oil and am going to give this a shot.
Good one Allan, would translate well with oils aswell.
Very good of course yet I’m am not interested in what students want to know rather what you the artist want to show!—With all respect go back to your instincts – your basics that brought you to this point of teaching.
Best
Michael
Hey Michael, glad you enjoyed the steps, the teaching method for this tutorial is exactly how I would approach any classical teaching. I had actually taken this image to create a painting as part of my personal practice, but with the response from students thought it would be nice to share the process.
Cheers,
Will
Thank you Will. If anyone makes me want to try acrylics again , its you .. you made that little boat scene come to life .. great work..
That’s lovely to hear Victoria.
I really appreciate you sharing techniques and tuition with us beginners. It’s very generous and so very helpful to see and learn in stages. Thank you so much
My pleasure Carole.
Will
I’ll try this one now that you demonstrated. I noticed the boat right away but felt the scene was “ to much” for my current level. Thanks Will
Hope the steps help Abbey.
Cheers,
Will
WHOO-HOO! Can’t wait to try this out. Can you help me to translate your colors using student-grade acrylics? I can usually find one of the Phthalo Blues. What could I use to replace either the red shade or green shade of Phthalo Blue?
Have a great day and thank you so much for the painting!
Hi Laundrea, you would be able to use the student Phthalo Blue for most of the painting, maybe a little lemon yellow to mix the turquoise.
Cheers,
Will
I’ve enjoyed reading this piece immensely, Will. The meticulous step-by-step and the detailing of your thought process is incredibly helpful to beginners like me. You are such a generous teacher who never fails to inspire: I always come here or re-watch your various courses when I feel stuck. And I always find nuggets of advice and wisdom that help me move forward.
Hope you’re having fun and making good progress with whatever you’re working on at the moment. As always, looking forward to your next post.
Cheers
Jo
That’s so great to hear Jo, really pleased the lessons have been helpful.
Will
Will, you are the Bomb!! Thank you for sharing once again. I have painting along with you in the past and will certainly paint this lovely little boat scene. Salud!!
Hope it turns out well Faye.
Will
Thanks Will! I always enjoy the boat projects the best! Had a bit of trouble with the darker side of the boat, but got it figured out in the end. Thanks again
Good one Jeff, pleased you enjoyed it.
Will
I love this tutorial- am going to try it but need to get a paintbrush. I have the filbert you suggested from a previous course but need the round one and have a question. There are two different brushes listed but appear to be the same size. Is it just a US/UK difference? Also, as I am slowly adding to my supplies- do you suggest the short handled or long handled brush?
Thank you for your wonderful, incredibly helpful and patient teaching style. I love your artwork and you are really an inspirational teacher.
Pleased you enjoyed it Barbara, the two brushes listed (on Rosemary & Co) are the same size brush, just different length handles. For smaller pieces, I tend to use a shorter handle for the smaller detail brush but use a long handle for filberts so I can keep a distance from the easel.
Cheers,
Will
thank you for this wonderful Tutorial…..learned so much about color and subtle touches to make the work come alive.
So pleased your painting went well Delores.
Will
I just did this painting after not doing any art for many months- it was so approachable and satisfying to complete. I needed something to jumpstart my motivation and this was just the thing. I was pleased with the result (with the usual- I should have done this or that thing that happens after you walk away) and am looking forward to another project from you. You’re the best.
That’s fantastic to hear Barbara, so pleased for you.
Will
This was so helpful Will – love the impressionistic quality of your painting. Do you ever do abstract paintings or would you teach a class on doing abstract art in acrylics or oils?
Glad you enjoyed it Donna, I do paint abstracts, good to know a class on abstraction would be of interest.
Cheers,
Will
Hi Will,
Happy thanksgiving to you’all too from the other side of the Atlantic. Very thankful for your teachings and inspiration.
I’ve been following your blog for some time now, and there is one thing in particular about the way you paint that I wish I could do better without exaggeration, because then it would be choppy. It has to do with the looseness of your brush strokes. For example I see the boat, and in one section of the side there are several colors of blue and grey blue that are distinct yet combined. So is it the layering and allowing the paint to dry underneath or a particular brush or something else? Maybe I simply have to stop swiping!?
And while you mention looseness in your lessons regularly, I’m not getting it, although maybe I missed a lesson somewhere along the line, so please direct me accordingly if you already have this teaching somewhere on your website. I’d really like to sink this aspect into my work.
Thanks … Laura
Thanks so much Laura, you might find this lesson helpful on How to Loosen up your Acrylic Paintings – Impressionistic Apples Tutorial It’s a free video tutorial so it might help being able to see how I apply the paint. To create the most free flowing style you would normally draw with the brush, but I’ve shown a pencil drawing layout to get the structure of the shapes down. Hope it helps,
Will
Hi Will, thank you for this tutorial. I hope to give it a go during this holiday. Happy New Year from across the pond.
Jude
Thanks so much Jude, and you, really hope you enjoy it.
Will
You are such a talented artist and gifted teacher!!! Love the way you bring warmth in to the painting, in a cold setting!! Thank you for shearing this … I really enjoyed painting it.
Great to hear Sarani, so pleased you enjoyed the lesson.
Will
Will-
1. You need to get a TV program going with the BBC.
2. There’s no one like you over here in the States. Do this!
V/R
Jane
Ha, ha, you’re very kind Jane, really pleased you enjoyed the lesson.
Will