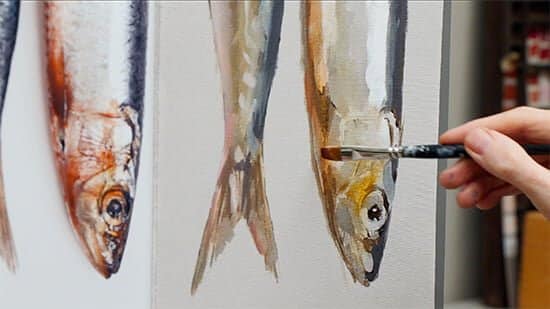
How to glaze with acrylics
The video tutorial looks at how to glaze with acrylics using a monochrome underpainting with coloured acrylic glazes. We’ll keep the piece’s freshness by building up layers of clear transparent glazes, and all we will use are five paints and a couple of brushes to create depth and dimension in your acrylic paintings.
Acrylics are fantastic paints for teaching you glazing techniques because they dry so quickly. This week we’ll be painting a simple study of a fish, taking inspiration from objects you might see every day and transforming them into paint using acrylic glazing techniques.
I’ll be using a stay-wet palette to hold my tonal colour string mixes in, and then any leftover colours from the painting can go back in there, ready for my next piece.
Want to add depth and dimension to your paintings? Try glazing!
Glazing is a technique where you add a transparent layer of paint over an existing layer. It’s a great way to add depth and dimension to your paintings and bring out the colours or form underneath.
To glaze, you’ll need a glazing medium and a brush. Mix the glazing medium with your paint to create a transparent layer. Then, apply the glaze over your base layer, using smooth brushstrokes to spread the paint evenly. You can build up multiple layers of glaze for even more depth and richness.
Remember to let each layer dry completely before applying the next.
You can download the reference image below to work along from, so grab a brew (maybe a couple of biscuits) and let’s get painting!!…
Downloading the reference photograph
The photo below can be ‘right clicked’ and ‘Save image as’, so you can print it out and follow along with the video above.
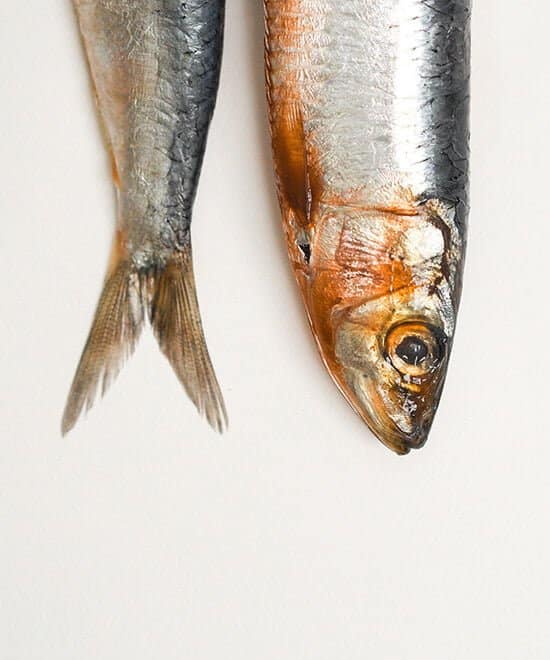
Here is a larger higher resolution version
Materials you will need for Glazing:
Brushes
- Flat ‘Brights’ Golden Synthetic, size #10 (10.1mm x 14.2mm) Series 302 Rosemary & Co
- Small round nylon brush about 5mm diameter (any brand will be fine)
Acrylic Paints
I use a mix of Golden Acrylics and Winsor & Newton Professional Acrylics, previously called Artists’ Acrylics.
For the Coloured Ground
- Raw Umber (Golden Paints)
- Titanium White Acrylic (Golden Paints)
For the Main Painting
- Titanium White (Winsor & Newton or Golden)
- Raw Umber (Golden Paints)
For Glaze with acrylics
- Phthalo Blue – Red Shade (Golden Paints)
- Permanent Alizarin Crimson (Winsor & Newton)
- Raw Sienna (Winsor & Newton)
How to use acrylic glazing medium
- Acrylic Glazing Liquid Gloss (Golden Paints)
This medium is key for glazing techniques. The paint will flow nicely and stay in a stable paint film on the canvas surface when working in thin layers; using water for this method won’t work as well. You can see a video on how to use acrylic glazing liquid here.
Palette Knife
- RGM Classic Line, Medium size 45, Diamond-shaped, cranked (angled) handle. I use an RGM 45 for mixing the paint on the palette.
Canvas
- I demonstrate on a 10 oz cotton duck canvas board 4mm thick about 10 x 12 inches (25.4cm x 30.48cm). It’s had 2 coats of white Acrylic Gesso applied by the manufacturer. (If yours is white also, then it has been pre-prepared with Gesso, and you’re good to go)
Other Materials
- Kitchen roll/paper towel
- Clean water in a little jar; I use a clean jam jar
- Mini jam jar, for putting Acrylic Glazing Liquid in
- Tear-off palette
- Stay-Wet Palette
- 0.7mm Iron Curtain Acrylic marker from Montana
- 3B Faber Castell 9000 pencil
Why do artists use glazes in their paintings?
Using glazes in your acrylics is a method from classical oil painting called ‘in-direct’ painting. You create an monochrome underpainting called a Grisaille. (You can see an in-depth lesson on How to create a Grisaille portrait with Oils)
By starting on the underpainting, you’re just focusing on the value relationships in the painting. Then, once these are established, you can bring in the colours.
The glazing and layering of colours bring a glow that can’t be achieved by just solid applications of paint.
This can be especially handy in portrait painting to add a subtle glow to skin tones. I have an Oil Portrait Glazing Course if you’d like to explore the method in more depth.
What is acrylic glazing?
Acrylic glazes are super thin layers of paint that act like coloured stained glass over your painting. You can use transparent or semi-transparent colours so you can still see the colour underneath but glazes enhance and unify the painting underneath. Glazing works best with warm colours, and artists such as Rembrandt used many layers of glazing to add visual interest and complexity to his portraits.
Step #1 – Preparing the Ground & Drawing Out

I’ve prepared the canvas board by painting a coloured ground over the white surface using a mix of Titanium White and Raw Umber. Start with some Titanium White and then add a little Raw Umber just to tint it, using the palette knife to mix, aiming for a colour that’s a light grey tone.
Add a touch of water to the mix, so it’s got a little bit more fluidity to it, and then paint onto the surface to create an even tone using a flat brush (see: How to paint a coloured ground.

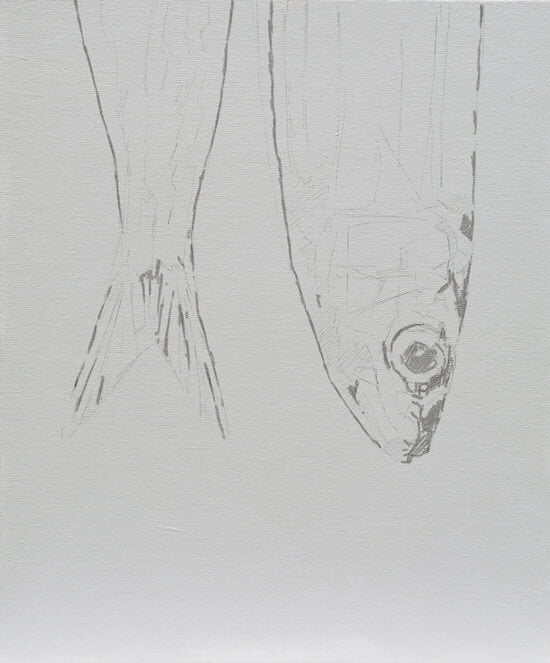
The fish is sketched in, initially with a 3B pencil and then the key dark detailed areas I’ve gone over with an acrylic marker from Montana, 0.7mm in Iron Curtain. The darker lines of the marker help to define the darkest darks to judge the next tones against.
Step #2 – Wash-in with Raw Umber

Here I’m washing in Raw Umber – purposely diluting only with water. This gives the paint more of a transparent watercolour feel, so it is perfect for starting to establish the tones within the fish. Whilst I’m painting, I’m thinking of how I would approach it if I was drawing.
If I could only work in monochrome, where would the light and dark areas be?
By adding more water, or more paint, you can start to vary the consistency and opacity.
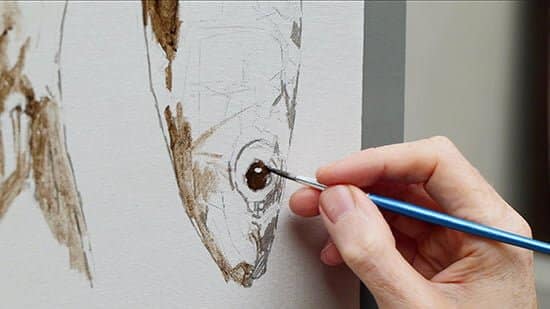
For some of the finer details, I dip the brush into the Acrylic Glazing Liquid Gloss. This helps when you want to increase the flow of the paint yet still keep the body. Having an acrylic medium is crucial when learning how to glaze with acrylics because it keeps the viscosity and paint film of the thin application.
Step #3 – Mixing a Tonal Colour String
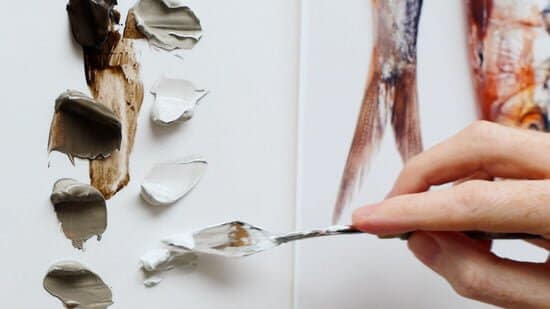
I now introduce a 9-step colour string mixed using Raw Umber and Titanium White. These enable me to judge the tonal value of the fish and work down the value scale.
If you’ve never used colour strings before, you might find this article helpful A beginners guide to colour strings (and how to paint quicker)
I’d previously mixed these value tones and stored them in a stay-wet palette (which means I can then place any leftover paint back in the stay-wet palette, ready for my next painting)
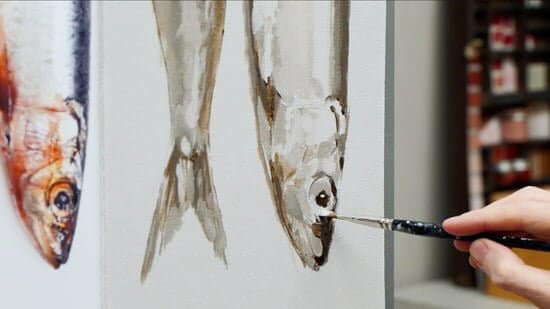
I work down the value string and across the fishtail and head at the same time; the more steps I paint in, the more tuned-in my eyes become to the value shifts.
How to glaze with acrylics – which is the best brush?
Having softer bristles on your brush can really help to create a smooth, even stain like effect with your glazing. I like this Golden synthetic from Rosemary & Co

Flat ‘Bright’ Golden Synthetic, size #10 flat synthetic brush from Rosemary & Co
“Commonly called ‘Nylon’, Golden Synthetic has some unique characteristics in that its retention, snap and spring are all superb. They are 100% Vegan Friendly.
A square shaped head offering precise ‘blocking’ action; good for windows, walls, architecture and when a sharp edge is needed. If you prefer a longer length to your brush – Rosemary & Co”
Step #4 – Adding Cool Hues
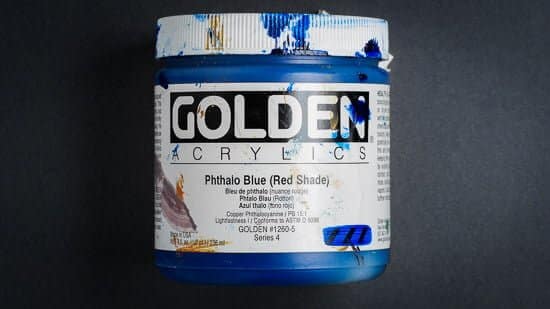
Once the underpainting has been established, I introduce Phthalo Blue (Red Shade) onto the palette.
I mix it with the Raw Umber to produce a muted green/blue – perfect for the fish’s darkest areas. I use the pre-mixed Raw Umber and Titanium White values in the colour string to tweak the colour.
I’ve chosen this blue because it also has a lovely transparent quality to it, which will make it handy in the later stages of the painting for the clear final blue glazes.
However, once I’d painted in my muted green/blue mix onto the dark areas, it looked too green, so I introduce a red to balance this out.
I’m using a Permanent Alizarin Crimson. Again, this pigment has a great transparent quality, which will also work well in the later glazes.
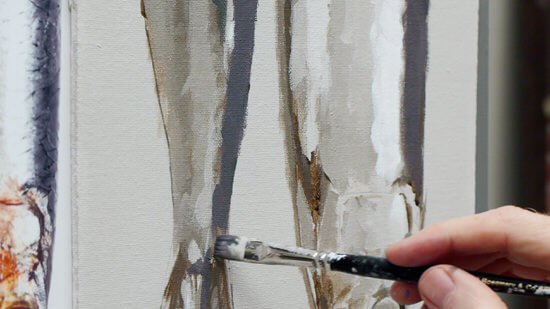
The colour is much more sympathetic once it’s been neutralized by the red.
Step #5 – Adding Warm Hues

Now we can start to add warmth to the fish with the addition of Raw Sienna.
I scan my eyes over the reference image and look to see where there are elements of this yellow glow. I dip the brush tip into the Glazing Liquid Gloss and start to paint thin layers over the surface. Because of the quick-drying nature of the acrylics, I can apply these in the same painting session.
The best paints for glaze with acrylics
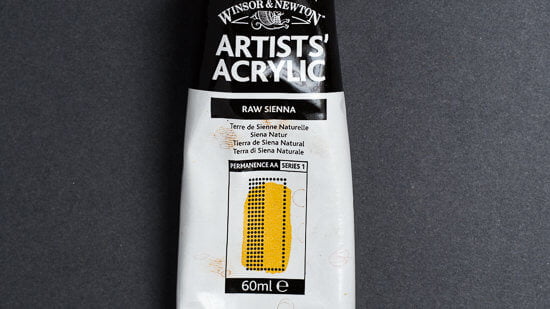
- Pigment type – is it opaque or transparent?
- Brand – which manufacturer has made it?
- Paint quality – is it student-grade or artist-quality paint?
Let’s look at these two reds: Cadmium Red Light and Quinacridone Red.

They’re both artist quality, both from the same manufacturer, but when we look at them side-by-side, we can see their differences in covering power – assessing their opacity vs transparency properties is key for how to glaze with acrylics.
You can see from the swatches on the front of the paint tubes how Cadmium Red Light is more opaque; it’s practically covered over the black marks underneath, in comparison to the Quinacridone Red.
Opaque colours cover other paints easily and are great for making solid, flat areas of colour and covering up any mistakes you’ve made.
Transparent colours are used for glazing and tinting.
This means Quinacridone Red’s qualities make it perfect for layering on top of other colours, similar to a stained glass window effect, whatever lies beneath, shines through.
So a quick glance at the front of your paint tube can be a useful clue for choosing the right pigment for the right job.
Step #6 – Glazing with Acrylics Pink Tones

Using the Permanent Alizarin Crimson, I apply a thin glaze onto the body of the fish. If there are any areas that go too dark, I tweak the value by painting back over the glaze with lighter opaque pigments from the colour string.
Step #7 – Adding an Orange Glow with Glazing
Then, with a final mix between Raw Sienna and Permanent Alizarin Crimson, I boost the orange colours’ intensity. You can get stronger with your mixes as your eye becomes more tuned-in to the balance between the colours.
Now I step back and see how my values are looking and adjust any areas that are grabbing my eye. The fish’s body appeared a little dark, so I painted some thicker white and then worked in whilst it was still wet, a little Phthalo Blue (Red Shade) to tint the colour.
A final mix of very diluted Phthalo Blue (Red Shade) helps to bring the fish’s edges together and gives the surface a glimmer.
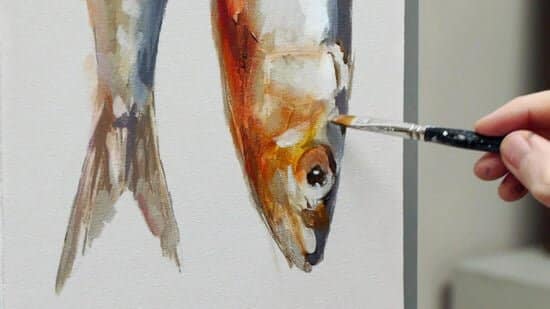
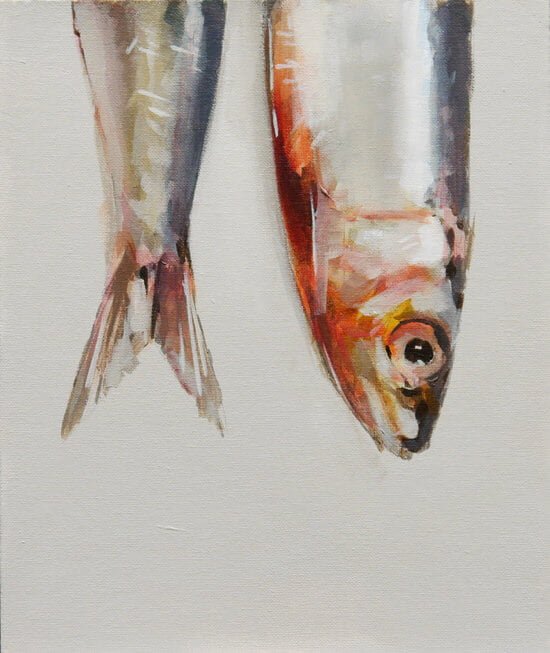
So take your time pre-mixing the value steps and then the actual painting process will be so much more efficient, and remember, you can always paint back over the top of your glazes if they go on too heavy. I really hope this lesson helped to show you how to glaze with acrylics, hope you enjoy it!



Really looking forward to having a stab at this one using your tutorial Will.
So much so that I’ve put off my first experiment using oils (those expensive tubes are going to have to lie dormant for a couple of weeks) after doing half a dozen or so acrylic paintings following the guidance in your courses!
As an aside, I really love painting still life subjects now after years of wondering what the fuss was all about when viewing them in galleries, so thanks for that too.
Good one Simon, really pleased you’ve been enjoying them, hope the glazes go well.
Cheers,
Will
brilliant lesson will thank you for sending it will.
regards Steve
Thanks Steve, hope the painting goes well.
Will
I have just started doing monochrome underpaintings and found this VERY helpful!
I just wanted to say thank you!
So pleased it was timely for you Cindi.
Cheers,
Will
Dear Will,
What a lovely surprise to receive this tutorial. I am a huge fan of yours. I have been painting approx. 3 years, and your tutorials have taught me so much that other classes and teachers have not been able to. I am continually telling other art students how extensive and professionally executed your tutorials are. I also am thrilled that you bring into your lessons a classical approach and apply it to modern subject matter. I believe I have purchased nearly every tutorial that you have created. I just finished the impressionist flower study, and was so pleased that I put in the time. I had to paint the subject 2x, because I struggle with getting the right value. For me, one of the many lessons I’ve learned from you is how an artist takes a subject and interprets it so that it will be paintable. As a beginner, I often put too much detail into my paintings in the beginning, and I am not able to generalize and see the “gestalt” or maybe notan would be a better word for what I’m trying to describe. I sincerely am indebted to your artistic insights , your gift to convey this information, as well as your generosity and willingness to share your love of art. Sincerely, Sandra
Hi Sandra, thanks so much for your lovely message, and so pleased that you’ve been finding the lessons helpful in your painting journey. Yes, the values are really key to the flower study so a good decision to revisit it. And your insight ‘how an artist takes a subject and interprets it so that it will be paintable’ is really spot on. You learn to paint by learning to see so the choices you make for your painting ‘work’ even before you pick up a paintbrush. Hope you enjoy the tutorial.
Cheers,
Will
Thank you for this video Will. I really understand now how to use glazes and colour over a monochromatic underpainting. This is the first clear explanation I have been able to find of the process.
So pleased you found it helpful Linda.
Will
Thank you very much for another super tutorial. Your teaching style is great. Very much looking forward to giving this a go.
I have had a look for the reference image but cannot find it. What’s the best way to download it?
Hi Guy, if you scroll down below the video there is a ‘Downloading the reference photograph’ section where you can ‘right-click’ with your mouse to save from or below that is a link to a high-res version you can download from.
Cheers,
Will
Good lesson with glazing, Will! Two questions: Can gesso be used instead of T. White for toning? It is cheaper. Second question: Would burnt umber be better than raw umber? Thanks,
~Liz (BTW, I love looking at the Italian scenes I painted with you! I love the colors and gondolier!)
Hi Liz, personally I wouldn’t use gesso for the painting because there is a lower amount of titanium pigment in the gesso so it won’t have as much coverage. Due to the cooler grey-green hues of the base of the fish the raw umber is more complementary to the subject.
Cheers,
Will
Morning Sir…
Beautiful… Enjoyed
Will try this technique
Thanks for sharing :)
Hope it goes well Romy.
Cheers,
Will
Hi Will, Yet another really helpful tutorial…thank you. Can I just ask you if you have to wait for each layer to dry completely before applying the next one. I know that acrylics dry quickly but have never used the Golden Glazing Liquid Gloss.
Love your work and generosity of sharing. B.
Hi Barbara, no, you don’t have to wait for the previous glazing layer to dry, working wet-into-wet will give you a smoother transition between different glaze colours.
Cheers,
Will
Thanks Will! What a great surprise. Your classes have provided me with so much valuable information about how to use acrylic paint and how to build a painting using color strings. I’m amazed at how many colors can be created using just a few pigments. I’m at an elementary stage of learning, so your precise step-by-step instructions are much appreciated. You’re a great instructor! Thanks again!
That’s brilliant to hear Peggy, really hope your painting turns out well.
Will
Dear Will,
You have made my day !
This fish painting is outstanding ! Looks real ! I love it!
You have given me an idea how to continue with this large painting I’m doing of the Old Courthouse circa 1900. Now I can see how I could try to render the brickwork with glazes.
You are so generous sharing your incredible skills and knowledge with us. You are much appreciated Will. Thank you.
Is it possible to get DVD’s from that would work on our players here in the USA?
Sincerely
Susan
Really glad you enjoyed it Susan and hope it helps with your painting. The courses are only available as digital downloads, but you can save them to a USB for playback on other devices.
Cheers,
Will
Thank you for that idea ,Will.
I’m not the brightest when it comes to technology so will have to ask someone for a bit of help in this case :)
Regards
Susan
No worries Susan, all you would do is add the USB to your computer and then save the files to that USB drive when downloading.
Cheers,
Will
Thanks for the tutorial, Will.
I have a question about acrylic glazing medium/liquid. I take glazing seriously, so I want to see the actual color I’m applying. I also want to see exactly how the glaze color interacts with the underlying paint color. I need to see this as I apply the glaze, BEFORE the paint has a chance to dry.
Acrylic glazing liquids are WHITE while in suspension (in liquid form) and turn clear only after they DRY. This is maddening. The glazing liquid TINTS my color, and its semi-opaque whiteness OBSCURES the underlying paint surface. These two factors reduce the process of glazing to, “Gee, I hope this works…”
Glazing medium needs to be CLEAR, but every brand I’ve tried has been WHITE and relatively OPAQUE. Can you offer a solution or perhaps some helpful advice?
Thanks
Hi Tom, yes, it can be a bit unnerving to start with using the white glazing medium, have you tried the Winsor & Newton glazing medium? it is a semi-transparent medium and claims ‘Maintains no colour shift from wet to dry when used with Artists’ Acrylic.’ It’s slightly thinner in consistency than the Golden medium I demo with, but if you’re working on very subtle glazes might be just the ticket.
Will
Thank you, Will. I know Winsor & Newton makes the claim that their colors do not shift (darken) as they dry. If W&N had found a way to keep the acrylic polymer in their PAINTS nearly clear while in suspension, I was hopeful they would implement the same polymer in their Glazing Liquid. But when last I checked, that was not the case. I’m encouraged by your comments, though. Perhaps they’ve made a change since then. I appreciate your advice and will inquire of W&N again.
My pleasure Tom.
Will
Another fabulous, inspiring lesson! Thanks so much.
My pleasure Beverly.
Will
Thank you, Will for this tutorial! I would myself stop short of doing such a painting. Now I must go try it!
Good one Anatoly, hope it goes well.
Will
Thanks for sharing your tips on still life painting..
Promila
Hope it helps with your paintings Promila.
Will
This is a very well-done and helpful tutorial, Will! Thank you!
Glad you enjoyed it Martha.
Cheers,
Will
Hello Will, what a great tutorial , I love your work and am getting a real love for still life.
I usually attempt to copy other peoples work, but with your tutorial’s I hope to learn to paint some of my own work. I think you are an exceptional and inspiring tutor.
thank you for sharing your talent so freely.
Teresa
Thank you very much Teresa, that’s very kind of you to say so. Hope you can incorporate the techniques into your own subjects.
Cheers,
Will
OK Will! :)
66 paintings ago you introduced me to painting – if that acrylic cherry had failed I probably would have finished there.
You then moved me into oils, and I now take commissions for portraits (don’t ask)
I think I’ve done most of your courses which, besides being enjoyable, have paid off.
Now you give us this little teaser, and like the fish, I’m hooked. I had a commission to draw six fish in pen and ink, and I think I will take a set of the prints and see if I can ‘colour & glaze’ them.
Cheers Will
PS I note a few grey hairs there :)
So pleased the portraits are going well John! hope the glazing work well for your commission.
Cheers,
Will
Thank you for another great lesson. I look forward to giving the fish a go. BTW, really enjoy your instagram messages. Keep them coming!
Many thanks,
Monica
Thanks Monica, pleased you’ve been enjoying them. Good luck with the painting.
Will
Another fabulous tutorial Will. I am fascinated by the way you develop the tonal values with one pigment. I am also intrigued by the layout of the fish with it cut in half vertically. Well done sir.
Glad you liked it Jay, yes, it’s amazing how far you can often go using one tone in a painting, hope you enjoy experimenting with the technique.
Will
Your tutorials are very helpful to me and it helps me in my paintings.
Your instructions are easy to follow, will apply your glazing method in my painting I am working on. It is a close up view of Stargazer Lily.
Olga
Really hope it helps Olga, a nice Quinacridone red within a stargazer petal can work wonders!
Cheers,
Will
Thank you for taking your time to point out the choice of color to use on those petals.
Hope to see some of your demo on how to paint close-up flowers on 24″x30″ canvas
and to be able to keep the acrylic from drying to fast.
Love your tutorials.
Olga
Really pleased you enjoyed the floral lesson Olga!
Will
Nicely done. I really enjoy watching your tutorials. I am mostly a watercolor artist and teacher, but I am still in the love-hate relationship with acrylic. Slowly getting to the love.
Thanks Sally, so pleased you enjoyed it, with your watercolour skills your glazing would be epic!
Cheers,
Will
Brilliant as always Will. Thank you very much
My pleasure Barbara.
Will
Love your generosity, the way you teach and the way you paint. I guess we will have to work quickly before that download starts to smell! Really? A fish, Will? What about a nice bunny? Just teasing you a bit! Thank you as always for your kindness.
Cheers Valerie!
Thanks Will. This was great fun to watch. The amount of conflicting instruction out there about how to ratio glaze to paint has overwhelmed me so I don’t even bother anymore. I’ll give it another shot with the next painting and experiment like cray.
Glad you enjoyed it Gary, have fun experimenting with glazes!
Cheers,
Will
Beautiful work, Will. I don’t usually like acrylic but your video shows you can make it look lustrous and subtle. Thanks for a very helpful video.
My pleasure Jenny.
Will
HI Will,
Thank you for the acrylic demo of the fish, and the use of transparent glaze and grades of tone in colours. Very informative.
Best regards,
Terry
Moncton,
New Brunswick, Canada
Cheers Terry, hope you’re well, really glad you enjoyed it.
Will
Will, this looks fantastic. I am very excited to try it out as soon as I buy the glazing medium. I had never painted before finding your art classes a few years ago. I purchased the beginning acrylics course and have almost finished it ( I work very slowly and sporadically). I have learned so much and find such joy in art. Thank you for such excellent teaching materials.
Thanks very much Astyn, really hope you’re finding the beginner’s course helpful. Enjoy experimenting with the glazes!
Cheers,
Will
Hi Will,
Just found your website, many thanks for sharing this excellent tutorial, a great help for an absolute beginner like me! I watched your apple video too and was initially really surprised at the yellow base colours you used, it was fascinating to see how it all come together. If I was to paint a still life of a pint of Guinness with a dark moody background what colours would you advise? Should I use a glaze too?
Many thanks
Debbie
Glad you enjoyed it Debbie. An excellent choice of subject matter! I’d go for a Burnt Umber and a little white as a ground colour. You can then paint darker tones on top but still have that warmth underneath. You wouldn’t need to glaze, but if you wanted to add a little glow you could apply a little Burnt Umber and Burnt Sienna mix.
Hope this helps,
Cheers,
Will
Hi Will!
I wanted to say hello and to thank you for all the wonderful lessons and step-by-step tutorials with such great detail. I really appreciate that you go at a nice easy pace and explain everything thoroughly so that the info sinks in and it gives us time to experiment and follow along. I’ve been painting on and off for many years but your lessons always have something new for me to learn. Great job and keep it coming!
Best,
Amy
Hi Amy,
Lovely to hear from you thanks for your kind words on the tutorials, glad the pacing has been suiting your learning style.
Cheers,
Will
it really awesome
Cheers Bruno
Will
Many thanks for the video WILL. I shall enjoy having a go.
My pleasure Bernie, hope you enjoy it.
Will
Hi Will Thank you for your excellent tutorials. I have not had much formal art instruction so really appreciate the methodical processes you take us through. I have tried the black and white portrait with tonal under painting and more recently the acrylic still life study with the glazing I was pleasantly surprised by the results Thank you
That’s great to hear Megan, so pleased you’ve been enjoying the lessons and getting some great results!
Will
Hi Will. I wonder, if I would like to prepare for a potential gallery exhibit, what depth should my canvasses be (1.5”…2”?) and how many paintings should I consider to exhibit and also to have ready to exhibit? Just wondering what a standard practice might be.
Hi Leslie, it’s often a mix of your own personal taste and style of the piece and any specific recommendations the gallery/space might have. If you contact a few local exhibition spaces they would be able to advise on what they would prefer. Usually, I’ve found simple frames work well and I’d tend to use a ‘floater frame’ for shallower canvases but some of the deeper canvases can work well unframed in the right space.
Cheers,
Will
Thank you. Will do.
Hi Will! I really enjoy your very informative tutorials. I followed this video step by step and I must admit, I did pretty well! Thanks to you.
Fantastic to hear Elizabeth, so pleased your fishes went well!
Will
Hi Will,
Thank you for this tutorial about using glazes, I have learnt how use the effectively. I have now got my husband interested in painting with water colour and acrylics!
I am hoping that I will be able to sign up for the painting the Venice scene and recent flower one. I have a question for you about adding detail to the fish, is it up to the artist to decide or should I just leave it as an impressionist style?
Thanks Denise
That’s great to hear Denise, really pleased you’ve been able to use the techniques in your work. Yes, it’s up to the artist on the finishes level of detail you prefer.
Cheers,
Will
Hi Will, thanks for all your work in acrylics, a real inspiration. You seem to restrict the amount of paint you load onto the filbert brush, normally keeping paint half way up to the ferrule, is this something you would advise when using acrylics?
Steve
My pleasure Steve, glad you’ve been finding it of interest. Yes, I would advise that when painting with acrylics and oils as you’ll find you’ll have much more control of the paint application.
Cheers,
Will
Hi Will!
I am thrilled about your latest tutorial and can’t wait to start painting the fish still life!
It looks a ‘next level project’, compared with my first tutorial for beginners, so I am looking forward to learn the underpainting technique, using glazing for the first time.
I live in Australia and art supplies are quiet pricy, so I am trying to buy the glazing medium and a couple of brushes online.
So far I am just confused with the variety of mediums available, and I can’t find precisely one called ‘glazing’, but I’ve found others called ‘gel mediums’ that can be used for glazing as well as final varnish.
Are those ok?
I am also confused about brushes for acrylic. I want to buy something not too pricy, but not too cheap either, so I was wondering if the synthetic can do a good job, or if I should get the stiff synthetic. I can’t find any mixed synthetic-natural.
Thanks in advance for your advice!
Cheers,
Linda
Hi Linda, yes, you could also use a medium, look for one that’s called ‘gloss medium’ that is fluid, that will be the closest. Yes, synthetics or a synthetic mix are really well suited to acrylics, I use them on most of my paintings. I tend to use Isabey Isacryl or brushes from Rosemary & Co in the UK (they ship worldwide) who have an excellent reputation for quality/cost as the brushes come directly from the manufacturer.
Hope this helps,
Cheers,
Will
What a great tutorial, thanks for sharing this Will.. you have inspired me to get back to painting. ;)
That’s fantastic to hear Steve, so pleased you enjoyed it.
Will
Hey Will!
Thanks a bunch for sharing your knowledge and your awesome tutorials. I learned so much from your videos and this website – I can’t thank you enough! But before I spend more money and make a wrong purchase, could you please look over my list and tell me if this makes sense?
1. I bought “Liquitex Heavy Body acrylic paint” and want to glaze my painting like shown in this tutorial, but in a larger scale. (The whole painting needs a rainy, moody, blue glaze.) My art supplier only has the “Gloss medium & varnish” from Liquitex. Does it the same as the “Glazing medium” or should I buy the “Acrylic Glazing Liquid (Gloss)” from Golden? Are the Liquitex paints and Golden products (like medium & varnish) compatible?
2. I would buy “Gloss medium & varnish” for the isolation coat and then finish with a removable “Soluvar gloss varnish”. Should I use a fluid or spray varnish? (I only use thick paper (600g) for my paintings.)
Cheers,
Fabienne
Hi Fabienne, yes you can intermix the paint brands. The Gloss medium from Liquitex will work fine for glazing. The spray varnish will work nicely on paper to prevent the paper becoming over saturated.
Cheers,
Will
Thanks Will, this helps a lot!
Pleased you enjoyed it Fabienne.
Will
Great tutorial thank you. Going to give it a try. Since my maidenname is fish in Italian it is fitting that it be my first try.
Thank you again you are inspiring!
Really hope it turns out well Carolyn.
Cheers,
Will
Hi Will, I’m wondering, if I created a painting like this with Golden Opens, using Open Acrylic Gloss Medium to create the glazes, would I have to wait for each layer to dry before I could continue to paint over top? I noticed in your demo that you were able to continue painting over top of everything without needing to wait for it to dry. I read your article about Golden heavy body vs Open acrylics and I’m leaning towards using the Opens, but I’m confused about whether this means that each and every layer must dry before I can continue to paint over top. I’m just starting out in acrylics after painting in watercolour for 4 years, and I’m feeling a bit confused by the range of products out there. Thanks for your advice!
Hi Kim,
Nice to hear from you, and pleased you’ve been enjoying the lessons. It would depends on the area of the painting you’re glazing, but yes, you can glaze with the OPEN acrylics and blend them together in one layer. For building up the next layer, if the OPEN is drying off and tacky it can have the tendency to pull the colour underneath so ideally would be dry before the next layer goes on top.
Hope this helps,
Cheers,
Will
Hola Will,
I paint in watercolours and oils and have done several of your videos in oils. My favourite was the coffee cup. Can I attempt this fish in oils? If so what glazing médium should I use?
Saludos, Joanna
Hi Joanna, pleased you’ve been enjoying the oil lessons. Yes, you could use oils and use any glazing medium you prefer. A premixed glazing medium or a liquin if you wanted the layers to dry slightly quicker.
Cheers,
Will
Thank you, it was challenging and fun <3
My pleasure Kenda, so pleased you enjoyed it.
Will
I did it!! What a great exercise. The tonal colour string is definitely a plus for me. I am so happy and confident with this new (colour string) tool under my belt that I have jumped onto my next project right away, which I am already half way through now with great results so far.
Thanks a million Will!
Virtual high five Rachel! so glad it inspired you on with your new project.
Cheers,
Will
Hi Will, as a beginner who’s just starting out with acrylic paintings, do you think I should learn painting with this technique (the greyscale painting) first to better understand the values, and would it make painting easier later on when using colors directly?
Hi Hana, working in greyscale is always a great way to start as you can learn to appreciate the importance of values. In classical atelier training you can paint with black and white for a whole year before slowly introducing colours to the palette. You don’t have to be this extreme, but its always a good place to start when arranging compositions.
Hope this helps,
Cheers,
Will
Hi Will,
Thanks for your tutorial, I have a question about using the gloss.
I didnt have Raw Sienna so mixed the orange from some other colours ( I think I mixed Cad orange light with burnt sienna) and used the golden gloss medium, but its not finished as glossy as I would have expected. (I havent used the medium before). Do different pigment suit being used with the gloss medium?
And is it OK to use opaque paints with the gloss to make a glaze or will it not work very well?
Many thanks
Ben
Hi Ben, I use the gloss medium because it will give the clearest glaze, not necessarily for the gloss sheen. I’ll alter the sheen in the final picture varnish depending on the aesthetic I’m after. You can use it with any colours, the more opaque colours just would let as much of the underlying colour show through, but the same principles apply.
Cheers,
Will
Thanks for this awesome demonstration Will! Your videos are always so informative and enjoyable to watch. You’re a great educator and artist… so inspiring for me
You’re so kind Judie.
Cheers,
Will
Wow, just what I needed – your video lesson came up in a google search on glazing with acrylics and I jumped in and tried it. Very helpful – love how you translate the classical indirect method to acrylics! I didn’t have Golden Glazing Liquid but used Golden Matt Medium instead and it worked fine! Lovely subject – I’m off to paint some more fish as they are perfect to practice with before going back to the work I want to add glazing to.
Great stuff Helena, thank you so much for your kind words! I’m thrilled to hear that you found my video helpful and that you were able to adapt it to your needs. It’s always great to hear when someone is inspired to keep painting and experimenting with new techniques.
Fish can be a wonderful subject to paint and I’m sure the more you practice, the more confident you’ll become with your glazing skills.
Will