
“No one is an artist unless he carries his picture in his head before painting it, and is sure of his method and composition.”
Claude Monet
Free 1 hr video tutorial
Morning class! This week we’re taking inspiration from around your home.
You might have always wanted to capture the corner of your sunlit living room or an interesting collection of books stacked up on your coffee table or a section of your garden or patio with all the vibrant greens and spring colours.
But when faced with a new painting subject, where do you begin?
How do you decide on the pigments to use or what’s important to focus on?
The tendency can be just to get started and work it out as you go along.
But without adopting a systematic approach to your painting, you can be faced with frustration with your colour mixing, wasted time on your drawing and an unsatisfying result; I want to show you an easier way.
In this acrylic still life tutorial, I go through the steps of how I think through my colour composition, from choosing the coloured ground to introducing the pigments and then slowly building up the piece before putting the brush to canvas.
So let’s grab a brew and any remaining biscuits you may have left, and let’s get painting!
Unravelling your subject
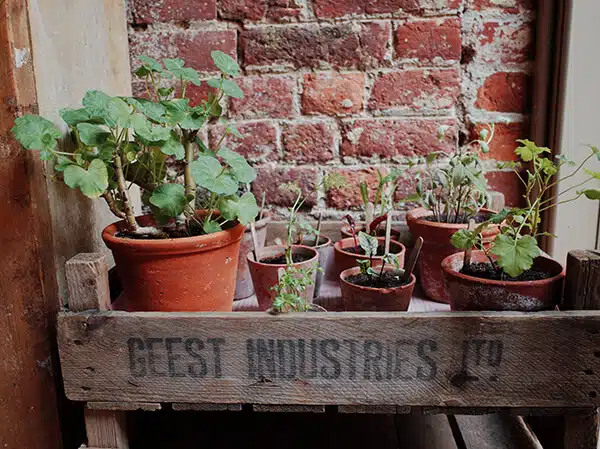
Original reference image
This lovely little collection of pots were part of a cottage garden I’d visited recently, and I like how they have the intense orange of the terracotta next to the muted purple of the red brick, which is then broken up by the fresh greens on the leaves.
I squint my eyes and consider the scene as a whole. On the right-hand side, the pots start to blend into the background too much, and the tones become too close in value. In comparison, the shapes on the left hand still read quite clearly.

So I focus my attention on the main pot and find by rotating the crop, I can reframe it while still keeping all the elements I want to capture. Vibrant terracotta colour, green leaves with nice shapes and interesting negative spaces, some tonal contrast and the lovely old brickwork, but now I have a much simpler composition.
An indirect approach
It’s all about peeling back the layers of the subject you’re looking at and reverse engineering how you’re going to approach it.
Now I’m happy with my composition; I begin to observe the parts in the subject that may cause me trouble and what I can do to give myself the best chance of capturing the subject accurately.
What’s going to be the three main issues?
For this scene, the three perceptional stumbling blocks that I can foresee are:
- An accurate drawing of the ellipses on the plant pots
- Keeping the background hues muted so they don’t overpower the main subject
- Judging the greens on the plant leaves
1. An accurate drawing of the ellipses on the plant pots
Ellipses can make or break your drawing of pots or cups when painting still life’s, the most common mistakes are overstating the ellipse shape or creating a sharp edge at the centre of the ellipse rather that one continuous smooth curve. (You can see an example in Set up #4 here: Are You Making Any of These 7 Compositional Mistakes with Your Still-life Paintings? )
To help with this, I’m going to be sketching out first with a pencil and then using an acrylic marker.
I’m initially looking for the value pattern in the composition. This is the arrangements of the lights and darks, which help me understand the painting’s mood and feel.
2. Keeping the background hues muted, so they don’t overpower the main subject.

Colour swatch from the mortar between the bricks for the coloured ground
If I know that the colours in the background of the subject will be low chroma and low tonal value, I can select a pigment that already has those characteristics.
For example, the general hues I can see on the brick wall are a yellow grey (in the mortar) and a muted purple and muted red-orange in the bricks.
If I paint the ground colour a yellow-grey, then use a muted purple (Violet Iron Oxide) and a muted red-orange (Venetian Red), I know I can quickly mix 90% of the colours within that area of the painting.
Then scanning the rest of the scene, the terracotta of the flower pot can also be mixed using the muted red-orange (Venetian Red). The front of the wooden crate has a subtle purple hue, so the Violet Iron Oxide will also be handy for that too.
Could you mix the colours using a more vibrant palette?
Yes, you could mix the same colours with brighter pigments. When I’m teaching the theory of colour mixing, I’ll often use a few intense colours to demonstrate how to manipulate bright pigments to create both muted and bright intense paintings.
But when working on paintings in the studio, I’ll often use other pre-mixed pigments to work quicker.
3. Judging the greens on the plant leaves
Having greens that are too vivid will fight with the overall colour balance in the scene, so for blocking in the greens in the shadows, I’m going to use Raw Umber & Cadmium Yellow Light. This (when painted next to the reds in the brick) will read as a muted green. Then I can slowly introduce Ultramarine Blue to this mix, creep up on my greens, so they don’t overpower the painting.
A step-by-step terracotta plant pot still life
Downloading the reference photograph
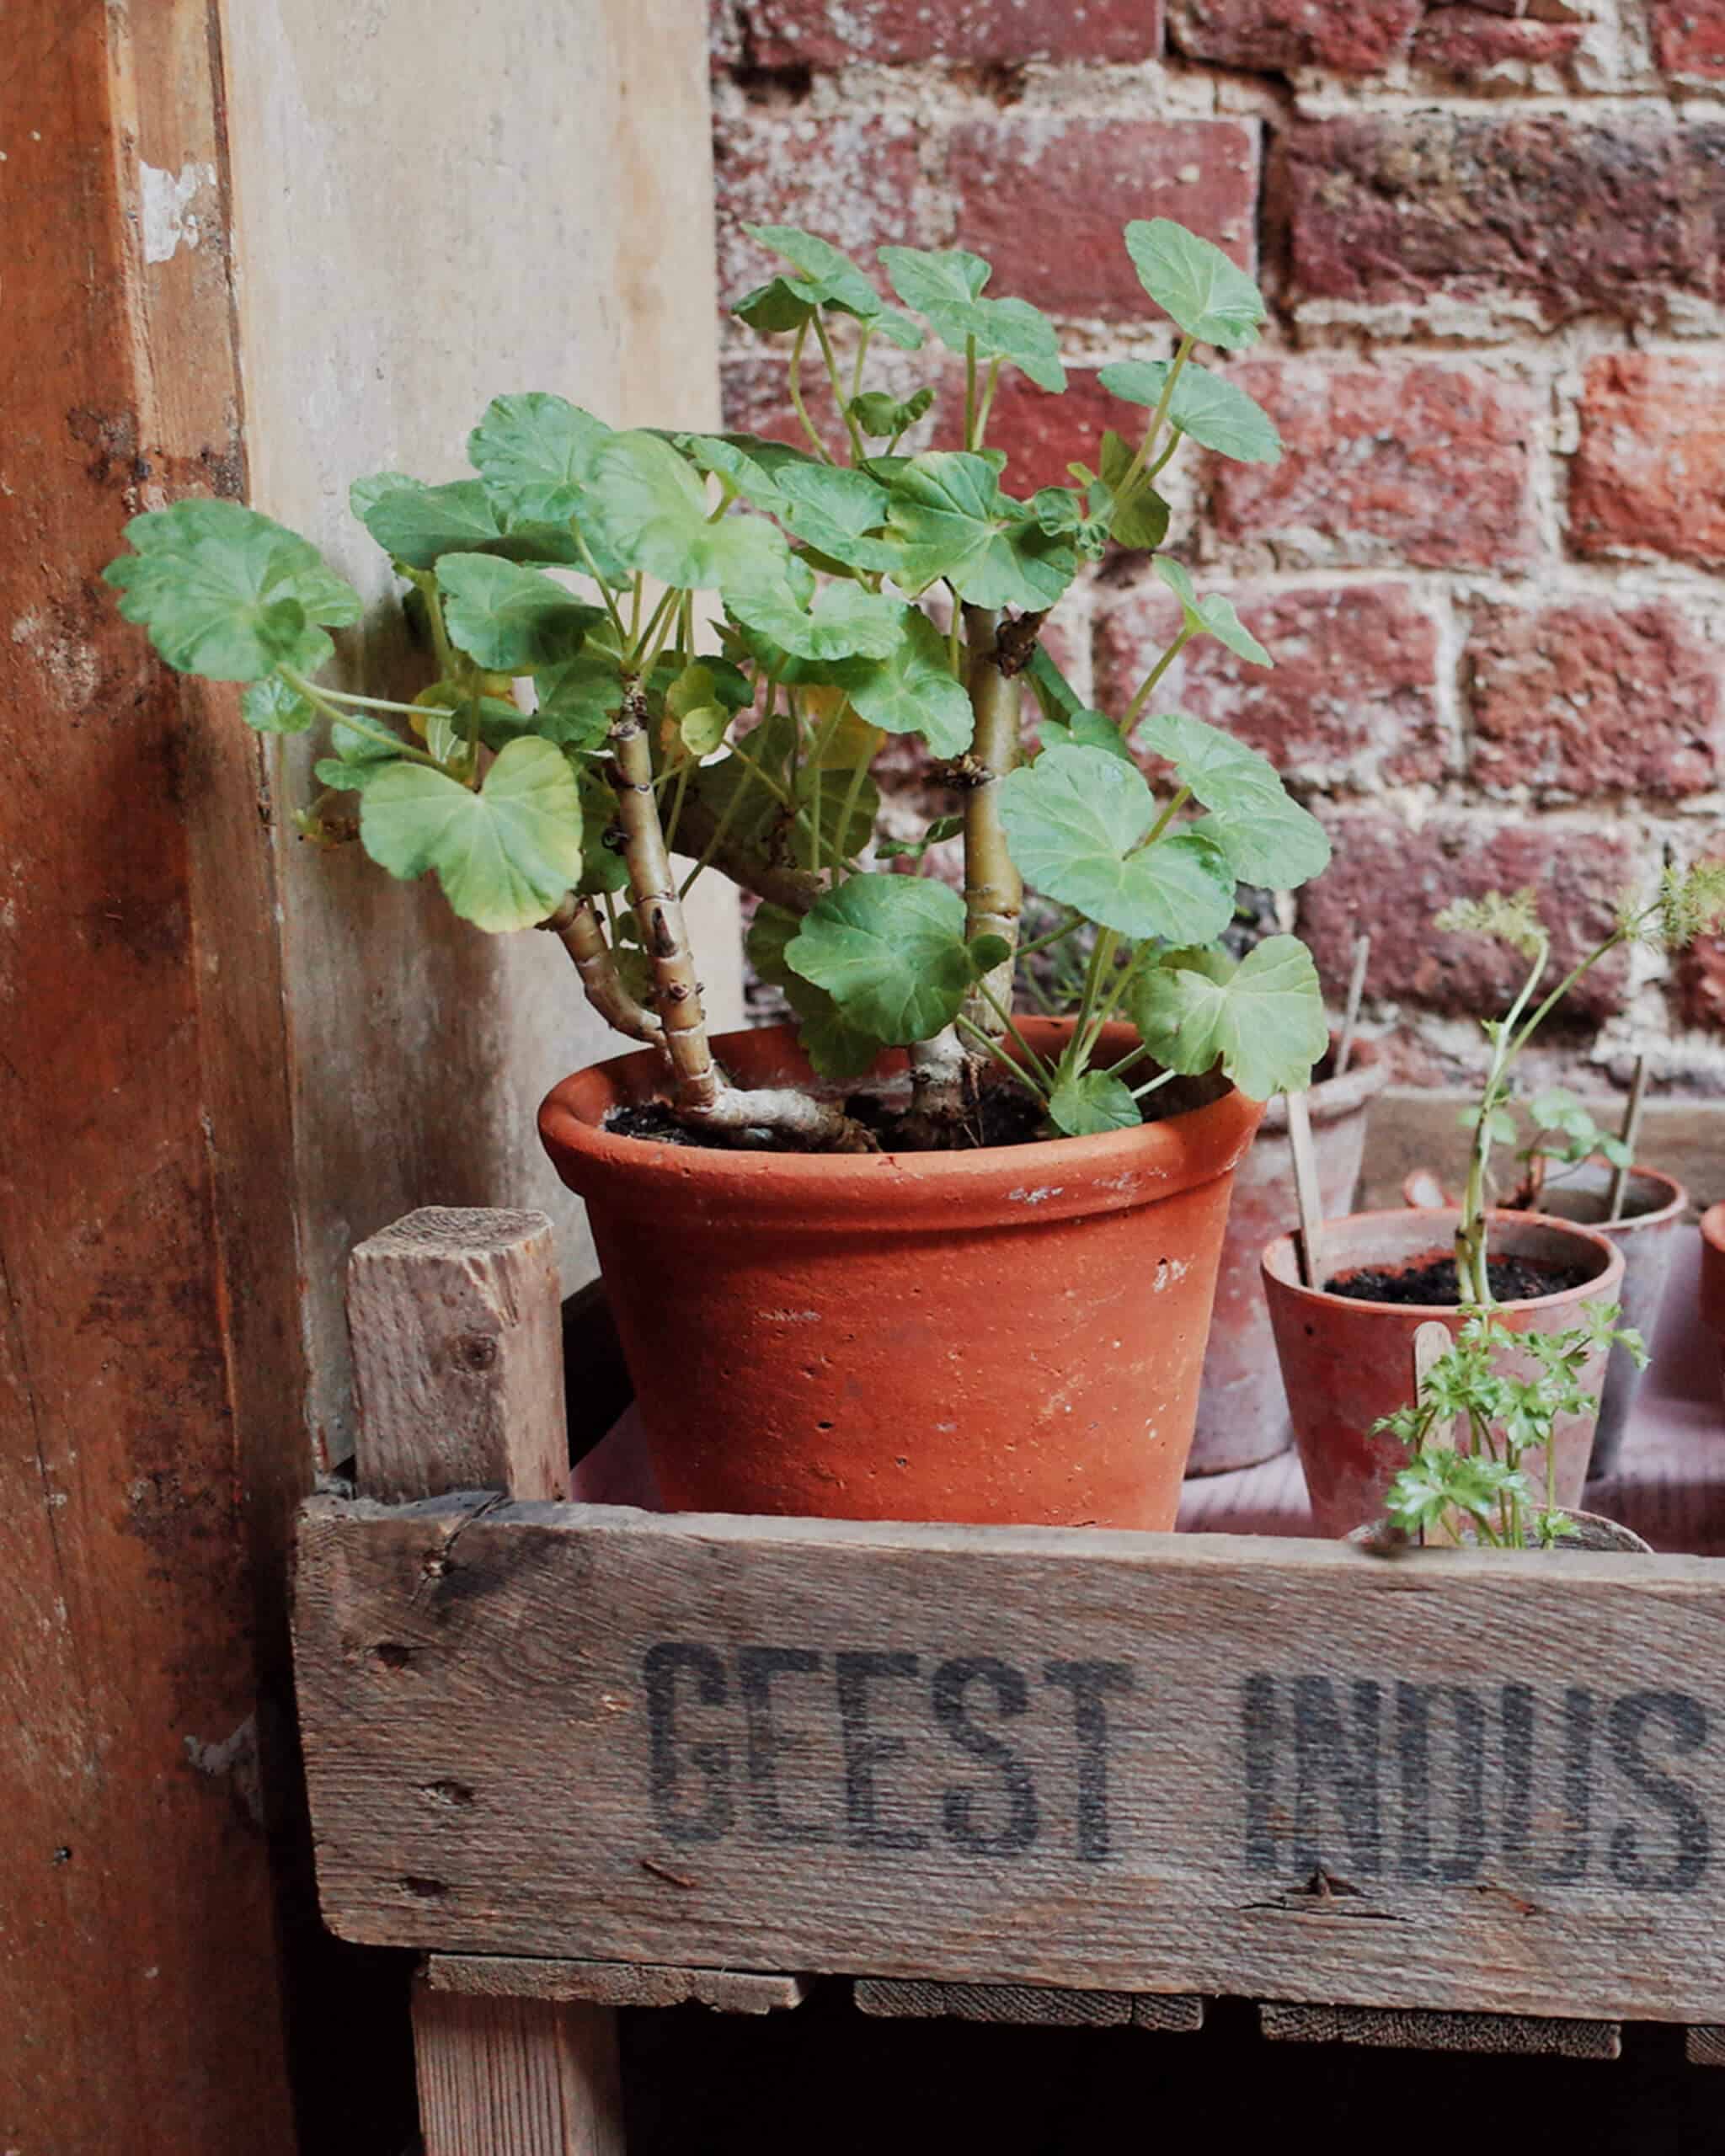
The photo above can be ‘clicked’ and ‘Save image as’, so you can use it as a reference image, print it out and follow along with the video.
You can also download a High-Resolution Image here.
Materials you will need:
Brushes

- Round – Small nylon round brush – My brush doesn’t have a brand name or specific size on the brush; any small round will be fine. The dimensions are approx 3-5mm in diameter and 1.5 – 2cm in length
- Flat – Rosemary & Co – Small Flat ‘Bright’ Golden Synthetic, Size 10, Series 302
- Filbert – Isabey Isacryl Acrylic Brush, Filbert shape, Size 6 – Series 6572
- Filbert – Rosemary & Co – Shiraz for blocking in the coloured ground (any large brush would work fine for this)
Support
- 10 oz cotton duck canvas 20.32 x 25.4 cm (8 x 10 inch)
I demonstrate on a 10 oz cotton duck canvas, 38mm profile. You could also use a canvas board.
Palette Knife
- RGM Classic Line, Medium size 45, Diamond-shaped, cranked (angled) handle. I use an RGM 45 for mixing the paint.
Drawing
- Uni Kuru Toga Roulette Mechanical Pencil 0.5mm HB pencil
- Faber Castell Putty Eraser
- Liquitex Acrylic Paint Maker (Burnt Umber)
Other Materials
- Kitchen roll/paper towel
- Clean water
- Metal double dipper (you could use two small pots)
- Tear-off palette or stay-wet palette (In this tutorial, I demonstrate on an A3 size Grey Pad from New Wave tear-off palette)
Paints – The Colour Palette
I’ve used a mix of Golden Heavy Body colours, Winsor & Newton Professional Acrylic (also called Artists’ Acrylic) and Old Holland artist quality acrylic colours.
- Titanium White (Golden)
- Burnt Umber (Golden)
- Cadmium Yellow Light (Golden)
- Venetian Red (Old Holland)
- Violet Iron Oxide (Winsor & Newton)
- Burnt Sienna (Winsor & Newton)
- Raw Umber (Golden)
- Ultramarine Blue (Winsor & Newton)
Mediums
- Airbrush Medium (Golden Paints)
Step 1. – Preparing the Ground

N7 Neutral Gray & Yellow Iron Oxide
I found a canvas in the studio that had been prepared with a ground colour that was very close to the colour I was after. I tweaked the colour slightly by mixing some Neutral 7 Gray and some Yellow Iron Oxide. (The neutral colours are a mix of Burnt Umber, Bone Black and Titanium White if you’d like to mix your own).
When looking at the reference image, I wanted the hue (colour) and value (how light or dark) of the ground colour to be close to the lime mortar colour in-between the bricks.

Golden Airbrush Medium
When diluting the paint, I used water that had a few drops of airbrush medium added to it. The airbrush medium helps when you are diluting the colour not to thin the paint film too much. (you can read more about thinning acrylics in this article on painting surface absorption)
Drawing Out

HB pencil & Burnt Umber Acrylic Marker

Uni Kuru Toga Mechanical Pencil, 0.5mm HB
I started the sketch using a Uni Kuru Toga 0.5mm HB mechanical pencil. What’s great about this mechanical pencil is the lead slightly rotates when you click to extend it, so you always have an excellent crisp point. Even though it’s marked as an HB, it feels slightly more like a 2B to me, so it is nice as a general sketching pencil.
I mark out the width of the leaves and the top and bottom of the terracotta pot, so I have some construct lines to work within. I then draw straight lines around the contour to create an ‘envelope’ of the subject. Once this is established, I can observe the smaller shapes within this larger form.

Faber Castell Putty Eraser
I then erase back the construct lines with a putty eraser, so I have a cleaner drawing. I’ll often also lightly rub the eraser over the surface to remove any excess graphite before painting on-top.

Liquitex Acrylic Paint Maker (Burnt Umber)
To establish some darker lines into the drawing, I use an acrylic marker. This is a 2-4mm chisel tip marker; you can also get finer tips for more detailed works.
Blocking in the background

I start by creating a ‘black’ by mixing Burnt Umber and Ultramarine Blue. I then mix a warm brown with Burnt Umber and Burnt Sienna. Diluting the paint with water, I work between the small round synthetic brush and the Isabey filbert to block in the darkest shadows. I then wash in a flat colour of Burnt Sienna as a colour note to judge my next mixes against.
The acrylic marker has already helped with the shadows within the plant pots, so it’s just the main areas in the background.

Burnt Sienna, Ultramarine Blue & Burnt Umber
Painting the brickwork

Using the Violet Iron Oxide, I can paint in the brickwork behind the plant. The coloured ground is left unpainted and creates the illusion of the mortar joint in-between the bricks.
The Venetian Red (you could also use a Red Iron Oxide) can then be used for the main pot. I lighten the value with a little Cadmium Yellow Light and Titanium White as the form changes value as it turns towards the light.
The Violet Iron Oxide, Titanium White and a little Ultramarine Blue can then be used for the colours in the wooden crate in the foreground.

Venetian Red & Violet Iron Oxide Acrylic
Mixing green
Once I have the brickwork, wooden crate and terracotta pot established, I start to paint in the greens. Green can easily overpower a painting and become garish very quickly, so for the first very muted green; I’m using Raw Umber and Cadmium Yellow Light. This creates a nice muted base that the shadow shapes of the leaves can be painted in with.

Raw Umber & Cadmium Yellow Light
How to Mix Green Paint
To lift your green value, the two colour options you’d usually pick are either white or yellow.
Yellow will warm the green.
White will cool the green
I start with a warmer base to the greens in the shadows and then introduce more blue and more white into the mix as I get lighter.
Pro tip: If you prefer not to work with Cadmium pigments, alternatives are Bismuth Yellow or Hansa Yellow Medium.
Finished painting

Once the greens were painted in, I then take a step back and look at the whole piece. Even small tweaks in the drawing at this stage can make a big difference to the overall feel of the painting. When I switch back to my ‘drawing brain’, I’m looking for shapes and shadows more than shifts in colour.
I really hope you enjoy the lesson, and it helps to give a small window of meditation in these unsettling times.
Cheers,
Will


Hi Will, this painting Lesson was so much fun and educational too.
I am an abstract artist. I learned a lot by reading your approach to seeing and developing your subject. I love mixing colors and often my pieces have lots of layers, but this approach gives such a fresh painterly finish. I look forward to painting a few new pieces from a subject. I especially enjoy reading your process. I am not terribly fond of watching videos, so having the photos with your process and reading thinking process was perfect for me, I like to read and take my time observing that stage of the painting. Thank you.
new pieces with a subject
Hi Judy, so pleased you enjoyed reading the steps and how you can adapt the layering approach to your own abstract pieces.
Cheers,
Will
Will, your great talent and clear instruction presented in the relaxing and calming way that you do (complimented by the soothing background music) is as good an antidote to the world’s current troubles as I can think of.
Thank you!
That’s very kind on you David, glad you enjoyed it
Will
This came after my morning meditation and it is so healing. Thank you for your good heart and keen eye.
In Joy
Andi
Cheers Andi, pleased it helped to keep that meditative calm
Thank you so much for this free lesson. I can’t wait to do it.I prefer to use oils, though, will that work?
Sure thing Patsy, yes, you could paint the tutorial with oils, would work great
Will
Beautiful, Will. Looking forward to the lesson. Stay well.
And you Tracey
Thank you very much for this. I haven’t painted in over a year and I’m very rusty! I was indeed frustrated yesterday when trying to get started. This video tutorial is just what I needed.
Thanks for sharing this Will.
Linda G. From New Jersey.
So pleased it was good timing for your Linda
Will
Thanks so much for this Will. We need to keep our minds busy during this trying time. Stay healthy.
Will do Pat, really hope you enjoy the lesson
Will
You must be reading my mind. I was wanting to paint a terra cotta pot of geraniums just lasto
Monday. Thanks for video. Stay well.
Linda Harris
Austin Texas
Well that is good timing Linda, really hope you find it helpful as inspiration for your geranium painting
Will
Thanks for the tutorial, Will. I am going to give it a try in oils. Love hearing from you. Stay safe.
Sharon
And you Sharon, hope you enjoy it.
Will
After moving to the retirement home I now live in, I never bothered unpacking any of my artist materials. The first thing I did after receiving your email and watching your video was to unpack everything as if it was Christmas Eve. From the bottom of my heart, thank you for giving this old lady something to look forward doing, and with any luck given the hard time we now live in, finishing. God bless.
Hi Lise, what a lovely message to receive, so pleased its helped to get your art materials out of retirement! have fun
Will
Can’t wait to get started? Thank you.
My pleasure Nancy
Great lesson thank you for sharing it to me
I am still doing the jar I will send you a picture
I am not very sure I know how to but I will have a look
Because of corona virus I am inclosed as it is forbidden grand parents to look after their grand children
That means I have plenty of time to experiment with painting
II have been involved with painting in the past and I find Will Kemp Art School very helpfull & inspiring And a very good company Tank you again
Take care
Laura
My pleasure Laura, enjoy your painting time.
Will
I am not an artist at all – have little natural talent but love art and have enjoyed watching your videos –landscape seems more approachable as a beginner so am planning to experiment with your Cornish Fishing Village scene – thanks so much for posting your videos and information. Take care during this very surreal time – you are helping more than you know!
Hi Karen, I think that should be ‘I am not an artist at all, yet’ really hope you enjoy the painting of Padstow.
Cheers,
Will
Will, thanks so much for this. Was thinking last night what to paint while awaiting some supplies for the Venice painting. It’s beautiful! Stay well.
Sharon
Great timing Sharon, a few of the pigments I use on the Venice course are featured in this lesson. Really hope you enjoy it
Will
This is such a generous gift. A way to calm the mind and body while we shelter-in-place. Thanks much! Beck
You’re more than welcome Beck
Can’t tell you just how much receiving your video freshened my day. Thanks Will. Made me smile as I “grabbed a brew”.
Kindest regards
That’s so great to hear Les, keep well
Will
So pleased with everything you send to people who love to paint. School has been cancelled so as a teacher this gives me something productive to do.
My pleasure, really hope you enjoy it Olivia.
Will
Thank you so much, Will!
Hope the painting goes well Colleen.
Will
Thank you so much for your generosity in sharing your beautiful technique
Linda
My pleasure Linda, so pleased you enjoyed the painting.
Cheers,
Will
Hi, Will, and thank you so for this tutorial in these difficult times. Q.: For the colored ground, if I’m starting with a white canvas, might I use a Purdy brush and the same n7, titanium white, and yellow iron oxide mixed with water and put on the ground in your usual way? Or should I use your approach with the airbrush medium and a smaller brush? –Mary
Hi Mary, yes that would work fine with the Purdy and water dilution.
Cheers,
Will
Thank you so much for your generosity Will. I’m really looking forward to getting started. The instructions and video, as always, are so clear and concise. Stay safe and well.
Val
And you Val, glad you found the steps easy to follow.
Cheers,
Will
Absolutely marvelous: Your generosity in these difficult times shines and defines who you are. Blessings, stay safe,
Mary
Much appreciated Mary, keep well
Will
Thank you for this clear and useful tutorial! I enjoy every one of your posts.
Thanks very much Connie, pleased you enjoyed it
Will
Violet Iron Oxide Acrylic is not a tube in my arsenal as of yet. What can I mix to achieve and still work with the others as I blend?
Hi Gail, if you mix a purple with alizarin crimson & ultramarine blue, then add a little white, then tone down with some burnt umber.
Cheers,
Will
Thank you so much for sharing your talent. I just watched the video and will start the painting tomorrow. Something to look forward to during this trying time.
Hope the painting goes well Maggie.
Cheers,
Will
Great the way you show steps to blend the mixing the thickness needed can not be overstressed for us new painters especially self-taught and it gives us courage to experiment
Pleased you found it helpful Andrew.
Cheers,
Will
I love your work Will and I love to read your preparation method which is extremely interesting and is a bit like I, in my very beginerish (is that a word?) like to do. I really look forward to the tutorial and then having a go. Four of us in my art group have decided to each choose a subject and we all have to do it and choose our medium then send photos to each other whilst we are ‘grounded’. There is so much to learn in the art world but I have to say it is an incredibly meditative pastime. Keep well!
Hi Margaret, so pleased you’ve been finding learning about the preparation method helpful, hope the art group paintings go well!
Will
THANK YOU SO MUCH FOR THE STEP BY STEP AND LISTING THE COLORS AND PRODUCTS. I AM ENJOYING THIS ESCAPE FROM THE TOUGH TIMES WE ARE ALL GOING THROUGH. ART MAKES EVERYTHING POSSIBLE. I TRULY ADMIRE YOUR ABILITY TO MIX THOSE COLORS WITH LITTLE EFFORT. SHOWS I REALLY NEED TO PRACTICE MORE. AGAIN, THANK YOU FOR SHARING, I AM LIFTING A GLASS OF WINE AND TOASTING TO YOU WILL!!
That’s good to hear Cheryl, thanks for the toast!
Will
Thank you for the lovely lesson. As an amateur artist, I always learn something of value.
Cheers
Monica
Really pleased you enjoyed it Monica.
Cheers,
Will
Hi Will, so happy to see your email in my InBox today and so glad to watch another amazing video from you! Hope you are well in this incredibly surreal moment of our lives. Thanks for putting together this wonderful video for everyone to enjoy!
That’s great to hear Franceso, really hope you enjoy the lesson.
Cheers,
Will
Your tutorials always help me get started again after a hiatus. Thank you. I notice you used a tear-off palette. I go through way too much paint because it dries while I’m painting. I have to continually spray with water, which off course eventually dilutes the pigments too much. How did you keep your paints wet and mixable in this tutorial? I prefer using a dry palette to a stay-wet palette. Any suggestions would be appreciated.
Fantastic stuff Pam, so pleased the lesson was timely for you. You can mist the paint with a water mister to add moisture, the drying time will vary depending on humidity, heat, airflow in the studio and the volume of paint onto the palette.
Will
This is wonderful….how long will you have it on your channel
Hi Donna, it’s a permanent video, it will stay on the channel.
Will
Thank you so much Will, you stopped me in right in my tracks in the most wonderful way with the project i’m working on. Colour mixing, composition and the shear joy of it all, it’s you’ve transported me back to when i was 19. I’ve been listening to Arnold Bennett and my home town, so i’ll be working from imagination and old photo’s. Realy great thanks so much, your like a breath of fresh air
You’re more than welcome John, and maybe an oatcake to go with it?, hope you’re keeping well
Will
Thank-you Will! Your detailed lesson brightened my day, Stay safe.
My pleasure Sheila, that’s so nice to hear.
Will
Thank you, Will. Great inspiration again
Cheers Norbert
Thanks Will, you are a saviour ! Another fabulous lesson.
Thanks very much Lisa, keep well
Will
Hi there
thanks so much, really appreciate. I have not painted for at least two years but you have now given me the inspiration to pick up a brush. We are in lockdown in South Africa so have the time.
God’s blessings to you
And to you Lorna, so glad you found it helpful in your journey back to the easel!
Will
Hi Will,
Thank you for another generous tutorial. It was really helpful to read about your thought process as you decided what to crop and what to include. I would have never guessed a collection of potted plants would yield such a lovely painting. I’ll have to take a closer look around the house for future projects. Currently I’m working my way through the Venice Sunset course and learning a lot in the process. Take care and stay safe.
So glad it was helpful to see the composition process Karen, enjoy the Venice course
Will
Absolutely wondeful painting and teaching process!!!! Thank you very much!
Oh, that’s great to hear Aita, hope it helps with your painting.
Will
I love to watch you work – very meditative and I find it so helpful to see how you think in terms of warms and cools, lights and darks, shapes and contrasts, composition – and just generally making the painting work.
PS When’s the next online course due out? – I’m a bit addicted!
Hi Peter, so pleased you enjoyed it, just working on a new water-mixable oil course at the moment.
Will
Hi Will,
great tutorial which morivates me to give acrylics a try again. One question due to diluting acrylics. I understand why you add air brush medium for painting the colored ground on a gessoed canvas. But why don‘t you add the air brush medium during the whole painting stages?
Cheers Stefan
Hi Stefan, hope you’re keeping well, the water still had the airbrush medium in throughout the lesson. The airbrush medium added to the larger pot at the start of the video was decanted into the dipper before I started. But as I was working in thicker paint application layers and an absorbent paint surface, even just using plain water would have been absolutely fine.
Cheers,
Will
Thanks, Will! You’re so thoughtful and inspiring…looking forward to trying this! Take care!
Really hope you enjoy it Mary.
Cheers,
Will
Hello Will – many thanks for this and so looking forward to the water mixable oils course… Question – I’d like to experiment with fluids but ideally use my existing arsenal of paints which are all heavy body – would a mix of airbrush medium and water work or would you recommend another medium or method?
Hi Hella, yes the airbrush medium would work well for that.
Cheers,
Will
Thanks so much, Will. I loved it and shared it with all my FB artist friends. Looking forward to purchasing your next course and in the meantime, I’m reviewing the ones I already have.
Thanks so much Honey, really pleased you enjoyed it.
Cheers,
Will
Hi Will
Thankyou for your kindness in sharing your work, especially at a time when Australia’s Prime Minister is rightly telling everybody to “stay at home!!!”
I have done a number of your courses in the past and you have helped me a lot to manage my anxiety and depression. It is much more effective than all of the medication I take. Stay safe. xx
Well that’s fantastic to hear Penny, so pleased the lessons have been helping.
Will
Hi Will,
Thank you for this tutorial, I learned a lot. It seems to be your fantastic teaching style and ‘queuing’ during the demo that I find most valuable. I hope you continue to do these demos / lessons. I’m always looking on your site to see what new tutorials you have developed. I’m looking forward to your Water Mixable oil series. Is there a possibility that I could upload my painting for your comments and suggestions? I would greatly benefit from that.
Kindest regards,
Tina
Hi Tina, my pleasure, so pleased you enjoyed the lesson and glad you’re looking forward to the WMO course. I don’t currently offer a critique service due to the number of requests I receive but if I offer one in the future I’ll add details to the blog, keep well.
Cheers,
Will
Thank you for sharing your time and talent Will! I love seeing how you layer the paint and come up with such rich looking colors. The way you methodically create a painting has helped me tackle paintings that I am working on. I think about the different steps you take from the colored ground to the highlights you add at the end. Take care and stay well!
That’s brilliant to hear Jenny, so great that you’ve been implementing the techniques into your own practice.
Cheers,
Will
Hi Will Many thanks for this wonderful video and thank you for sharing I really enjoy it as you always give us nice and important tips and techniques
wish you all the best ever
Namir
Thanks very much Namir, so pleased you found the tutorial helpful
Will
Thank you for this wonderful video at this difficult time in the world ! You are helping us all…blessings ! Stay safe!
My pleasure Avril.
Will
Thanks alot for the lovely tutorial Will! So kind of you to give it free in the troubling times.
Where there is ‘Will Kemp’ there is a way!
Stay healthy
Ha, ha, you’re very kind Anjali, so glad you enjoyed it.
Will
Thanks Will! I love this terracotta pots painting. I envy how you see such beauty and such a range of colour in every day objects. I need to find a way to see things better. I would have stopped painting long before you did as I’d be too scared to overwork it, but with each tiny dab of paint you made, it delighted me further. I particularly like the way you give the subject the soft focus quality of a pastel painting. Acrylics are just so versatile. I’ll definitely be attempting a still life this week. Thanks so much for sharing this. Wishing you and yours well :)
Hi Jules, really pleased you enjoyed the subject and good luck with the painting later this week.
Will
Hi Will!
I love your lessons, thank you so much! I’ve just finished Beginners’ Acrylic, and I’ve downloaded the Still Life Project Book, Beginners’ Drawing and Simple Color Mixing courses, and having a whale of a time. I’m thinking of trying this tutorial at some point though and I was wondering if it was possible to mix Venetian Red from more basic colors? Will we need this and the Violet Iron Oxide for the Venetian painting class? Seems like useful colors to have, but it’s not the right time to go out shopping and all.
Thank you very much!
Hi Hon, nice to hear from you and so pleased you’ve been enjoying the courses. Yes, on the Venice course I use the Venetian Red, Violet Iron Oxide and Yellow Iron oxide, but you can mix them from brighter pigments. If you have a Titanium White, a cad yellow, alizarin crimson (or a cool red), ultramarine blue and a burnt umber you’ll be able to mix the hues. Hope this helps,
Will
Really, really nice, Will. I especially liked your description of the colour contrasts!!
God bless, C-Marie
So pleased the description helped C-Marie
Cheers,
Will
Very relaxing, pleasant, interesting instructional video, Will! I love geraniums also and enjoy painting them. I hope I can paint a similar piece in your relaxed manner. Having been a realist for so many years, I need to loosen up more because my eyesight is failing, as well as my sense of color (macular degeneration) and detailed realism is not easy any more. Thank you for the free gift of this video – – a nice distraction during this time of stress. God bless you and protect you! Martha
Hi Martha, thanks so much for your kind words and hope it helps with inspiration for your geraniums painting. Keep well
Will
Hi Will,
I’m actually in the middle of the Colour mixing course (which I’m loving!) at the moment but plan to have a crack at the terracotta pots after this. I was wondering if I could use Binder Medium in the water instead of Airbrush medium? I was trying to work out if they were much the same thing but am still none the wiser. Thanks for sharing your awesome talents so generously.
Hi Sheryl, really pleased you’ve been enjoying the colour mixing course.
It depends on the brand you’re using, Binding medium is traditionally used when grinding your own pigments. So an acrylic binder medium is usually an acrylic polymer resin used when grinding your own paint pigments, not as a medium for painting. Whereas Atelier Binder medium is used to seal a canvas surface to size it before painting to prevent absorption of paint into the fabric. But again, this wouldn’t be used in the same was as the airbrush medium.
Hope this helps,
Will
Hi Will:
So generous of you to share this tutorial! I’m “stuck” on a painting I’ve been working on for 2 weeks currently and am so looking forward to switching gears and starting something new. Your lessons are always calming and I gain so much from your step by step approach. Thanks very much and Stay Well!
Really hope it gives a new perspective to your current painting Michele.
Cheers,
Will
Will, thank you so much for sharing this (and all of your tutorials). Your expertise and methods have been so very helpful to me. Glad you’re doing well. stay safe!
My pleasure Sherry, and you, keep well
Will
Thanks heaps Will. That helps a lot!
I have the Atelier Binder medium but will purchase the Airbrush Medium for this purpose. Time to boil the kettle. Cheers.
Perfect stuff Sheryl
Hi Will thank you so much for the reference photo and lesson I did paint this and am pleased with the outcome I posted the completed painting on my Facebook page giving you credit for the photo and tutorial. My friends (some artists) said they thought it was a photo so pretty pleased with it.
Hey Ann, lovely to hear from you and really glad that you’re pleased with the outcome of the tutorial and it was well-received on your FB page, great job!
Will
Will, I haven’t even watched your video yet and am so thankful that you have sent this and are sharing your art, teaching and knowledge, with us at this time. I love it! Getting my coffee so I can watch then I’ll gather my materials,watch again and paint with your video.
Thank you for this gift,
Linda Lopez
Really hope you enjoy it Linda.
Cheers,
Will
Thanks Will for this lesson – loved painting it. Your colour mixing is really helpful. moe
That’s great to hear Moe, pleased the colour mixing sections helped
Will
Many thanks Will. My wife and I both enjoyed it and you have started an enjoyable art conversation.
That’s great to hear Bernie, so pleased you both enjoyed it
Will
Thank you for your tutorial. I painted from your reference photo and got a good result with just red yellow and blue plus violet and white. I appreciate your work very much.
Great stuff Robert, really pleased you enjoyed the lesson adapting your own palette to it
Will
Thank you so much for this tutorial, Will. The way you explain every part of the drawing and painting process makes it so much easier to follow. I hope to start it tomorrow, but as I don’t have a few of the items to hand, I’m going to have to improvise!
My pleasure Jacqueline, really hope it turns out well for you
Will
Hi Will
Happy Easter. Another egg-cellent tutorial. A little easter humour – couldn’t resist.
Just wanted to ask one question, what would be a good substitute for the liquitex paint marker?
could I just use thin paint of similar colour?
thanks
Cathy
Australia
Hi Cathy, thanks! yes you could use a thinned burnt umber and a small round brush.
Cheers,
Will
Great work Will and love the greens!
Any suggestion whee to purchase products online during this time?
Best,
Michael K.
Hi Michael, where are you based?
Hi Will, a very lovely painting, the colours are beautiful! I have a question: what is the size from the white canvasboard on 2:36? It looks as a nice size.
Hi Trudy, so pleased you enjoyed the lesson, that’s a 6 x 4-inch canvas board.
Cheers,
Will
Thanks!
Hi Will, thank you so much for sharing this tutorial video and I learned a lot from your painting techniques. Stay safe and healthy!
Sandy
Vancouver, Canada
And you Sandy, so pleased you enjoyed it.
Cheers,
Will
Hello Will!
I have recently finished your beginners course in acrylics and also finished this terrific lesson –do you have plans for another beginnners course in acrylics? I am going to work on the beginners landscape and Monet’s garden you have and am eager for more! (Also – do you have a recommendation from an American source to substitute for the Rosemary brushes you recommend – the shipping from the UK to Atlanta is quite expensive.) I have never painted before and am learning so much from your videos – you have truly made this time in quarantine better for me – thank you!
Hey Karen, so pleased you enjoyed the course. I did see Wind River Arts stocking Rosemary & Co as, but couldn’t see shipping details.
Will
Hi Will,
Thank you so much for this tutorial, I’ve learnt a lot with it, in particular how to keep a tidy palette! I have your Colour Mixing Course and go back to it often to refresh myself, it’s invaluable.
The frame you held agains your terraccota pot painting, would you mind if i asked where it was from? It looked such a simple frame and yet finished the painting of nicely!
Many thanks & good health,
Janette
Hey Janette, so pleased you enjoyed it and have been finding the colour mixing course helpful. That frame I’ve had for years from a local framer, the only thing I tweaked on it was to paint the white edge so I can judge my values against white. So if it’s just for judging the painting you can buy a frame moulding you like an then paint the surface.
Hope you’re keeping well
Will
I completed your Beginners Acrylic Course, which was excellent, and have very much enjoyed painting the terra cotta pots. I’m just getting started with painting, and your videos are not only incredibly helpful, they are a delight to watch. You have wonderful talents of painting and teaching—thank you so much for sharing and doing what you do!
That’s very kind of you to say so Donna, so glad you’ve been enjoying the courses.
Will
OK I’ll try again. This is about the 5th time I’ve watched this video. Need about 20 more to get all the little advices straight in my head. It’s quite fascinating to see how you layer the different hues to end up with the one you want. Question: If you don’t have an acrylic marker – could you brush the dark darks in? I am just beginning with acrylic after years with watercolour, oil, charcoal and a few other mediums and find it fascinating – especially the manner in which you block and use shapes.
Fabulous work. Thank you, thank you, thank you for sharing your expertise.
Patti B
Glad you’ve been enjoying it Patti, Yes, you can just use Burnt Umber and a brush to brush in the darks. So pleased you’ve been enjoying it.
Cheers,
Will
Hi Will. Really enjoyed this video. Have only recently started painting and have just a basic set of acrylics. Would now like to upgrade so I can join some of your classes. I can’t seem to find the Old Holland Venetian Red anywhere and also the W and N Violet Iron Oxide only seems to be available in watercolour paint. Any idea where I can get those paints from? many thanks Catherine
Hi Catherine, glad you’ve been enjoying the lesson. You can see the Venetian red here, but’s its out of stock at the moment, ( red iron oxide is also good but that’s also out of stock)also the violet iron oxide. Ken Bromley have both the Red Iron Oxide and Violet Iron Oxide in stock
Cheers
Will
Hi will,
Thank you for this video! Looks great!!! I have downloaded your beginners guide and just bought the drawing course – can’t wait to start. I was wondering (when I get to painting) what size brushes I should buy please? I’ve noted that you suggest a flat, a bright, a filbert and a round but I have no idea what size to chose.
Thank you!
Hi Katherine, really hope you enjoy the lesson, under the ‘materials you will need’ section are sizes for the brushes I demo with and these are a good start for smaller works. Usually, the larger the painting, the larger the brush, although individual artists have their own preferences. Really hope you’re enjoying the drawing course!
Cheers,
Will
Hi Will,
This is amazing stuff. I really like and enjoy your teaching style. Thanks for sharing your painting process and clearly explaining each and every step, materials used, reference pic, etc.. Amazing talent – it is wonderful to watch you paint and share your knowledge. One of the best acrylic tutorials. Thanks again!
Cheers, Viggy
My pleasure Viggy, thanks for your kind words, so pleased you enjoyed it. Just posted a new acrylic tutorial here
Cheers,
Will
Hi Will,
I loved completing this painting. I do have a question. While painting, my colors look nice but once it dries and the acrylics darken, my painting is quite flat and lacks contrast and pop. Any advice?
Hi Sheri, you can re-introduce saturation to the colours by applying a varnish. Gloss will be the most saturated, then Satin, then Matte will be similar to how they are looking on your canvas at the moment.
Hope this helps,
Will
Hi Will , My 4th tutorial and your demonstration / instructions really good as always . But I did struggle wit the leaves , ended up with too much paint everywhere as I tried to emulate that abstract leafy style of yours . Less is more as they say !
Never mind , onto the next.
Glad you enjoyed it Bob, yes leave shapes can be tricky, pleased you enjoyed the process though.
Will
Hi Will, thank you so much for this tutorial. I’m beginer in painting and it was really helpful. I’ve learned a lot.
So pleased you enjoyed it Elvira.
Will
Hi Will,
Greetings from Canada! After 40 years in a highly technical field and still a few more years to go, I’m beginning my journey to develop my artistic side of my brain. I’ve painted the apple study and really enjoyed the process. It came out ok, so it’s hanging on the wall. Now I’ll try the still life plant study before I attempt the Monet class I just purchased from you. Spending time sketching as well, I believe learning to draw is an improtant skill to transfer what I see to paper. Thank you for providing so much infromation on your website.
That’s so great to hear Stewart, so pleased that you’ve been finding the lessons helpful, enjoy the Monet Course!
Will