
Cherries overflowing perfectly in a bowl, a sense of life captured in a single moment, creating the perfect still life composition appears to come naturally to some artists.
Reassuringly, there are a few simple adjustments you can make to your own set-ups, that prevent you making the most common beginner mistakes.
By making small changes to the placement of your objects, you can breathe life and energy into your compositions and by observing how your viewing position impacts the shapes and shadows, will help develop accuracy in your drawings…
Set up #1: A Too Tight Crop

Beginner painters often focus too heavily on the object, even if it’s unintentional.
When you’re putting all your effort into the colour mixing and drawing of your still life, it can be easy to super-size your main subject.
This creates the illusion that the object is cramped onto the canvas and gives a claustrophobic feel. If you then have the addition of a thick frame, it can emphasise this problem even more.

When you set up a single object, try and start with around 50% of blank background space, this will give you a good starting point and give the subject some breathing room.
You can then extend the space – more space usually dictates a more contemporary feel.

Then add extra elements.

- Creates a negative space between the objects
- Adds a different texture and scale
- Introduces a wider tonal range (think black pips in a pear next to the flesh)
- Brings a sense of timescale – the fruit has just been cut
- Adds a different shape to the shadows
Additional Elements

For more visual interest, extra objects can be introduced.
I tend to use things related to the subject matter in some way because it gives the painting a more natural story.
The plate brings in complementary colours, the subtle green next to the magenta of the pomegranate with an increase in tonal range from the white of the plate edge.
It also provides a nice surface for the pips to spill out onto.
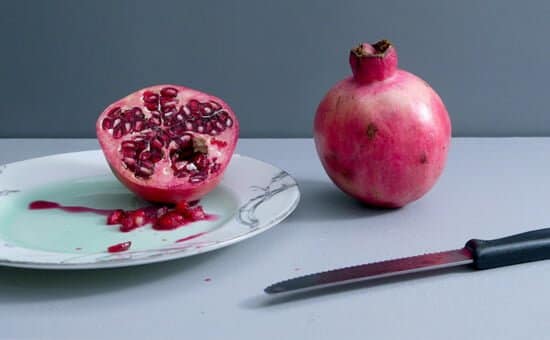
Utensils, such as spoons or knives, add compositional elements to guide the viewers gaze. Diagonal angles in any scene increase visual eye movement, so now we have a balance between the soft circular shapes of the pomegranate and the harder angular shape of the knife.
On reflection, I preferred the angle of the cut pomegranate in the images above when it was twisted slightly. From this angle, the face of the pomegranate is quite circular and similar to the shape of the whole pomegranate.
Whenever I’m working on a painting, I first take into account how the setup would work as a drawing.
The knife lying flat would create a too dark line to sit in harmony with the rest of the objects for the lighter tone of the piece that I want, so I propped the knife with a small piece of blue tac so the blade reflected the shine of the light source.

This gives us a lighter tone in the foreground and breaks up the space. Simple, but effective.
I’ve shown the square crop to illustrate a more contemporary composition, but you can vary the crop for a more classical view depending on the feel you’re after.

Set up #2: Misdirecting the Viewer’s Eye


By twisting the pear, the stalk shape has a softer flow to it and the cast shadow has now been combined resulting in a more calming piece.
Set up #3: Too Many Even Shapes Creating a Solid Shape


When you’re arranging a simple still life using a bowl of fruit, the tendency can be to just pile up fruit in the centre of the bowl. What this creates, from a distance, is a circular shape around the bowl and fruit on top.
It doesn’t offer any intrigue, even if you’ve painted each individual piece of fruit perfectly within the bowl, the viewer just sees it as one large block shape.
The easiest way to change the feel and add a level of subtlety is to take one of the pieces of fruit out of the bowl and place it in front of the main subject.

This gives space for the eye to move through and also a different variety of shapes on the top line of the fruit – breaking up the shape.
Protip: You get a bonus point if you noticed the angle of view and position of the bowl has changed slightly. The clue is in the lighter shape behind the cast shadow and the curve on the top of the bowl


Peeling adds great texture, a different shape on the edge of the tangerine top and a human element to the composition.

However, this has now created a uniform triangle flow between the objects, which is o.k ….but ideally, you want the eye to try and meander through the piece, adding something else will slow the eye.


The next thing I notice is the shapes of the tangerines are all a bit samey, you’re always trying to achieve irregular shapes and gaps between objects.
Even shapes tend to stand out more in a painting, so if you notice them in your reference photograph, you’ll notice them even more in your painting.

Splitting the tangerine breaks the circular shape and reveals more interesting shapes in-between the segments.

I then move some of the tangerines around to change the shape and show the dark centres, I’ve also elevated my viewing angle to reveal the inside of the bowl slightly.
The single segment adds a different sense of scale and overlap to the bowl, which helps create depth.

Set up #4: Imagining Ellipses – Eye-Level View of Jug Still Life
Some of the most common drawing issues tend to come from man-made objects.
Why?
Because any object that is round will create a curve or ellipse when viewed from any angle – and ellipses can be tricky!
The easiest way to think of an ellipse is to imagine squeezing a circle from the top and bottom.
The sides get wider, but there is still a curve to the edge of the shape, and this is the key.

In the sketches above, the central drawing is an accurate representation of the photograph, in comparison to the drawing on the right-hand-side – which has been purposely altered to illustrate the most common mistakes.
The urge when drawing a jug (or cup) straight on, is to cheat a little.
Exaggerating what you can see inside the jug to make it look ‘more realistic’.
It’s very easy to find yourself sitting slightly taller in your chair to peak over the edge, but keep strong!
Even this subtle change in the top ellipse shape throws the drawing out.

Key points to remember for an Eye-Level View:
- The bottom of the jug is very flat, there is still a slight curve at either end.
- Cast shadow is narrow
- You can’t see inside the jug
- The spout angles down at the top
Set up #5: Exaggerating Ellipses – Classical View of Jug Still Life

Now we’ve got a more classical view, a slight angle looking down into the jug, giving us a visible ellipse.
However, the exact same mistake can happen.
Even though you can now see inside the jug, the natural tendency is to try and show more.
So you make the top ellipse of the jug a little wider than before.
This drawing has the most subtle differences from the correct drawing to the over exaggerated ellipse, but it still gives us a strange perspective.
From this more elevated angle there are a couple of other changes in comparision to the flat on view that are visible in the reference image:
- The cast shadow has grown wider
- The curve has increased on the bottom of the jug

Key points to remember for a Classical View:
- The bottom of the jug is more curved
- Cast shadow is wider
- You can see inside the jug
- The spout angle is a smooth curve into the ellipse line of the top edge
(Here you can see a drawing demo of an apple that illustrates ellipses in the shadow shapes.)
Set up #6: Flat Bottom – Elevated View of Jug Still Life

90% of the drawing on the right is correct, the top of the jug, handle and ellipse, however, the bottom of the jug is the culprit. It has been drawn flat as if viewed straight on.
This makes it feel like the jug is squashed and folding over itself.

Key points to remember for an Elevated View:
- The bottom of the jug is much more curved
- Cast shadow is wider and the angle changes relative to the position of the light source
- You can see deeper inside the jug
- The handle shape has changed (a little)
Set up #7: The Pointy Plate – Drawing Ellipse Edges
For jugs and cups, it tends to be the exaggerated viewing angle that causes the most issues.
For plates, it’s the very edge of an ellipse, or more specifically, the lack of edge in an ellipse shape.
When you’re drawing a plate the tendency is to start on the left and then draw the curve on the top.
Then, from the same starting point, draw the bottom half of the plate. This gives you an angled point at each end of the plate.

Subconsciously this can then alter how you draw the cast shadow.
On the drawing on the left, the cast shadow is a smooth curve, whereas, on the drawing on the right, the shadow curve echoes the shape of the plate which further emphasises the point.
You might also find some drawings have a combination of both of the issues, increasing the perceived amount of the plate surface you can see (widening the ellipse) and emphasising pointed edges.
Have a look back at some of your still life drawings or paintings and see if you can spot any of these mistakes that can be easily tweaked.
If you’d like to learn more about painting acrylic still lifes and tackling more challenging compositions you should have a look at the Acrylic Still Life Masterclass Course
You Might Also Like:
1. Compositional Cardinal Sins
2. The Secret to Good Composition
3. Are you 1 cm away from the perfect composition?

Hello Will,
Very good informative instructions,
Thank you and have a blessed day
Margarete
Thanks Margarete, hope you find them helpful.
Will
What a fantastic article, thank you Will! It’s the exact information I needed at this moment in time!
Cheers Heather, pleased you enjoyed it.
Will
Very informative article on still life Will!! Thanks for sharing the pro tips..
Cheers,
Akshata
Hope it helps with your set ups Akshata.
Will
Maybe the best article i read on the subject…
Very kind of you to say so Melih, pleased it was of help.
Will
Hi Will,
This info is so good and informative. I just wanted to paint a couple of simple series of 2 or 3 still life pics for my house and this will help a lot. Funny is how I think of a project and some tutorial commes from you like it was ordered… :-) Thank you muchly, very appreciated
Tatiana
Ha ha, glad it was timely to your paintings Tatiana, hope they go well.
Will
Like you’re reading my mind… I was working on a still life that seemed so ‘odd’ and I thought it was my rendering. But these points show a bunch of corrections to be made in my setup. This post saved the day. Very much appreciated.
Hey Peter, that’s great to hear, yes it’s amazing how easily they can put your eye out to the overall effect of a painting.
Cheers,
Will
As always very interesting. Composition is so vital. Thank you Will.
Cheers Katja.
Will
This a sweet article. Thanks for sending it to me. I am somewhat guilty of the exaggerated ellipse, always trying to make it just a tad larger. I will now double check my drawing first before painting. (I might add that turning a drawing upside down can be helpful in seeing hidden problems.)
I do have a question, though. To me, the original angle of the cut open pomegranate is better than the full frontal view. It allows me to see a nice connection between both stems and helps move my eye back and forth. Do you think my preference of views just reflects that we all like different things for different reasons or does my artistic eye need some improvement?
Hi Margo, yes, on the angle of the cut pomegranate, I agree, I mention it in the article ‘On reflection, I preferred the angle of the cut pomegranate in the images above when it was twisted slightly. From this angle, the face of the pomegranate is quite circular and similar to the shape of the whole pomegranate.‘
Cheers,
Will
Oh, I see. I didn’t read your quote correctly the first time. Glad I asked though. Now, I see that my ‘eye’ is seeing things the right way. :-)
Hi: Thank you so much, this was so informative. I’ll need to keep referring to it, too much to take all in one morning!
I usually paint scenes with either lakes or oceans. Will you be doing any informative pieces like the one above on scenes with water in them?
Thanks again.
Rosary
Hi Rosary, I can’t think of any specifically focused on lakes or oceans, the main thing to look out for in seascapes in the horizon line. It seems obvious, but just checking your horizon line isn’t veering off at an angle can make a big difference.
Cheers,
Will
Will – thank you for these excellent tips. I find the jug and plate ones to be especially helpful – “foreshortened” objects almost always present a problem to me with regard to drawing them realistically.
Hi Tammy, pleased it helped, yes foreshortening can be another issue, particularly when painting figurative pieces.
Will
So much information in so few words! Very helpful. Thank you. You are a wonderful teacher.
Thanks Oksanna, very kind of you to say so.
Will
Thank you, Will! This has been so very helpful to me!
Pleased to hear it Sherry.
Will
Thanks Will, very helpful, I love it when your emails pop up.
Cheers Jill, hope it helps with your paintings.
Will
Great article, Will. I just bought two yellow pears and a red one for a piece this weekend. Now I’ll think about the set up a bit differently.—-Also, thanks for clearing up the cut pomegranate dilemma. I’m noticing so many different things now.
Glad to hear it Carol, yes, you’ll find as you start moving objects around you’ll start to notice different things pop out at you. Good luck with your pear painting.
Will
Hi Will
Always generous and kind sharing your knowledge and advice.
Thank tou so mutch.
Can we send you fotos of our atempts for you to comment and critic?
Hug
Jose
Hi Jose, pleased you enjoyed the article, I’m afraid I can’t offer personal critiques on your setups, but really hope the article helps to guide you.
Will
Thanks for sharing it is so helpful ,I have learned so much from you .A truly great teacher
Thanks
Cheers Sheila, so pleased you enjoyed it.
Will
Outstanding article, Will! Thanks for sharing these guidelines-actually the most helpful I’ve seen for analyzing and improving composition.
Thanks very much Marilyn, very kind of you to say so.
Will
This was great! It will also help me in my photography. I realize that one mistake I have been making is placing things too close together. Thank you so much!
That’s great to hear Jill, yes having that space for the eye to travel through can really help. You might find this article on tangents of interest about issues that can happen when objects touch together.
Cheers,
Will
Hello Will
You are my favourite teacher. Thanx for shairing this knowledge.
Regards
Alok Hari
Thanks Alok.
Will
This has been very eye-opening. I love painting still-life and cannot wait to go back to the drawing board. Thanks Will!
My pleasure Micki, really pleased it helped.
Will
Thanks Will. For the beginner like me, such tips will always help!
Great to hear it Namrata.
Will
Hi Will,
Thank you for your very informative info.Always like to read you and see what you doing.Thanks for taking the time to teach me.
Thanks Claudiane, pleased you enjoyed the article.
Will
Thank you, Will, for this reminder. My bad habit is I paint too much, trying to improve my work. Often, as with the bird I am working on, my subject gets larger, and LARGER. If I plan, as you suggested, I can control in advance where my weaknesses will lead me.
Hi Patricia, yes giving yourself more space that you think around the subject to start with can help to give a more balanced finished painting.
Cheers,
Will
Thank you for the excellent article, Will! This is very helpful!
My pleasure Lee, pleased you found it of interest.
Will
Thanks Will, beautifully and simply explained once again, you are a truly gifted teacher.
Sheila x
Hi Sheila, hope you’re keeping well, pleased the different setups were simple to follow.
Will
Thanks Will for the review of some fundamentals we all trip over no matter how long we’ve been painting (like pointy plates). Always enjoy your tips. Dave
Cheers Dave, yes those pointer plates can have a habit of always creeping in!
Will
Thanks, Will. Very helpful article, as always. Also, your vid/ info on glazes is the best out there.
Thanks Sarah and really pleased you enjoyed learning about glazing.
Will
Just in time to stop me beginning an arrangement of all basically round squashes. The difference in size and colour would not have been enough for a good composition. Thanks for the guidance and reminder that time spent on this planning is worthwhile.
Oh great one Marijke, pleased it helped just in time, good luck with your painting.
Will
Thank you.. As an amateur artist,I found this quite helpful in planning my compositions.
That’s brilliant to hear Monica, hope it helps with your compositions.
Will
Thank you, Will. Great advice and instruction! Very helpful. If I were to do this painting myself, I would cut down the background space at the top of the painting (wall) by 1/4 or a bit more in order to make the balance of the composition more pleasing to ME. It is jarring to me to have everything at the bottom of the composition. Am I wrong? Your feedback will be appreciated. Thank you. Martha
Hi Martha, yes, you can change the crop above the objects depending on the look and feel you’re after. I’ve added an image below the pomegranate composition so you can see how different ratios of canvas would work.
Hope this helps,
Cheers,
Will
Yes, i now. Thanks!
Hi Will, great advice again, very helpful, thanks so much for you generosity! best Michelle
My pleasure Michelle, so pleased you enjoyed it, hope it helps with your paintings.
Will
Wow what great tips. We’ll be right for sure now
Clear, easy to understand with good examples. I’ll re read often to help compositions and photos. Thank you for sharing your excellent techniques with beginners. It makes it less challenging and is very motivating. And I need motivating!!
Carol
Thanks Carol, pleased you found the examples helpful.
Will
Just started subscribing to these but the info is really helpful. Thanks
That’s great to hear Heather, hope it helps with your compositions.
Will
Thanks much. A great presentation. Terrific.
Cheers Tom
Wow! You are so exceptional at relaying information! This is the best article I’ve read on this subject – I’m not left with questions, but rather the inspiration and confidence to just jump in and do it! Thank you so much!
Lorrie
Really pleased you’re feeling inspired to feel more confident setting up your own still life Lorrie.
Cheers,
Will
That was a great Saturday arvo read. Real informative. Cheers for that. :-)
Hi Will, this was very helpful advice. I had started a new still life but it seemed “off” and now I think I see what was bothering me. Thank you for opening my eyes to some areas of the set that can help the painting be much better. Appreciate your generous sharing of information! Thanks so much.
Janie
Glad it helped with your current painting Janie.
Will
Dear Sir.
Thanks a lot, for my first lesson.
still a long way to go.
Thanks Aroon Parab .
Excellent article – love how you give us pictures to show what you are teaching. Great refresher after going on instinct for years and forgetting why certain things work and others don’t. Thanks Will!
You’re more than welcome Allison, hope it helps to give you a framework to get started.
Will
Will,
Thank you so much for this information. As a true novice I am learning a lot from your videos and newsletters. I appreciate your time and effort!
My pleasure Lori.
Will
Thank you for a very informative article. I’ll have to refer to this often because there is much to look for that I didn’t know before.
The pomegrate looked better to me when the half was turned slightly rather than have a full frontal view. Did you mean that was OK?
Camille
Hi Camille, yes, on reflection, I also preferred the first angled view of the pomegranate as mentioned in the article:
“On reflection, I preferred the angle of the cut pomegranate in the images above when it was twisted slightly. From this angle, the face of the pomegranate is quite circular and similar to the shape of the whole pomegranate.”
Hope this helps,
Cheers,
Will
Thanks, Will ! This is so helpful, especially as I am a beginner at painting and not very good at drawing
Pleased you found it helpful Jackie.
Will
Will – Those ellipses get me all the time. Getting better though. Love the tangerine setup. So many different shapes and angles. This should be a good challenge for me to try.
As always quite helpful!
Thanks Laundrea, yes pointed ellipses can always seem to sneak into a still life! glad you enjoyed the setups.
Will
Thanks again Will. You have a wonderful skill and are able to share it in a clear way that is very helpful. Most of all, your generosity in sharing your knowledge is really appreciated.
So pleased you found it helpful Irene, hope you’re doing well.
Will
Hi
i love your training article .thanks
Thanks for those wonderful points, subleased yetwhat adifference they make in the overall composition. I’m saving this to review before my next drawing.
Hope it helps for your next sketch Sharin.
Will
Hello Will,
Many thanks for the very useful hints on my favourite subject matter. I never tire of Still Life compositions and looking back at some previous efforts, I have found a couple of the errors you have highlighted.I must try harder in future!
All the best,
Peter B.
Hi Peter, glad you spotted a few of the issues, it’s often when looking back on works they seem to jump straight out at you, glad you’ve been finding it helpful.
Will
Thank you Will !
Very important information. It is exactly I was looking for.
You are really great teacher !
//Anya
Thanks Anya, pleased you found it helpful.
Will
Hello Will,
Thank you so much for sharing this information. I really enjoyed the composition lesson for still life. It is so helpful to analyze composition in this way.
Kind regards,
Kate
Hi Kate, you’re more than welcome, so pleased you enjoyed the lesson.
Will
Hi there Will
Many thanks for these useful tips. Thanks for sharing.
Have a wonderful day!
Willie
Pleased you found them helpful Willie,
Cheers,
Will
Wonderful help, Will, as always !
Thanks Paula.
Will
Thanks Will, I always learn something new from you, we never stop learning and that keeps me excited about my art. I appreciate all your emails, thanks so much, Frances.
My pleasure Frances, pleased you found the article of interest.
Will
Thanks much. Very. Helpful.
Very interesting
Hi Will
What a coincidence! I have just been drawing still life – jugs, creamers, cups etc and learned all about what you have been teaching us in your email. Thank you so much for your emails, I can’t wait to receive them. I learned so much from you with your Portrait lessons. I have been self teaching myself from books to paint Portraits for about 3 years now but , you showed me in your Portrait lessons so much that I needed to know. Thank you once again and keep them coming.
Regards
Rhona
That’s brilliant to hear Rhona, so pleased you’ve been finding the portrait course helpful in your paintings.
Will
Thanks alot for these tips Will, consciousness in directing the eyes through a piece.
This is really helpful. Thanks again
My pleasure Jerry, glad you found it helpful.
Will
I appreciate how you so wonderfully flush out this subject with great pictures and step by step adjustments to illustrate the thinking process. Thank you for your wonderful gifts!
My pleasure Marya, so pleased you enjoyed the article.
Cheers,
Will
Thankyou for sharing these informative and pro points . And very nice article .
Pleased it helped Palkita.
Will
Enjoy your classes, Will, and learn a lot. Excellent way of putting things over. Thank you.
Thanks very much Alison, really pleased you’ve been enjoying them.
Will
Thank you so much Will for the article on common mistakes in setting out a still life arrangement. I love the way you expanded a still life setting into interesting possibilities drawing the eye over the entire painting. Thank you
My pleasure Swapna, so pleased you found the lesson helpful.
Cheers,
Will
thank you will, you have helped me with my drawings and I understand it more. I hope that I do well and my teacher is pleased.
Glad it helped Lorri.
Cheers,
Will
Super! Thank you, Will!
My pleasure Tato.
Cheers,
Will
That was really Good! Great Job!
Pleased you enjoyed it Mary,
Will
Merci Will pour ces tutos clairs et si riches ! ce sont de véritables pépites !
Thank you Will for these clear and rich tutorials! these are real nuggets!
Avec plaisir Dom, content qu’ils te plaisent.
My pleasure Dom, glad you enjoyed them.