Ever looked at your drawing composition and something feels wrong?
You just can’t put your finger on it, 90% of the piece looks great but somethings not quite right.
You could have fallen prey to an easy slip-up, you might have drawn a ‘tangent’ by mistake.
A few simple changes can transform your drawings for the better…
What are tangents?
Tangents are where 2 lines just touch each other in a way that causes spatial ambiguity and a slight jarring on our eyes.
It’s not super obvious but can really ruin a perfectly good painting and can unwittingly change the composition in your drawing.
Tangents ain’t pretty!
So let’s look at a few simple examples to try and decipher any tangents hidden in your own works.
Tabletop line
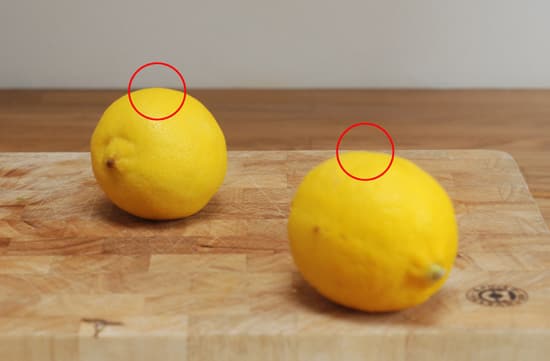
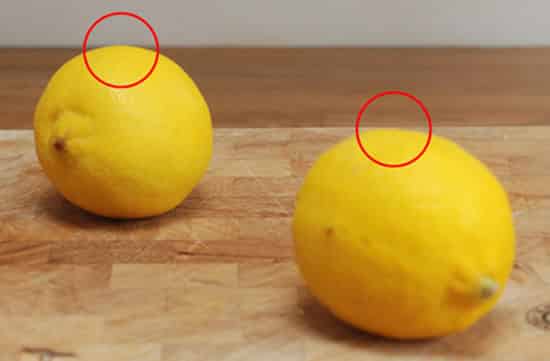
In the example above both tops of the lemons hit a horizontal line, it can start to make whatever is on the horizontal line feel like it is sitting ‘on top’ of the object.
You’ll often see it in landscapes where the top of the trees hit the ‘bottom’ of the clouds. This creates a weirdness, and it flattens the perspective in your drawing.
If you’re working from a reference photograph, these tangent lines can be harder to spot, but when anything is translated into paint, the effect is amplified.
It is worth taking a bit of time when selecting an image to paint from, to double-check that overlaps are in the image to help with depth.
See How to draw perspective for beginners for an example of how overlap can help your painting.
Edge to edge
Here we have another couple of examples.
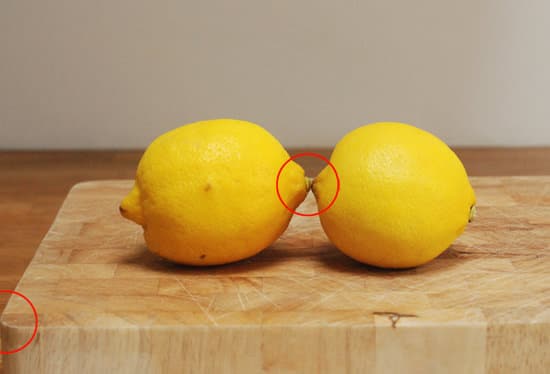
The edge of the chopping board (bottom left) hits the edge of the frame. This is a visual no no.
It draws the attention to that point and ‘charges’ it, equally, where the two lemons touch your eyes are really drawn to that point.
Notice how the space between them, the negative space, forms an x shape.
This also visually blocks the back edge of the chopping board so prevents your eyes from wandering through the piece.
On the positive, the top of the lemons are now looking loads better than in the first example as they break through the horizon line and each lemon is at a slightly different height.
Being at a slightly different height creates a slightly different shape, and the more varied you can make the shapes in your paintings or drawings, the more natural they will appear.
Parallel lines
This particular tangent needs a lot of help!
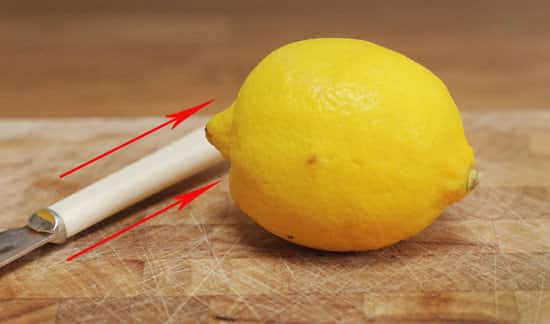
The angle of the knife is the same as the tip of the lemon, this sends your eye to that focal point, but then there aren’t any gaps for your eye to go.
You can’t judge how long the knife is and thus creates an optical illusion where you’re unsure if the lemon overlaps the knife or is butted up to it.
When viewers are faced with these subtle questions, albeit on a subconscious level, it makes the finished painting feel forced even if you have loose brushmarks and great colours.
If the composition jars – you lose your audience.
Edge to edge
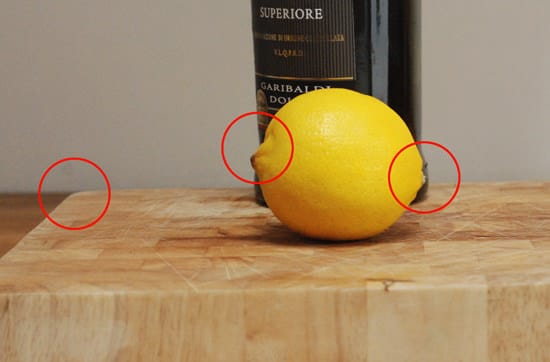
We have our old friend the ‘tabletop line’ back again, but this time we have an issue with our objects that are edge to edge.
Both sides of the lemon are hitting the wine bottles edges, which creates a solid pillar of focus.
If the lemon was moved to the left 1 inch, we would suddenly have good overlap, a view of the curve of the bottle’s base and more interesting negative space.
As it stands, it feels unbalanced and lacks interest.
Before & after a tangent composition

Before: Notice how awkward and squeezed in this image feels.
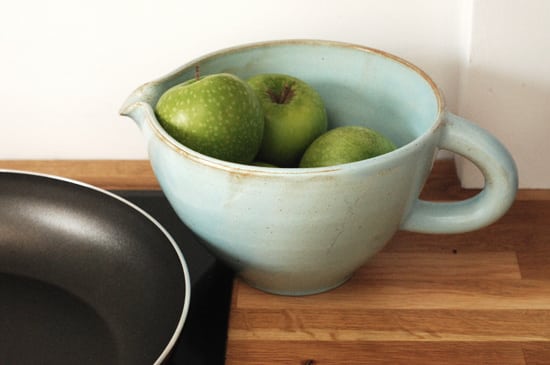
After: By slightly adjusting the viewing angle we now have a much more balanced and less jarring composition
Seeing spaces as shapes
Working between tangents and negative spaces can really improve the compositions of your paintings and drawings with the success of the piece.
A tangent is when two or more lines interact in a way that creates a relationship between them that the artist did not intend.
One of the most powerful of my ‘7 painting success principles’ is the simplest skills to learn and one of the most eye-opening.
It can give you an ‘aha’ moment in an instant and help to give you stronger compositions, balanced paintings and dramatically increase the professional look of your paintings.
The only problem with this technique is its name.
It doesn’t fill you with hope.
Negative space
I know, a negative before you’ve even got your paints out!
Negative space is the space around an object—the shape through a cup handle, the shape between two apples on a still life painting.
These spaces between objects help you arrange the composition, create an interest, or move the viewer’s focus.
When you are first beginning drawing or painting the tendency is the start simply with a single object, in the middle of the canvas.
The 3 things that are usually missing are as follows:
- An indication of what the object is sitting on.
- An indication of where the light is coming from.
- A variety in the spaces around an object.
Being aware of negative space helps to make you aware of all of these things and avoid the common mistake of tangents.
If you’d like to learn more about composition in drawing you should have a look at my Absolute Beginners Drawing Course.


Really terrific information! I struggled all day yesterday with a composition and woke up to find your wonderful article. It has helped me isolate 3 problem areas that I wasn’t even aware of!
You write such lucid stuff – really easy to understand, and SO specific.
The guidelines you’ve put forth will give me lots of ways to improve my work. Thanks again for sharing your knowledge.
Diana L
Hey Diana,
That’s great news, those tangents have a way of sneaking into your pictures!
really pleased it has helped your paintings.
cheers,
Will
Dear William,
Thank you to teach us new lessons. I am deeply touched by your behavior of granting free of any charge, basic elements of paintings. When you open a subject, we can see good points which we were unable to find by ourselves or may take some mistakes to learn how to not do it again.
I am waiting for more lessons, which increases our ability of painting.
Hi Ardeshir,
You’re welcome, often a simple lesson can be the most effective when learning drawing & painting,
Thanks,
Will
Dear William,
I enjoy your lessons very much there is so much to learn that is not even comprehended. As a retired Pipefitter I like to paint but lack the basics.
So again,
Thank you,
Alfred
Hi Alfred,
Thanks for the comment, really pleased that the site is helping you with the fundamentals of painting. They really are the keys to success in painting.
Cheers,
Will
Thanks for the lessons and tips, its really helps me and I want your help more because I am new in this field.
I love to paint from my childhood and I was really good too but I got a chance now to improve my skills and learn it properly.
Once again thanks to you for your help, it means alot to me.
Thanks Hira, really kind of you to say so, brilliant to hear you are starting painting again.
Cheers,
Will
Hi Will,
My 1st “chance” meeting with you was via “youtube”. I followed your 4 part course – http://www.youtube.com/watch?v=AWQ1S1YwkI0 – and completed my very 1st ever painting in a day. It is especially difficult learning a new craft (art) when one is so “green” that one doesn’t even know what questions to ask.
For example, I would have never asked someone about “tangents”, since I had no clue what the heck a “tangent” was in the first place! The last time I heard that term was 30 years ago in Math class, I think. lol.
I enjoy your lively and easy-to-follow, free lessons.
Thank again – you are much appreciated, Lucy (Canada)
Hi Lucy,
Thanks so much for your kind comments.
Glad it’s inspired you to pick up the paintbrush!
Enjoy the rest of the tutorials,
Thanks,
Will
Hi Will,
I’m that kid again and I haven’t been reading this because of soccer season, but I back again.
My question is: how would I not make tangent lines in a scene of the cook space in one’s house. I am preparing to draw it.
David.
Oh Hey David, nice to hear from you.
You’ve just got to keep on changing your viewpoint untill there aren’t any major lines that touch and put the viewers eye out, work from the general view and build the drawing from there. Sometimes cahnging the height you are viewing from can simply fix the issue.
Cheers,
Will
Hi Will,
Thank YOU so much for your 2 great tips about increasing my shutter speed and avoiding tangents which I have created unintentionally to improve my painterly look photography. Have a nice weekend :D
You’re welcome Abby, pleased it helped.
Cheers,
Will
Hi Will,
I am a volunteer teacher. My students are senior citizens. Thank you for illustrating this problem in this totally comprehensive and understandable way. I have been at my wits end trying over and over to explain this concept. So, at first I thought my students thought I was crazy or they were just totally ignoring me. Then one of my students came up to me and explained that she would forget. So I’m up against ingrained preconceived ideas and memory problems. So again, thank you. I’m hoping this helps them.
Ruth
Hi Ruth,
So pleased you found the article of interest, really hope it helps your group to start seeing tangents and improving their compositions.
Cheers,
Will
What a great post! I don’t even have time to finish reading it right now and I learned a lot! I’ll come back to this for sure.
Martha
Pleased you found it helpful Martha.
Will
A lovely prompt to get the pencils out
Thank you for all your time and effort to share your time and skill
RESPECT !
Anita
You’re welcome Anita, pleased you found it helpful.
Cheers,
Will
Thanks Will. Your generosity in sharing invaluable lessons — gratis — speaks volumes about both your work ethic and your passion for helping people create their own art.
You’re welcome Susanna, hope you’ve found the lessons helpful in your work.
Cheers,
Will
Great eye-opening instruction…Can’t wait to pass it on to my kids. Thanks you!
Pleased you found it of interest Phil.
Cheers,
Will
Hi Will,
This is a very helpful post! I took your beginner drawing class over a year ago. I liked what you wrote about pen and ink drawing tools and was wondering if you plan to have an introductory course for drawing with ink. The way you sketch with ink doesn’t look like drawing with pencils. Is that right?
Liz
Hi Liz, nice to hear from you, I have a new course on urban sketching that’s coming out in a couple of weeks that introduces pen and watercolour wash techniques for quick sketching, I’ll be adding more details to the blog soon.
Cheers,
Will
Thank you for your helpful instructions. They are great.
Cheers Lugenia, pleased you found it helpful.
Will
Thank you for posting these awesome tutorials. I am about to start your drawing course, but can say that I’ve already learned a lot from the lessons and youtube videos. The instruction you give is very easy to follow. It breaks down complex concepts into ideas that are very helpful. I’m a fan of both your teaching and artwork.
Thanks very much Jeannie, really hope you enjoy the drawing course and pleased you’ve been enjoying the teaching style.
Will
Precious information always from you Will. Thanks a lot. I have painted four from your still life paintings. The apple, the pot, the pan and the fish. Wonderful paintings and you make it so easy to follow with your limited palette.
I have an issue and I was wondering if you have to propose me to read something about it. How to start the base color. I know that it depends from the background too unless you have left the area of the objects without having the background color but still it confuses me in order not to have too many layers to finally achieve the result I want. Actually my problem is color theory not well known
Hi Katerina, really pleased you’ve been enjoying the tutorials. When choosing a base colour it depends on the style you’re working with, the effect you’re going for and your personal taste. What can be a useful experiment is to choose a simple object and then to paint 4 small paintings (6 x 4 inch) but use 4 different coloured grounds and the same object. That way you can start to learn what style you prefer and the way that different colours optically react with each other.
Hope this helps,
Cheers,
Will
Your tutorials are so very helpful. I,m an old lady (93) who had not painted for many years.. I especially found your artical on shadows very helpful. Thank you so much
That’s great to hear Audrey really hope they’re helping you with your new creations!
Cheers,
Will
Welp, I committed a cardinal tangent sin on my painting, but I like it. This is great information though, and the provided pictures really put the ideas into perspective. The only issue I really have is that I like to paint as a realist. I try to make my painting look exactly the same as how I originally saw it, or anyone standing in the same position would see it. So if the mountains are in the corner, the mountains are in the corner. A recent painting I did would have to be shared to see if it looks off with the “tangent”. Now I’m wondering if it’s jacked up, like your “Tom Jones” portrait pallet.
Glad the pics helped to illustrate the effect Eric, yes, the Tom Jones Palette effect can be dangerous!
Im a technical draftsman the has an artistic practise and i say, do every single of these things. The make the work intelligent. Mathematicly intresting. Wonderfull compositiond m8. Cheers from Belgium Jo
Thanks Jo!