Painting is all about perspective.
The shifting nature of our perception can be a huge obstacle when learning how to paint.
Have you ever seen your artwork as a masterpiece one moment, only to label it a disaster the next? I know I have!
The first step to advancing your critical judgment skills is to realise that there probably won’t be a moment you see your work with 100% clarity.
We can all be swayed by various cognitive biases of creation.
A cognitive bias is a tendency to make decisions or take action directed by emotions rather than by careful thought. They can subtly skew our judgment and we can become influenced by our own personal preferences, beliefs, or feelings caused by our values and experiences. When viewing our paintings we tend to place excessive value on pieces we have crafted ourselves or have sentimental attachments to certain scenes or memories.
Or you may just been standing at the easel all afternoon, trying to mix the exact colour for too long and you can’t see it anymore!
The importance of self-checking your own work as an artist.
Do you find it easier to notice flaws in other people’s artwork compared to your own?
When you’re so concentrated on your own painting, it can be challenging to assess your work and identify areas that need improvement. This is because you are seeing others’ work from a fresh perspective every time. You’ve no idea of the time it took them to paint it, the struggles they faced with the materials or the entire backstory behind the image. You just have a single image to look at. That’s why having an art tutor or going to a class with live feedback can be so helpful.
So if the success of our paintings is based on the way we can critically view them, what can we do to be more objective?
I’ve put together a list of 7 small but helpful tools and techniques that I use in my painting practice to help me and hopefully, they will help you too.
Painting is repainting.
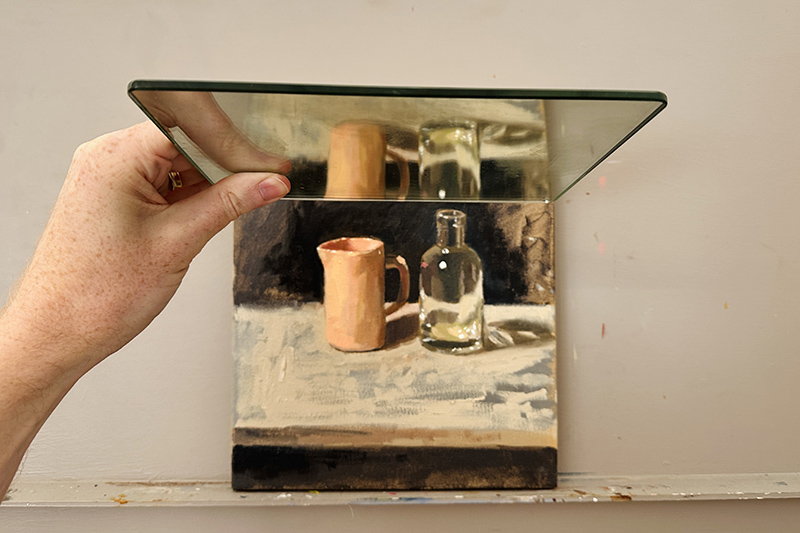
Technique #1: Using a Mirror to check for symmetry and proportion

Mirrors have been used for centuries as an optical device for judging your paintings. I started using them more regularly when studying sight-sight portraiture with Nick Beer at the Sarum Studios.
The use of a mirror became integral to the process of creating the portraits as a way of constantly checking your work. There are a couple of different techniques. Holding the mirror to the side of your face and looking into the mirror to view the painting and subject at the same time, or holding the mirror to your forehead and looking up at the reflection.
Because you’re seeing the subject in reverse, it disrupts the familiarity of it and often highlights what I call the ‘dark zones’. These are the areas that aren’t as interesting to paint or you’re putting off because they look too challenging. When you look in a mirror, they will be the first thing that stands out.
Technique #2: Upside-Down Art
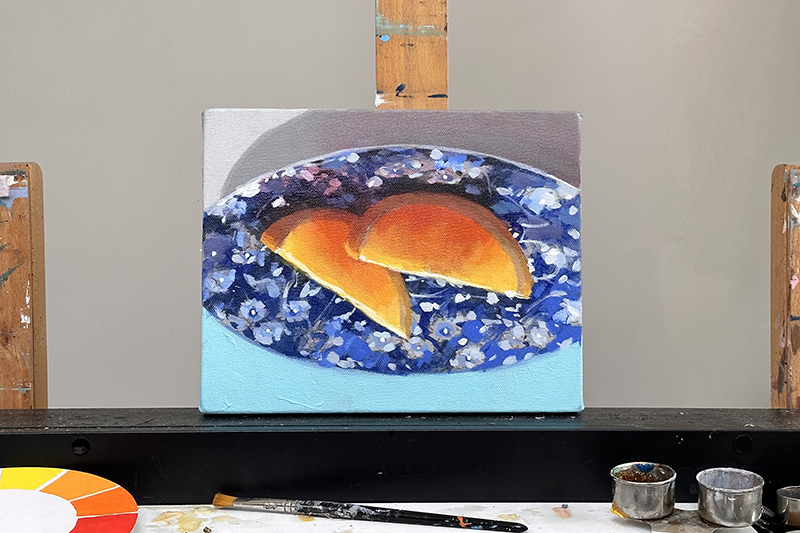
The next method is quite simple: turn your image upside down. Those who have done the Beginner’s Drawing Course may be familiar with the power of upside-down drawing as an effective tool for understanding the mechanics of drawing and how our brain can mislead us by trying to predict what we should draw, instead of observing abstract shapes.
When checking your paintings, this technique also holds true. Viewing it upside down or even sideways refreshes your perspective, allowing you to see it as a different artwork. Examining it from this new angle helps identify relationships that are either working or not within your piece.
Technique #3: Mastering Drawing Accuracy with Tracing Paper
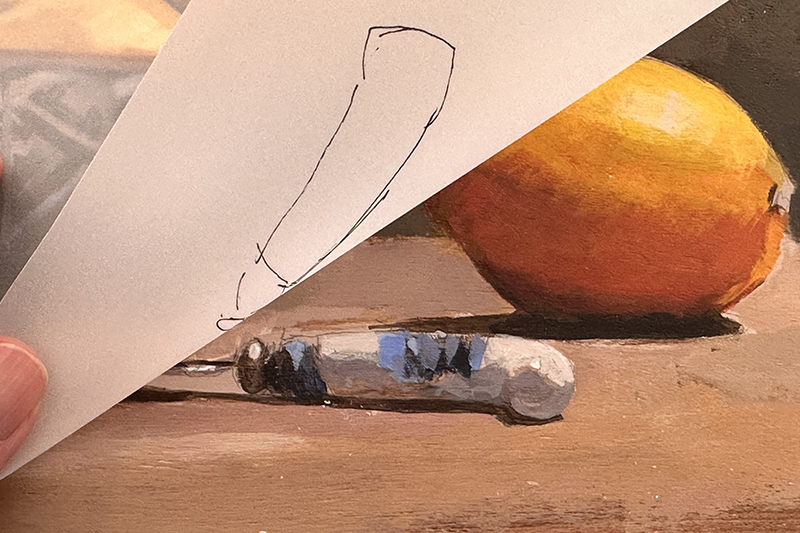

Tracing paper has long been associated with the act of replicating images, however, its potential as a teaching tool extends far beyond mere copying. By embracing tracing paper as a personal teaching assistant, we can use it as an excellent tool for checking your drawings.
Tape a piece of tracing paper to your reference image.
Start your drawing on a canvas or paper the same size, and make your first few marks.
Trace the same few marks onto your tracing paper over the top of the reference image.
Then slide your drawing inbetween the tracing paper to check accuracy.
This method resembles using a proportional divider but with added benefits – tracing paper allows you to assess curves and contours in addition to measurements between elements.
Technique #4: Proportional Divider – Learning How to Check Your Draw


Wooden proportional divder
One of the first measuring techniques you learn when drawing is to hold out your pencil at arm’s reach and use the pencil as a unit of measurement, to compare different proportions of your work.
This can help when you can get back from your subject, but a more accurate way to check your proportions is with a proportional divider.
A proportional divider is used to maintain accuracy when copying or scaling an image. It consists of two adjustable arms connected by a hinge. The arms usually have a series of holes allowing you to reposition the screw to set a desired scale or ratio.
First, make an educated guess on the width of your subject and mark it on your paper. Then using the dividers, create that exact measurement on your reference image (assuming you’re working one-to-one) and compare it with your initial estimate.
The divider serves as a checking device rather than a measuring tool, helping you to set proper proportions in the early stages of drawing. By accurately determining the highest and widest parts of an object, everything else can be aligned accordingly.
Pro tip: They can also be useful outside the studio for en plein air sketching. For example, measure the largest object in front of you (such as a tree), then transfer that measurement onto your sketch at a smaller scale to establish accurate proportions.
Technique #5: Mirror Image App
Your phone or tablet can be incredibly useful for assessing compositions before you start drawing out and throughout the process. One helpful feature is creating a mirror image of your subject using the edit tool.
For example, I took a photo of a fab coconut cake and a cup of tea recently, I thought it would make a nice painting. However, after flipping it into a mirrored version, I noticed issues with perspective and distortion caused by my proximity to the table. But interestingly, even knowing this, my emotional ‘cake excitement’ and memory attached to the occasion, still makes me overlook these flaws and I have considered painting it since.

Left: Original Image, dreaming of coconut cake. Right: The cake looks much larger due to the distortion of the lens.

To create a mirror image, click on the edit tool, then select the crop tool at the bottom of the screen. In the top left corner, click on the button with two triangles facing each other – this will flip your photo. This technique helps identify any visual biases that may affect your judgment of whether an image works as a strong composition.

Click the Mirror Image Icon at the top left
Using this method allows you to double-check if you still find an image visually pleasing when mirrored – if so, it should work well in its original form too.
Technique #6: The Value of Values

By utilizing the black-and-white mode of your phone’s camera, you can instantly view the values of a subject. Getting the values right (how the painting appears in black and white) is often more crucial than the actual colours used. Values hold the painting together.
For example, in our Cornish Seascape course, we had both a black-and-white printout and a colour reference image for evaluation purposes. Using a value scale to examine colours and hierarchy of values can be so helpful.
You can use the iPhone’s built-in camera or use an app to see the value structure. This article on Notan Design for Artists, looks at the importance of black and white design in your paintings.
Technique #7: Viewing Distance – Move further back to see more clearly

Changing your viewing distance can help you see your artwork more accurately in several ways. It’s easy to get too close to the easel and lose sight of the overall composition. By stepping back and viewing your work from a distance, you can get a better sense of how the various elements fit together and how the piece reads as a whole.
As well as stepping back, I’ll often take the painting and place it on the floor, or against a different coloured wall. You’re trying to create a new visual environment so you can see any proportion or perspective issues.
Bonus Technique! A Cup of Tea

Yes, a brew can give your eyes that much-needed break, when you come back to your work, you’ll often be amazed, I do it regularly and clearly see shapes that are ‘out’ or things that are working.
Hope you find these techniques helpful!



Fantastic tips on checking your own work. Will is the best!
Thanks Janice, hope you find them helpful.
Will
Thank you for these great tips.
I will certainly use them in my paintings.
Good one Dawn, hope you find them helpful.
Super helpful! Thanks for sharing!
My pleasure Jenna.
Can I come to Cornwall. A group art tutorial.
Ha, ha, on phase 2 of the build at the moment so without a roof! but good to know it would be of interest Abbey.
Will
Thanks Will, these are very helpful tips. When I know something is wrong but can’t decide what, I photograph my work. For some reason I find it easier to detach myself from the process & recognise the problem using this method.
Yes, that can really help Sarah, also you can hold your phone at arms length to feel like you’ve stepped back across the room!
Thank you for all these great tips! We never stop learning. Your sharing is much appreciated.
My pleasure Margaret.
Best tip for me was the mirror image. Will give it a try today. Thanks!
Yes, can be so helpful Frieda, hope you find it useful.
Will
I really enjoy your teachings, thanks!
Cheers Jean
Will, thanks for the tips and techniques. I plan on incorporating in my work.
Good one Leslie, great to hear.
Many thanks from across the seas in Sydney.
Cheers Anne
Thanks Will, great advice. I definitely need a proportional divider. And I love that painting!
Ahh, thanks Jennifer.
Yes, Will, very helpful tips. Thanks!
Cheers Jennifer
Fantastic tips! Read it twice. Thank you, Will!!!
Thanks Mary, really hope they help.
Thanks Will for your tips definitely will give them a go.
My pleasure Gladwen.
Thanks Will, I can always learn so much from you, I still remember and use all the tips you gave me at the Saturday class at Hanley, definitely the best tutor ever!
Ahh, you’re too kind Jean, hope you’re keeping well.
Will
Thank you Will. I usually use the upside down/sideways, step back (a lot) and cuppa methods. Also, sometimes I look at the mirror image in the window if painting at night.
I’ll definitely give the B&W values method a go.
BTW, I’m always second guessing myself. It’s a love/hate relationship.
Hey Steven, yes, can be super handy to see if you’re on track with your mixes.
Thanks so much Will. Extremely useful handy techniques.
Thanks Chez
Thanks Will, I always enjoy your emails and special information treats. I am engaged in oil painting portraits now. I hope you decide to paint the coconut cake and tea pot pouring. You would make it even more inviting! Send me a picture of it when you’re finished please!
Thanks Patty, hope your portraits are going well.
Fantastic tips Will. Thanks. There are quite a few I use already and share with my own students. But a couple of new ones were “ahah” moments! Now I’m off to have that cuppa! I knew that one!!
Ha, ha yes, start with a brew and work through!
Great info Will. I built my own proportional divider, I need to use it more but I find using the “grid method “ my go to most often. I believe the old masters used the grid method by using a wooden frame with wires or string for the grid within the frame. But I use the grid on my iPad or printed photo. Will do you use the grid method? Is the proportional divider better?
Hey Mike, the grid method can work great, I find a proportional divided can be handy just to check your first few marks and then work freehand. The grid method will help to keep the whole piece in check if it’s a more complicated scene.
Will
Aloha, Will! Good pointers here! My favorite painting that I did with you is the Italian sunset with gondola. Waiting to do the Grand Canal. Thanks!
Liz from Blue Hawaii
So pleased you enjoyed the Venice painting Liz.
Thanks Will, these tips are the best. I’m having trouble becoming inspired, so when I receive your emails, they encourage me to pick up my paintbrush and get on with it.
Well that’s fantastic to hear Louise, the inspiration often comes when you’re within the process of creating. Even just mixing random colours and playing will help. Sometimes the thought I ‘what am i going to paint’ can become so dominant it build the pressure too much. Great that you’re feeling inspired.
Will
Thanks Will….your post is so helpful!
My pleasure Sue.
Thanks Will. Such helpful ideas, especially viewing with ‘fresh eyes’….
Thanks Libby, yes, it’s so easy to get engrossed in a painting and miss something that seems so obvious the next day.
Super helpful, Will. Thank you.
Kathy
My pleasure Kathy.
Thanks Will, the tips are really helpful.
I’m going to get a pair of those duviders. Best wishes
Pam
Cheers Pam, hope you enjoy using them.
Thank you so much once more for all your very helpful tips. I’m very much a beginner and have been on the verge of abandoning my paints as never seem to manage the perspective of the subject I’m endeavouring to paint .
Will have another go using your tips.
Really hope you find them helpful Catherine.
Just what I need at this time. Thanks!
Thanks Beatrice.
Thank you very much for your tips. Mirror image is something i will use fro now on. You should come to Croatia and give some life classes. And of course enjoy the summer here.
Heard fantastic things about Croatia Gordana, what a beautiful place to live.
Excellent!! Just what I need as I am practicing!! Great to incorporate into daily habits. Thank you!
Pleased it was helpful Tina.
Cheers,
Will
Thank you for your tips. Really appreciated here.
Why not coming to Croatia and do some summer classes here? To paint and enjoy beautiful scenery.
Glad you’ve found them helpful Gordana, what an inspirational place to live!
Will
I look forward to your emails, because I know they will have useful information that actually can be used and more importantly, easy to understand. As always, THANK YOU!
My pleasure Helen, thanks for your kind words, hope you find them helpful in your practice.
Will
Thanks so much, Will, your tips are always a great help. I’ve just ordered my very first proportional divider. Take care!
Great stuff Noralee!
Such helpful suggestions, thank you very much!
Thanks Katherine.
Thanks for the tips Will. I have used 3 of them in the past but had not used them recently.
A good reminders for me and I love the idea of using a mirror.
Hey Julie, yes, the mirror image can be super helpful.
Hi Will and thanks for writing a very valuable and helpful article. I have never used a proportional divider but I often scale up paintings from a reference photo and a tool like that would be useful. In regards to the coconut cake still life, I cannot see that the one version looks distorted flipped 180. They both look delicious! Guess I am not sensitive to the distortion. Cheers.
Thanks Anne, hope you enjoy working with the proportional dividers, and glad you like the look of the coconut cake!
As always thanks so much for this info.
I use my phone to take photos as I work as well. That way, wherever I am I can review my work…it also kind of of works the way stepping back works…
Looking forward to the new class.
Cheers Carmen, pleased you’re looking forward to it.
Thank you Will Kemp! Your help is so appreciated. Bless you for sharing your talents!
My pleasure Elizabeth.
Hi Will, Thank you, for all of these tips!! Love the teapot, the pouring of the tea and the tea cup. Lovely colours! Maybe skip the cake or make it much smaller!!
God bless, C-Marie
Thanks C-Marie, Hope they help.
So timely Will..a boost when I needed it. Moving forward in my learning how to paint. Many thanks.
My pleasure Dale, so pleased it was helpful.
Will
Thank you, Will, for another excellent set of helpful tips!
They mostly rest on the principle of somehow “refreshing our eyes”!
Thanks again and take care!
My pleasure Colette, hope you find them helpful.
Will
Just come home from 2 weeks break at Crantock Beach ,North Cornwall, armed with a camera full of wonderful pictures of magnificent beaches. Now the challenge is translate best pics onto canvas using your tutorials. Need to practice acrylic painting of ‘waves’ and ‘tidal sand colours’ on Crantock Beach .Any tips? We also visited St Ives ,Fowey ,St Agnes and Padstow.
Thank you for this recent very useful post. I will certainly be trying out ‘Value of Values’ and ‘Mirror Image Apps’ on my mobile phone. Also I liked the wooden proportional divider.
Sounds like you had a great tour Keith, glad you found the post helpful. I’d start with the colours we used on the cornish seascape course and then build out from there.
Will
Hi Will – many thanks for these tips – I have put this article on reminder so that I can run through them with every painting that I do from now on. I have used the upside down one quite regularly since I first did your drawing course, but I hadn’t thought of using the phone camera’s editing facilities to simplify the checking process. Once again your teaching skills are outstanding.
My pleasure Gloria, hope you’re keeping well, really hope you find them helpful.
Will
Fantastic techniques….because of your painting classes, I was able to sell one of my paintings recently for $250. I still take your classes!!!
Great stuff George! congrats on the sale.
Will
I have used tracing paper for things like dog portraits that need to be pretty accurate. I found I cannot trace reliably, and my drawing isn’t improving. Using the tracing paper to CHECK my drawing seems far more efficient. Thank you for that tip!
My pleasure Rachel, hope you find it helpful.
Will
Great suggestions! I do several of these (e.g. rotating the painting every which way). And something you didn’t mention but that I always do is to prop up the piece in the house away from my work space so that I will see it accidentally as I walk by doing other things … surprise, there’s a painting there! This is often very helpful, allowing a less biased impression.
Thanks Margaret, yes, in Technique #7: Viewing Distance – Move further back to see more clearly, I mention moving the painting away form the Easel, I do like the idea of the surprise painting though!
Will