And How to Fix Them
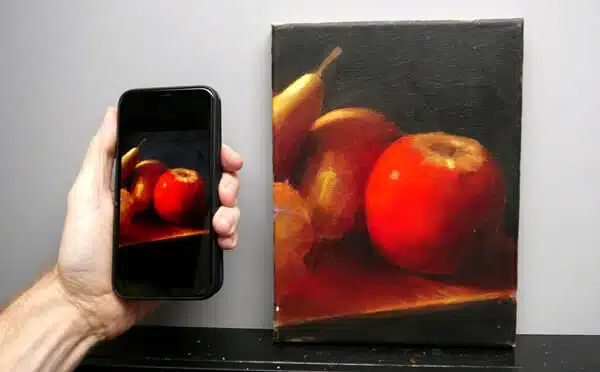
I see a lot of fantastic success stories from the tutorials on the blog and one of the most common footnotes is,“‘my painting looks better in real life than it does in the photo.”
90% of them are taken on a phone or iPad and over the last couple of years, I’ve found smartphone cameras are getting better and better, as long as you bear in mind their sensor size.
A traditional camera has got a much larger sensor, in comparison to a smartphone.
The larger the sensor, the bigger the surface area available to capture light on, so to get the best out of your phone and get great exposure on your shots, you need to follow a few easy steps.
I’ve put together a guide below which addresses some of the most common issues and the simplest way to fix them. There are two main approaches, natural light or artificial light, depending on what lighting conditions you have available to take your photos in.
Photographing with your phone in natural light

Issue #1: The colours don’t look accurate
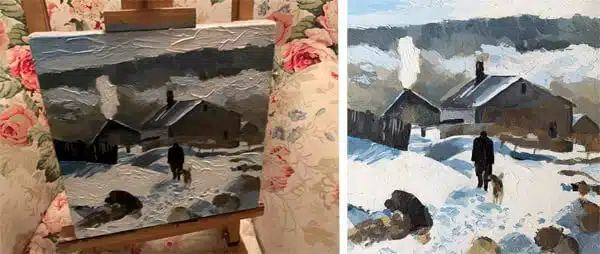
Photo taken indoors with the lights on in comparison to natural daylight
I appreciate how frustrating it can be to spend all your time on your painting and then when you want to share your work, the colours look off, or too dark, the image is slightly blurry or distorted.
The most straightforward fix if you’ve been taking your photographs indoors, is to move towards the light.
Solution: Photograph in natural daylight
Taking your painting off the easel away from standard household lamps and placing it in natural daylight will make the biggest difference to almost every aspect of the photography process but primarily colour accuracy.
Step-by-step: capture stage
You can either hang your canvas on a wall outside, preferably not in the glare of direct sunlight to avoid any reflection and hold your phone level and shoot.
Or lay your canvas on the floor inside, next to an open door, this will be your light source.
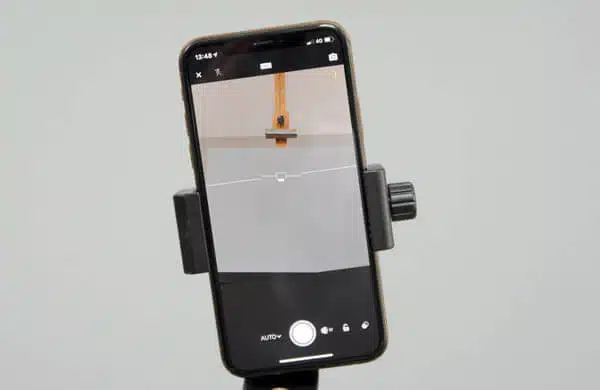
Turn off all the other lights in the room and position your canvas roughly 60 cm away from the bottom of the door frame, stand directly over it to take your shot.

Placing your painting on the floor by an open door will give you good illumination, even on a rainy day!

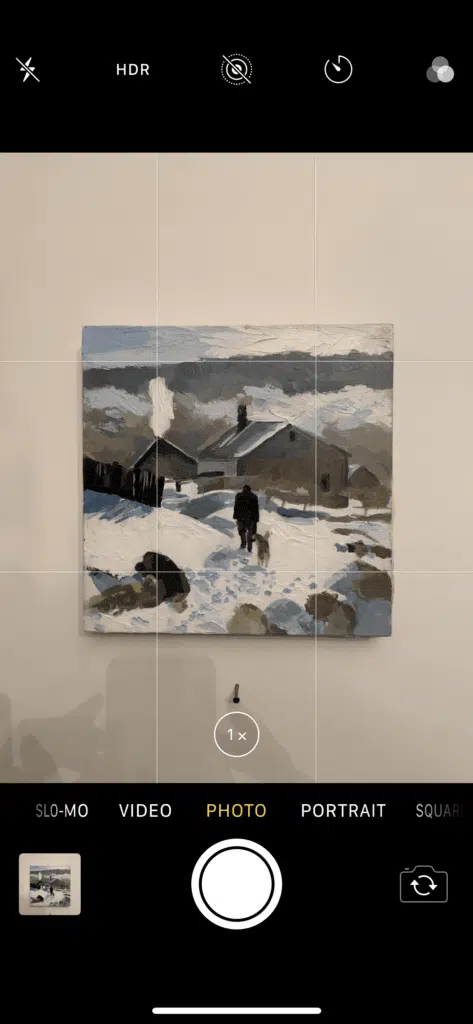
This is my view when I’m standing over the painting and holding the phone directly above it

I then crop the image: (see Issue #4)

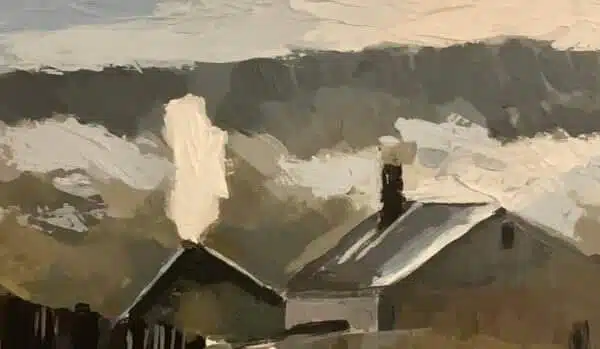
Here is the final cropped version of my photograph, notice how the colours look pretty accurate, the entire painting is evenly lit and you can clearly see the impasto marks

If you paint with texture and want to show depth and brush marks, the side light coming in from the door/window is called a raking light and will enhance the details.
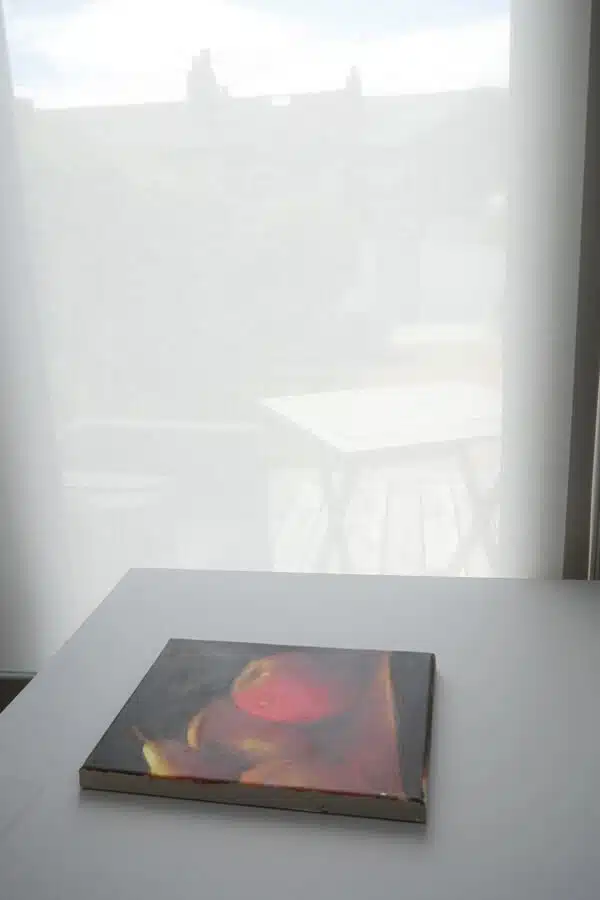
Alternatively, you can place your painting flat on a table next to a window and hold your phone above. The daylight is being diffused by a window blind in this example (yay Ikea!)
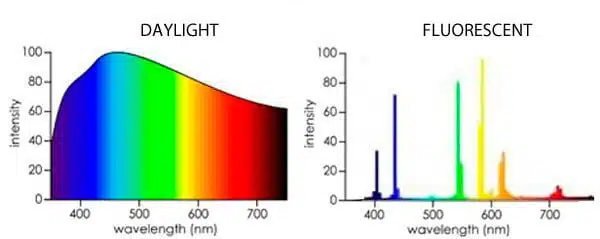
Why natural light?
Colour is created on a surface by specific wavelengths being absorbed and others being reflected.
If the light that is shining on the surface doesn’t contain all of the visible colours (full spectrum) they can’t be reflected, so your camera won’t be able to record them.
Daylight is called full spectrum lighting because it contains all the different coloured wavelengths; some artificial lights have missing colours and ‘spikes’ in the spectrum. Photographing your painting under low colour rendering household bulbs indoors, will prevent the camera from capturing all the different colours in your picture.
Colour is caused by the absorption of certain wavelengths of light by a surface, and the reflection of others. For this to work properly, the light shining on the surface in the first place needs to consist of all the visible wavelengths. – Neil Oseman – http://neiloseman.com/tag/cri/
Pro tip: Remember the small sensor in your smartphone camera?
Natural light is so much brighter in illuminance than your household bulbs it enables the camera to use a fast shutter speed automatically. This means you can handhold your phone without using a tripod, and there won’t be any camera shake or blur.
Issue #2: Distorted perspective

When your painting looks out of perspective, it takes away all the hard work you’ve put into creating an accurate drawing or painting to start with. It could create an elongated face in a portrait or short legs or arms on a figurative piece.
The key is making sure the angle of your painting and the angle of your phone are the same.

If you have two angles out, it can distort the edges quite dramatically. In this example, the canvas has been propped against a wall at an angle and then photographed from a different angle.
Solution: Adjust your angles
If you’ve laid your painting on the floor and you’re shooting down on top of it, there’s built-in help on an iPhone to make sure you’re aligned.
Step-by-step: capture stage
You have to go into your settings to find the Grid function and the steps below are for an iPhone, (but most smartphones will have a similar function)

Go to SETTINGS > CAMERA > GRID

Then, when you’re looking down on an image, two crosses will appear in the centre of your phone display

Move the phone until just one yellow cross shows – you’re now level – the same plane as the floor
If your canvas is hanging on the wall, try to keep your phone vertical matching the angle of the canvas.
If you want to go one stage further there are Apps available that show levels using the phone’s gyroscope, so you can hold the camera upright knowing you’re spot on the level.
Some third-party apps have built-in levels (this is from Lightroom mobile)
Why?
Because when you prop your canvas at an angle then hold the camera at a different angle, you get perspective distortion.
Issue #3: Lens & perspective distortion
Have you ever noticed the straight, square edges of your canvas look warped? Or a fence post you painted vertical has a slight curve to it?
The culprit is distortion. Lines can appear straight at the very centre of the canvas and curve away at the outer edges.
This is a small issue that is much more apparent when photographing 3D objects but can be evident on smaller canvases. It can pull the viewer’s attention to the centre of the piece, which may not be your focal point.
Solution: Check your distance
The effect varies in severity depending on your distance from your canvas.
Step-by-step: capture stage
If you hold your camera further back than you think from your painting, it will help to reduce the optical lens distortion.
Why?
An iPhone, for example, has a wide angle lens, so the closer something is to the lens, the larger it appears. When you’re holding the phone too close to a small canvas surface, the lens will make the edges of your canvas look curved and the centre of the frame larger.
Most photo editing software has a function that automatically fixes barrel distortion.
Pro tip: If you’re posing in a group and want a flattering shot, make sure you don’t stand in the centre in the front row!
Issue #4: Cluttered environment

When you’re promoting your work, you want to put out a professional looking image, even if you’re sharing it with friends, you never know who they’re going to show.
Solution: Crop your image
Photos of paintings in books or gallery websites are almost always cropped to clean edges.
Step-by-step: editing stage or post-processing
Using the ‘crop tool’ to crop and frame your picture to avoid the distraction of background

Tap ‘Edit’
Tap the crop icon
Sometimes the image will swivel around as the phone tries to adjust the level automatically. By pressing and moving the dial under the image you can change the angle, try to line it up with a straight edge on your canvas.
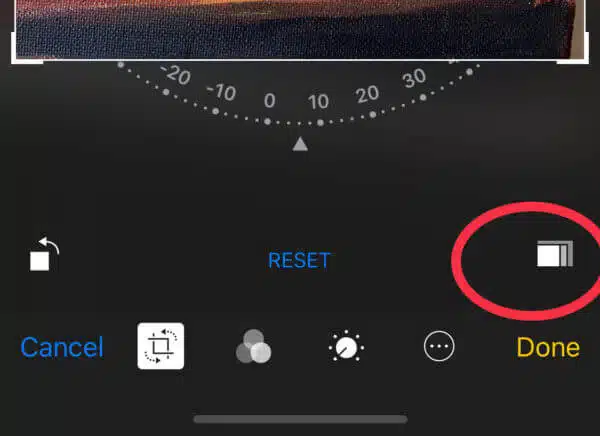
Then tap the rectangular icon in the righthand corner
This shows a range of different image ratios. If you know the ratio of the canvas you are using you can select it or click ‘original.’
Pull in one of the corners of the frame; this will show you a preview of your crop.
When you’re happy with your selection press ‘Done.’
Pro tip: If you want to include your background in the final shot, be mindful of what’s showing. Having some background around the image can help when showing a sense of scale or works in progress.
What about photographing indoors?
There will be occasions when it’s impossible to photograph your work using daylight as your light source, maybe you’re on a deadline and it’s gone dark outside.
The only option is to shoot under regular household bulbs and the main issue will be getting enough illumination for the small sensor in the phone – desperate measures call for an App or two and a brew and a biscuit!
You can see below on my light meter how much difference there is in illuminance indoors compared to outside (even taking an outside reading in a shady spot.)

2889 lx (Lux) in illuminance in the shade outdoors

158 lx (Lux) in illuminance indoors away from window (nearly a 95% drop in illuminance!) at my kitchen table in the evening it was 75 lux)
The illuminance of an area is measured in lux and you can see below the huge variation from outside to inside.
- Inside, furthest away from the window – 158 lux
- Inside, the centre of the room – 719 lux
- Outside in evening shade – 2889 lux
- Outside in evening sunlight – 22,000 lux
- Very bright daylight can go close to 100,000 lux
I cover various Apps below that help by giving more functions to overcome this.
Photographing with your iPhone in artificial light – extra Apps (and a brew) needed!

- Moment App: iPhone & Android (paid app)
- Snapseed App: iPhone & Android
Issue #5: Blurred image
Handheld with a 1-second shutter speed
If you’re photographing a moving subject you wouldn’t be surprised to see a blurry image, but when you’re shooting a static canvas inside, you may also have to consider blur – it’s just you’re the one that is moving not the painting.
It all stems from using a handheld phone indoors with low illuminance.
Solution: Use a tripod and adjust your shutter speed
Depending on your illuminance you may need a tripod.

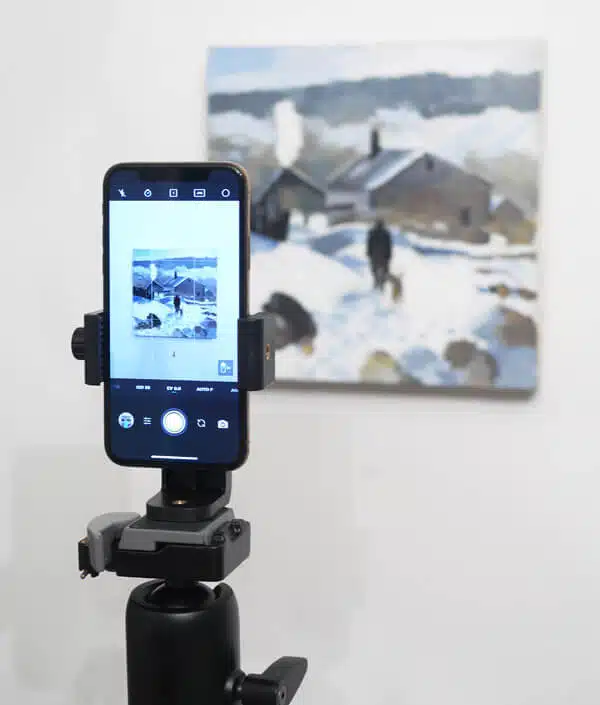
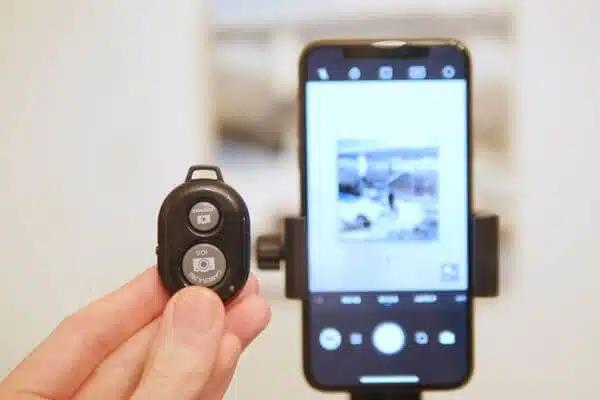
This budget tripod came with a bluetooth trigger so you can trigger the camera shutter without having to touch the phone (amazing for long range selfies!)
Step-by-step: capture stage
Download the Moment App (paid) and open it

Click the Flash Off
Set the timer to 3 seconds to prevent camera shake
Click File Type to save JPG

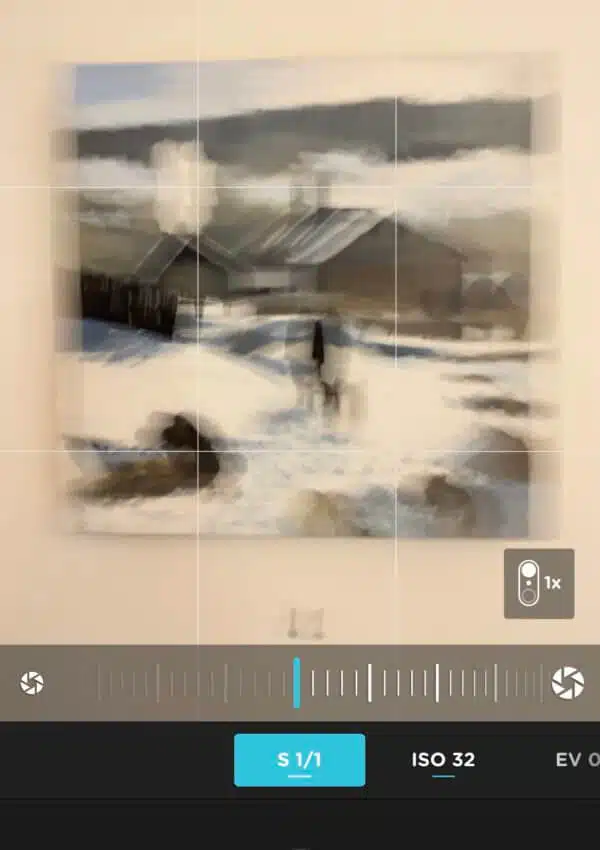
Move the ISO to 32

Then move the shutter speed until you start to see red lines on any white area in the painting.
Take the shot.
Why?
Shutter speed – A measure of how long a camera’s shutter stays open to let light in.
When you’re taking photos in bright natural daylight, the camera shutter can open quickly and allow enough light onto the sensor in a very short amount of time because the light source is so bright.
This is called a high or fast shutter speed resulting in no blur.
When you’re indoors and there isn’t as much light, the shutter speed has to be open longer to allow enough light in from the small or less bright light source. This is called slow shutter speed. The longer the shutter is open, the longer you have to stay still and the higher the chance there is of camera shake, which can make the image look blurred.
When you’re using a shutter speed lower than 1/60th second, any slight movement when you’re holding your iPhone can be exaggerated and cause blur.
Pro tip: Shutter speed is measured in fractions of a second. The shutter can open for 1 second or 1/100th of a second, or a 1/000th of a second. They are all different shutter speeds.
- 1 second
- 1/10th second
- 1/100th second
- 1/1000th second
Issue #6: Image looks too dark (or too light)
Because phones are so smart, you can be fooled into thinking that they know exactly what you’re looking at. We’re so used to face recognition that when you hold a phone in front of your painting, it can be annoying when the shot comes out too dark.
It’s all about the exposure.
Solution: Tweak your exposure
Here’s a quick test you can try.
Hold up a piece of white paper in front of your camera and let it fill the frame, don’t adjust anything and take a photo. Notice how the camera creates a general grey tone, the white paper looks grey.
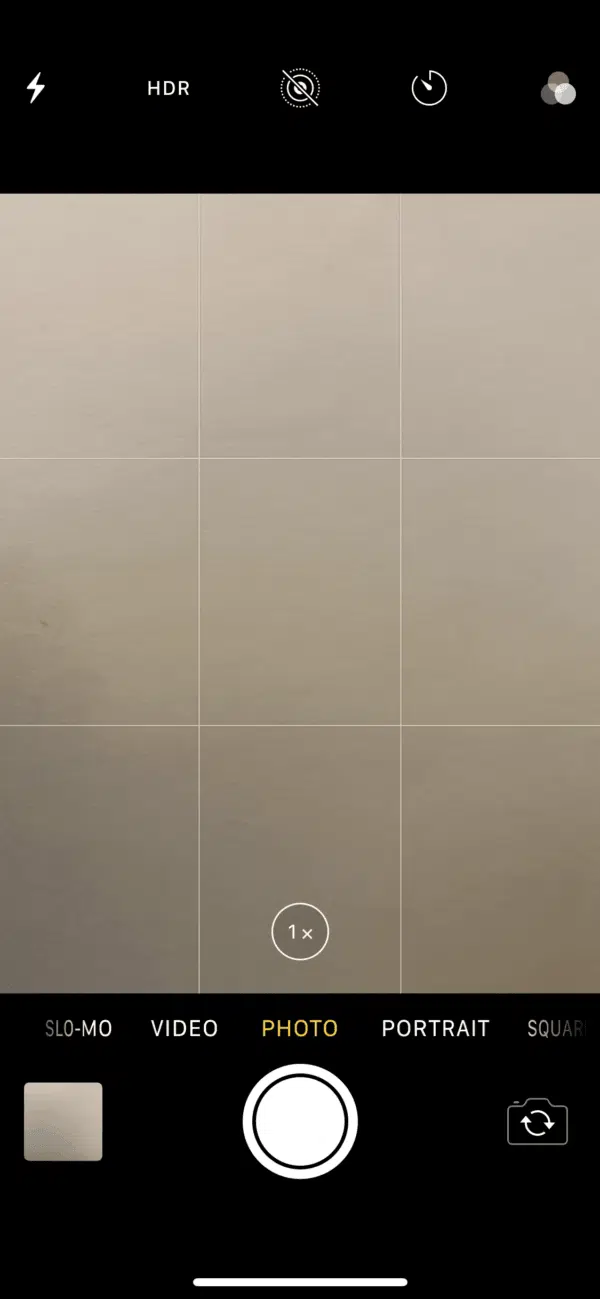
White paper in front of the camera without adjusting exposure is captured as grey
This is just a reminder that if you’re photographing a painting that has lots of white in it and you hold your camera so the painting fills the entire frame, the camera will tend to underexpose the image and your whites will look grey.
‘Exposure compensation’ is key. In other words, you are going to have to adjust your exposure manually.
Step-by-step: capture stage
The steps below are for an iPhone (but most smartphones will have a similar function)

Tap the camera screen and a yellow box will appear
Next to the box is a sun icon.
Slide your finger up and down to adjust the exposure.
The main problem I’ve found with the in-built camera function is it doesn’t tell you if you’ve overexposed the image too much in a light painting or underexposed in a dark painting, you have to do it by eye.
Gaining more control
The Moment app has a great feature that shows you when your highlights are clipping by displaying diagonal red lines over parts of the image that are on the brink of being blown out.
Step-by-step: capture stage
Open the Moment App.
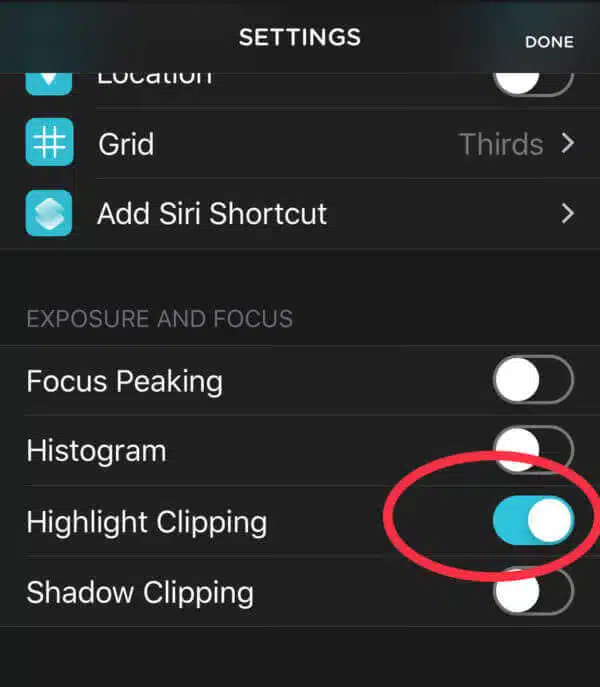
Go into Settings
Under ‘Exposure and Focus’ turn on ‘Highlight Clipping’
You can also turn on ‘Shadow Clipping’ if photographing a dark painting, this will show as blue diagonal lines when you’re losing details in the shadows. I try and get a few blue lines on the very darkest black areas.

The red lines on the Moment app show the highlight areas that are blown out or ‘clipping’
Excess red lines will mean you are losing information from the image, I try and get a few red lines just on the very brightest white area.
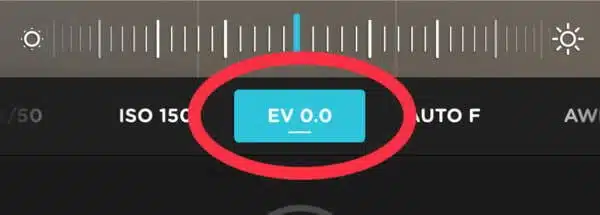
To adjust the exposure value, tap EV 0.0
Slide the dial left or right until you’re happy
Why?
Two common scenarios can cause the camera to under or overexpose.
- Your painting has lots of white in the painting
- Your painting has lots of black in the painting
Your camera is always looking for an average tonal exposure of an image, it doesn’t necessarily know if there is a large amount of white of black in the painting, it’s trying to expose for a mid-tone.
Issue #7: You’ve got glare

If you’re in a low-level light space, an obvious choice would be to add more light in. It might seem a good idea to use the camera flash, makes sense right?
Solution: Turn your flash off
The issue is that the flash is on the same axis as the camera lens, so if you have a glossy or even semi-glossy paint surface, the flash is reflected straight back into the lens resulting in glare.
Step-by-step: capture stage
Turn off the camera flash.
Open up the camera, and you’ll see the flash icon in the top left corner.

Just tap the flash icon on the top of the camera screen

Then tap ‘Off’ and you’re set
Issue #8: Digital noise
This is one of these things that you might not notice immediately but if you zoom into your image you can see little speckles, the colours can look a little bit artificial and the edges not as crisp.
This is known as digital noise.
Solution: You need a tripod & to adjust ISO
Attaching your phone to a tripod is the first step.
Step-by-step: capture stage
Open up the Moment App
Move the ISO dial to lower the ISO to 32 (this is the recommended setting for this App)

Then adjust the shutter speed to gain a correct exposure – until you start to see the red diagonal lines on just the lightest white in your image.
(On the inbuilt camera you won’t be able to see this information because it’s all happening automatically. On third-party apps, you can see more details on what the camera is doing.)
Why
In issue #5 we learnt about how shutter speed (the amount of time the camera shutter is open) can alter the amount of light hitting the sensor.
One of the other ways digital cameras control the exposure is by making the sensor more sensitive to light. The sensitivity of the digital film sensor to light is called ISO (pronounced: eyeso)
ISO – The sensitivity of the film/digital sensor to light
The lower the ISO number, the less ‘noise’ you get in an image
A low ISO would be the least sensitive to light but give you crisp images and the most accurate colours
A high ISO is more sensitive to light, but the image can suffer from digital noise and the colours aren’t as accurate.
So if you place your phone on a tripod you can use a longer shutter speed with a lower ISO to capture a noise free but well-exposed image.
Pro tip: With traditional cameras, you have an ‘exposure triangle’ you can change aperture, shutter speed and ISO, the aperture on your phone is fixed and can’t be changed, so we can only alter the shutter speed and ISO.
Issue #9: Colour cast

Your eyes are amazing at perceiving colours in different lights, so if you have a piece of white paper inside or outside you just perceive it as a bit of white paper.
But your camera has to change its settings to balance the colour. This usually happens automatically and is called auto white balance. Most phone cameras are pretty good at doing this.
Sometimes a problem occurs when your camera hasn’t fully adjusted to the correct colour light of your room, resulting in usually a blue or orange filter over the whole of the scene.
This is called having a colour cast.
Solution: Adjust the white balance
If the image has a colour cast or looks the wrong colour you can change the white balance in one of two ways:
- Before you shoot your photograph at the capture stage, I’m going to show you how using the Moment App.
- Or you can adjust the colour cast with post-processing software, in the editing stage and I’m going to use the Snapseed App.
The colour of daylight changes subtly throughout the day, these are called changes in colour temperature. A frosty winter’s morning would have a cool light, whereas a glowing sunset would be a warm light.
Artificial light bulbs come in different colour temperatures and the colour of the bulb are shown on a Kelvin scale. The higher the Kelvin number, the bluer the colour will be. It’s easiest to see the different colour temperatures on the back of light bulbs called ‘correlated colour temperature’ CCT.
CCT values are described in degrees Kelvin, so a 2800K (2800 degrees Kelvin) would be a warm light. A photography standard for ‘daylight’ is 5600K

Notice how the White Balance (WB) is 5600K and the CCT of the light bulb is 2800K so it reads as orange
Step-by-step: capture stage

Open the Moment App
Scroll along until you see AWB – Tap it
Scroll along the lightbulb icon to adjust the colour temperature
Above I’ve manually adjusted the White Balance (WB) to 2800K to match the CCT that was on the light bulb resulting in a balanced colour on the photograph with no colour cast
Step-by-step: Adjusting the white balance in the editing stage or post-processing
Look for any white or neutral grey within your image or frame.
Open your image in the Snapseed App (free)

Tap on ‘Tools’

Click ‘White Balance’

Click the Eyedropper icon and position over a white area of the painting

Click the tick icon and your white balance has been adjusted.
Pro tip: You can also use grey cards to include a neutral colour in your frame.
Lay a grey card next to your painting and take your shot. When editing the image click the grey card to white balance your image and then crop it out.

Here are a few photography grey cards

A homemade greycard using a canvas board and Golden Neutral Gray paint N6
Quick note
If you can photograph your artwork with your phone using natural light and want to keep it simple, then the first few steps should solve 90% of the problems, the extra 10% is fine-tuning using extra Apps.
If you want to get more technical and experiment with the Apps mentioned, you could combine them with your outside photography as well.
Moment App can be really handy for exposure display, and if you want to delve deeper into editing your shots, then Snapseed can be great for cleaning and colour balancing images.
If you want to gain even more control, then the Lightroom App has amazing options for capture and tweaking colours but takes a little more of a learning curve.
Hope you’ve found it helpful, let me know how your new photo skills turn out!
p.s. The new Simple Colour Mixing Course is coming in the next few weeks.
Recommended Apps
Photography apps
Moment (paid)
Halide (paid)
Lightroom (free) but paid subscription for more features
Post Processing apps
Snapseed (free)
Lightroom (free) but paid subscription for more features
Touch Retouch (paid) This is like a magical cloning paintbrush that repairs sections of your painting. I’d tend to use healing brush in Snapseed for smaller tweaks
Footnotes
Colour Rendering Index (CRI) – http://neiloseman.com/tag/cri/
Test Colour Samples (TCS) – https://www.waveformlighting.com/tech/cri-ra-test-color-samples-tcs
You can read about art studio lighting here
You can read about basic DSLR camera setups here


Thanks for the info!!!!
Big help!
Are you sure it’s only 9 common mistakes? (I feel like I’ve invented more!) To work around this I’ve been using a regular digital camera and transferring the images to my Mac.
What I’d like to do is use the iPhone to take the photo but not work on it on the iPhone but transfer it to my Mac. Any suggestions in that department for apps?
Thanks again
Ha, ha, pleased you enjoyed it Linda. Yes, you can either airdrop your photo from your iPhone to your Mac and then edit on there, or on the paid subscription from Adobe Lightroom capture with your phone and then edit on iPad or Mac.
Cheers,
Will
Thank you so much.
This is an excellent tutorial on taking photos of art with an IPhone. Thank you!
Cheers Bill
Wow, this was freakin great.
Thanks Stephen.
Will
hi will the simplest way to photography painting is an overcast day the kind of day I used to call oil painting light a soft pastel light that is soft and even lighting and gives you a bigger light source as the light is soft and even and when the light is even you have about 30 mins before having to change your setting in the camera or smartphone
kind regards Steve
Sure is a nice light Steve,
Cheers,
Will
Wow Will – thank you for sharing all this information.
My pleasure Ruth, hope you find it helpful.
Will
Thanks for this great article!
Cheers Kathy, glad you enjoyed it.
Will
What a wonderful overview! I’ve experienced many of these problems, and now know how to correct them. Thank you for these detailed instructions!
Hope it helps with your photos Donna.
Will
How informative!! Sending this to several people … However, I have sometimes photographed a watercolour picture and thought it looked better on camera than in real life. I think it’s the backlit screen making the colours look brighter! Just going to have to get the acrylics out again
Thanks very much Priscilla that’s very kind of you.
Will
Hi Will, Your article is stupendously informative!! Thank you so very much! I have already forwarded it to many family members. Thank you so much for your generosity in time spent putting this together and sending it on.
God bless you and your family, C-Marie
You’re more than welcome C-Marie, really hope it helps with your photos.
Cheers,
Will
Thanks, Will, I appreciate you so much for taking the time to put together this very informative tutorial and for all the others you’ve done!
My pleasure Mary, hope you find it of help.
Cheers,
Will
Thank you so much Will – once again very informative and helpful information
Cheers Gloria, hope you’re keeping well.
Will
Thanks Will, as usual you are so generous with your information. This article in particular is most helpful.
Blessings, Wendy
Thanks Wendy, much appreciated.
Will
Hi Will, thanks very much for the helpful tips on using our iPhone camera and suggestions on how to fix mistakes. There’s a lot of info to absorb so I will be referring to this article quite often. Thank you again for sharing your knowledge.
Cheers Karen, yes there are quite a few variables to think about but hope the steps help.
Will
Thank you for an excellent article Will. I also find the printing stage a problem. Every printer seems to darken the picture…. Andrew
Hey Andrew, yes printers and monitor settings can also be a tricky thing to match, lowering the brightness of your monitor is one of the best ways to get a more consistent print.
Cheers,
Will
Thanks, Will. Useful as always
Cheers Norbert
Photographing my art work has always been a problem, thank you for generously sharing your knowledge it is much appreciated. I will now be more confident of achieving good results.
That’s great to hear Joan.
Cheers,
Will
Great helpful article as usual thanks Will. Love your painting too.
Best wishes, Sheila
Thanks very much Sheila, pleased you enjoyed it
Will
Just brilliant information, Will. And couldn’t have come at a better time. Just last evening I read an email from a potential client who is interested in an original piece I have offered at a local restaurant. He couldn’t use the size I offered, but is interested in something smaller. Perhaps a print will suffice! I will use your guide (and also download those apps – thanks for the handy links) in hopes of getting perfect pictures to send to my neighborhood print shop to order my first giclee ever. Thank you!
Oh great stuff Lesley, really hope it turns out well.
Cheers,
Will
You say “the aperture on your phone is fixed and can’t be changed”. I use a Vodafone Smart X9 phone which has two lenses on the back. If I switch the camera to Portrait mode a curve appears on screen allowing me to set the aperture from f8.0 to f1.0. I’m not sure this is really possible as the lenses are fixed! But it might be able to merge the results between them to allow aperture changing. I know it can take a photo which you can then change the focus afterwards! I shot a flower in focus which I could later blur and focus on the background instead. Anyway, I know the article is aimed at the iPhone but I just thought I’d let you know about my phone. Most of the screenshots of your phone’s camera look very similar to mine.
Phone makers are also working on real zoom lenses that will have genuine aperture ranges I guess. Exciting times for mobile photography!
Cheers for sharing Chris.
Will
Thanks for another wonderful tutorial, Will. You’re the best!!!
My pleasure Kathy.
Will
I have the opposite problem. My photos always look better than the painting. So much so, that I prefer to show the photos rather than the paintings. Fortunately, I’m not trying to sell the paintings, so it works out well. Very nice that you can do it all on the iPhone, but it would drive me crazy (screen too small).
I have had to make adjustments occasionally on my PC using Paint Shop Pro software. PSP is not too expensive (< $80 USD).
Very good article Will, regardless of phone type or software.
Thanks, Jim, and thanks for the PSP tip.
Will
Thanks for the great article – as always! It was good to get some understanding behind the bad photos that can happen when photographing artwork.
Lyssandra
Glad you found it helpful Lyssandra.
Will
All that trolling the internet for snippets of tips…and it’s all HERE! Thank you so, so much. A massive amount of work that is very much appreciated.
My pleasure, really hope you find it helpful Robert.
Will
Hi Will. Having bought one of your courses and watched many of your excellent videos over the years, I’m moving into the Master’s stage of an MA in Fine Art, and I need better images for exhibition submissions etc. You’ve introduced me to some great phone camera features that will be very useful. Thank you!
That’s fantastic news Carole, really hope the techniques help and good luck with the MA
Will
I always enjoy your tutorials, and this one has answered many questions about my iPhone camera. Thank you so much for taking so much time and effort to make complicated stuff simple
That’s great to hear Sue, really glad it helped.
Will
Thank you so much sir for your elaborate description of how to take picture of a painting . It is really very helpful tips for me . Your teachings are always helpful for me . Thank you again .
My pleasure Paul, pleased it helped.
Will
This was a very timely article. I have started painting again after about 20 years. It is thanks to your courses and instruction that I had the confidence to start putting paint to canvas last fall. After dozens of brews and countless biscuits, I put five paintings on the wall for a show last Friday. Thank you so much for your informative articles and your excellent courses, Will. I look forward to your future classes!
You can see the pieces here:
https://twitter.com/capruchet/status/1144574598635065344
Great job Mike! so pleased for you, you’ve got some nice brushwork in your cloud studies, look great.
Cheers,
Will
p.s and deserving of extra biscuits!
Its always a pleasure to read a new article from you Will. You are always focus on explaining everything in detail and with the best way.
Thanks Katerina, really glad you found it helpful.
Will
Such a fantastic article on something we all do! I really liked the screen shots and clear explanations. I never understood until now why the colours of my photos weren’t as good as the picture itself . Also as someone who works in multimedia too the effect of light raking was so useful . Thanks Will
That’s great to hear Michelle, so pleased you found it helpful.
Will
Hello Will, I was trying to purchase the “Color mixing” course , but I can’t find it anymore…Did you take it down from the “Shop courses” section? Im starting to delve into color and I thought that would be the right course for me. Thanks
Hey Hernan, the new version of the simple colour mixing course should be out in the next couple of days.
Cheers,
Will
What great tips. I have had all of te problems you covered. I guess I need to get the app. That looks amazing and I don’t have to change it in photoshop. Thank you
My pleasure Colette, glad it helped.
Will
Wow this was so useful to me. I photograph my art on my iPhone and have experienced a few problems which after reading your photographic tutorial have been sorted out for me. Thank you so much for taking the time to education us artists. My photos will be ten times better now.
That’s great to hear Trudy, so glad you found it helpful with your photos.
Will
Hello Will. I have found this article really useful and have been trying to put the suggestions into practice to make a web page. I would just like to add one point, which I think is important, but has not been mentioned, probably because it is so obvious. The point is that with the iPhone the camera lens is at the top left hand corner of the phone when in landscape mode, and at the top right hand corner of the phone when in portrait mode, and not at the centre of the phone. And of course it is the lens that should be centred on the centre of the painting. People may be initially tempted to just centre the phone on the centre of the painting.
I have also used a Canon Powershot camera and again the lens is in the top left hand corner of the camera, not in the centre as in an SLR.
If you have time/inclination, maybe when having a brew, you can see some results at http://www.bobpeckhampaintings.com – and I would welcome any suggestions/comments for improvements (to both photography and painting!). I have bought and followed several of your courses and found them very informative and enjoyable, especially the Venice Sunset course a couple of years ago.
Hey Robert, nice to hear from you and so pleased you found the article helpful and enjoyed the Venice course. Good point on the lens position, thanks for the tip. You’ve got some lovely colours on your Venice paintings, love the glowing sky on ‘last passage’ has me daydreaming about a hot chocolate at Caffè Florian!
Will
Thank you so much for this excellent article. I have forever been struggling taking decent pictures of my art work. Such a simple solution!
Really glad you found it helpful Jutta, hope your photos turn out well.
Cheers,
Will
Excellent article! This is the best I’ve found. Looking forward to executing this tips when photographing my art work. Thank you for sharing
Really hope it helps with your photos Leslie.
Cheers,
Will
How can I upload artwork to web site size restriction of 2mb prevents upload
Hi Allen, you can’t upload images direct to the website.
Cheers,
Will
Thanks so much for the article about photgraphing your art. Very very helpful!
So pleased it helped Robyn
Will
As a painter I really appreciated these brilliant tips and have immediately set my iphone to the grid setting, which should save me from cropping out more corners! I will have to read over more carefully the section on overexposure, as I am hoping to find an answer to photographing my paintings on Yupo (polypropylene) paper that is such a bright white that it washes out light colors next to it (when I leave the white of the paper unpainted). My other issue is that I have trouble getting teal blue to reproduce correctly. Any ideas on that? Thank you so much!
So pleased they helped Ginny. It will depend if the light that the painting is photographed under has a high Colour rendering for teal. I’d try a shot outside and one indoors and see if there is any difference in the intensity of the teal.
Will
Grid setting and distortion tips. Hugely helpful! Thank you!
So pleased it helped Monica, those grid settings are so helpful
Will
Can’t wait to try these tips with my next art peice.
Hope you find it helpful Kayla
Will
This article was very helpful. Most of this stuff I didn’t even know you could set on a phone.
Pleased it helped Ericka
Will
Thank you, Will, this is so helpful! Do you think an iPhone camera can produce a digital image that is high enough quality to make prints from? I keep hearing conflicting opinions about that. But the newest iPhone that was just released this month seems to have an even better camera. Thank you!
Hi Laura, yes, you can make some great prints from the image from an iPhone, but it depends on how big you’re printing. On a 12 megapixel iPhone, and image size of say a 10 x 8 inch print would still look great. As soon as you print larger the image wouldn’t hold up as well becasue as you increase the size of the print, you also increase the size of the pixels. So the larger you go, the more pixelated it would appear. But I’d order a couple af test pieces with your currrent phone to see how they look.
Will
Wow! This is so helpful :) There are so many things I’ve been doing incorrectly all these years, ahahahaha. I’m super excited to put these tactics to the test.
That’s great to hear Antonia, hope it helps.
Will
Great article on IPhone photography ! Thanks!
A lot of really great, helpful information here, thank you! One question, you briefly mention glare with the solution of turning off the camera flash. What are your solutions for glare from the environment? This has been my biggest challenge, glare from various directions, glare from outdoor light even when it’s an overcast day. No matter what I’ve done I see shiny glare on at least parts of my work the reflect the light back and prevent me from capturing the entire image. I’ve heard of people using two light sources from 45 degree angles, do you have any other recommendations?
Hi Stephanie, yes, if you have access to lights you can position then either side of the canvas at a 45-degree angle.
Will
A lot of really great, helpful information here, thank you! One question, you briefly mention glare with the solution of turning off the camera flash. What are your solutions for glare from the environment? This has been my biggest challenge, glare from various directions, glare from outdoor light even when it’s an overcast day. No matter what I’ve done I see shiny glare on at least parts of my work the reflect the light back and prevent me from capturing the entire image.
Hi Jaquan, you can also use a polarizing filter to help eliminate glare.
Hi Will, I jist came across all of this information that you put together concerning photos and IPhones. Thank you! Here is a copy and paste from your article which I had no clue of and am hoping it is okay to do this.
“Colour is created on a surface by specific wavelengths being absorbed and others being reflected.
If the light that is shining on the surface doesn’t contain all of the visible colours (full spectrum) they can’t be reflected, so your camera won’t be able to record them.
Daylight is called full spectrum lighting because it contains all the different coloured wavelengths; some artificial lights have missing colours and ‘spikes’ in the spectrum. Photographing your painting under low colour rendering household bulbs indoors, will prevent the camera from capturing all the different colours in your picture.”
Thank you ever so much!!! No wonder my photos were not coming out true!!! Have 78 years and learned another new thing!!!
God bless you and all, C-Marie June 13, 2022.
Great stuff C-Marie, so pleased you found the photo tips helpful.
Will
This is so good!!! Thank you so much
Good one! so pleased it was helpful.
Will
Thank you very much for your great generosity in sharing your knowledge about photography, among other things. I really enjoyed your article. Have a wonderful holiday season with the people you love.
Good one Hélène, so pleased you found it helpful.
Will
Thankyou Will
This is great and helpful information. I seem to always have a glare on the photos of my art work.
My pleasure Laurie, pleased it helped.
Will
Fantastic piece of work with some clever solutions explained in a way that is easy to follow. Thank you!
Grids! Who knew?! What a difference they make… all of a sudden my photos of my paintings are no longer distorted, lol. Here I was, wasting a perfectly good camera on my newish Pixel 8… this old fogey learns something new everyday! Thank you!
Great stuff Cathy, Pixel 8 has an epic camera on it! So pleased it was helpful.
Will
You created this post in 2019 and still so relevant considering how fast technology advances. Thank you so much! This is totally saving me cash as I though I would need to invest in the digital camera to photograph my new art. (New artist = clueless about photography)
My pleasure Nely, so pleased you found it helpful.
Will
Thank you for sharing, this is so useful
Glad you found it helpful Anne
Thankyou for the tips regarding photos of paintings.
Regards.
Hi Will,
What to say but a truly heartfelt Thank you!!!
God bless you and yours, C-Marie
My pleasure C-Marie.
Taking daylight photos is working well! Thank you! I mostly photograph my watercolor art. The photos themselves are good once edited, but there is a watercolor paper grain that shows up, especially when it’s unpainted or a light color. I notice some! people’s posts have a very smooth clear look to them. Is there any way to achieve this? Without an expensive app? Thank you! Kim
Hi Kim, it will depend on the smoothness of the watercolour paper used and the angle of the light. It might also need studio lights to light the paper evenly from both sided so the light ‘fills in’ the shadows of the watercolour paper.
You can experiment with daylight by placing a piece of white card or white foam core opposite the direction of the light. And observe how with the white bounce board you are ‘filling in’ the shadows.
Will
Do you have any advice on getting the same color family? My phone looks at turquoise and shows blue. It’s happening before I take the picture, and it doesn’t matter where I take the photo. It’s a beautiful blue, but that color isn’t in my painting.
Hey Diane, you can often change that in photo editin software, but it will depend which software. On lightroom mobile there is a section called “Colour Mix Tool HSL” The H is Hue, S Saturation and L Lightness. So you can select the blue and then shift the slider more towards turquoise.
Will