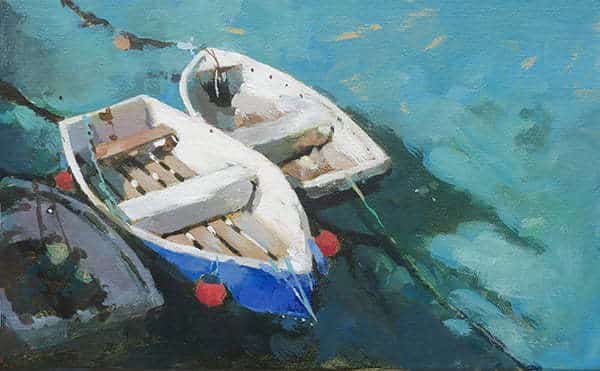
Longing for the sea during lockdown, I decided to have a look through some of my old travel photos from trips around the coast.

I did a few thumbnail sketches looking at different images; I liked the diagonal composition in the first sketch. I used an Acrylic Marker by Daler Rowney (FW Marker) filled with Sepia High flow acrylic (Golden Paints).
I settled on an image looking down on some fishing boats, moored in the harbour of St Ives, Cornwall.
You can download a reference image below to follow along with this acrylic lesson, hope you enjoy it!
Downloading the reference photograph
The photo below can be downloaded, so you can use it as a reference image, print it out and follow along with the steps below. (The size of the image is 1:1 to the size I painted, so slightly larger than an A4 printout)

You can download a larger version of the image here.
Materials you will need:
- 8 x 12.75-inch (20 x 32.4cm) canvas or board
I’ve used a canvas based on the Golden Ratio or Golden Section. This a ratio of 1.618:1 and found in many examples of architecture because of its aesthetically pleasing nature. This one is from Jackson’s Art in the UK, (they are labelled GS range) you can also get them from Dick Blick in the US. You could easily adapt the composition to a different smaller ratio if you fancy it, but this gives it a bit more of a panoramic feel to the painting.
Paints:
- Pale Umber – Galeria range Winsor & Newton (or you can mix your own using Burnt Umber and Titanium White)
- Green Gold (Golden Paints)
- Cadmium Yellow Light (Golden Paints)
- Permanent Alizarin Crimson (Winsor & Newton)
- Ultramarine Blue (Golden Paints)
- Burnt Umber (Golden Paints)
- Phthalo Blue – Green Shade (Golden Paints)
Brushes:
- Rosemary & Co, Golden Synthetic, Series 302, Size 10
- Isabey Isacryl Size 6, Series 6572 filbert shape
- Medium round synthetic
- Small round synthetic
Mediums/extra tools
- Kuru Toga 0.5 mm Mechanical pencil, HB
- Glazing Liquid Gloss (Golden Paints)
- Palette Knife (I use an RGM diamond shape size 45)

(Left to right: small synthetic round, medium synthetic round, Rosemary & Co Flat size 10, Isabey Isacryl Filbert, size 6
Step #1. Mixing a coloured ground

I worked on a colour ground for this painting, using a mix of Pale Umber, which is the Galeria range from Winsor & Newton. You can’t get this in the artists quality range, but essentially it’s a mix of Burnt Umber and Titanium White. I’ve mixed in a little bit of Green Gold, which is an absolutely fantastic green because it has an amazing glow to it.
There is a green undertone to the sea, and you get some of that plankton or Algae that are built up onto the side of the old fishing boats, so it’s only a subtle glow, but it will help to bring that colour field together for the painting.
I applied the coloured ground, slightly diluted with water, using a 1 1/2 -inch Purdy Monarch Elite decorators brush, with a light stroke as I don’t want too much texture onto the canvas surface.
(If you want to learn more about the benefits of painting on a coloured ground see: How a prepared canvas can drastically improve your paintings)
Step #2. Drawing out the image with a mechanical pencil

I’ve drawn out the subject with a mechanical pencil. This is a Kuru Toga Roulette pencil from Uni-Ball, with an HB lead.
I’m initially looking at the pattern across the frame. What’s great with the size of the canvas is, you get this nice diagonal appearing across the surface, which brings in movement into the scene. So, even though the boats are moored, there’s still a dynamic flow to it, due to the diagonal angles of the boat. I also like how you’ve just got a couple of ropes coming from the boats, they go off the canvas just out of the frame, but this helps to allude to the sense of some kind of human presence within the scene.

I indicate the main shapes and areas of shade to give me a rough value map of the light and shadow pattern.
Colour palette choice

(Left to right: Phthalo Blue (Green Shade), Burnt Umber
Because this is a cooler painting, I’m going to be using a cool blue Phthalo Blue (Green Shade) and a warm brown, Burnt Umber, for the blocking of the shadows.
Step #3. Blocking-in the shadow tones

So I start the block-in, diluting with water using a medium round brush. I’m looking for the darkest tones in the shadow of the sea and then looking at those shapes and how they form around the boats. The Phthalo Blue gives a lovely rich muted green when mixed with the Burnt Umber.
Step #4. Adding warmth to the boats

Then just with the Burnt Umber in a very light watery wash, I indicate where the warmth is in the boats – on the wooden decking and the bottom of the boat on the far right side.
When you’re only using a couple of colours to start with, you’ll notice all the subtle shifts in colour that you can’t achieve, which will help you determine the next pigments you might use. I began to notice that for the nearside boat in the shade, it needs a warmer blue than the Phthalo Blue Green Shade, so I’m going to introduce an Ultramarine Blue to block those in.
Step #5. Introducing a warm blue in the shadows

Here you can see the warmer blue into the shadows. I also mix a strong blue for the central boat.
In the shadow tones on the central boat, I noticed on the reference image a purple tint and there’s a little yellow hue in the centre of the boat. So I put out the rest of my palette to achieve these tones.

(Left to right: Green Gold, Permanet Alizarin Crimson, Cadmium Yellow Light, Ultramarine Blue, Titanium White)
Step #6. Pushing the sea towards turquoise

The sea in the reference image is a green-blue, but I thought I’d try pushing it to be a bit more turquoise.
So for the block-in of the sea, I’m using a Phthalo Blue Green Shade and Titanium White mix and then toning that down with Burnt Umber, which. takes it a more muted tone and kind of more towards green.
Step #7. Strengthening the shadow tones.

As I block in the sea area, I leave a few little glimpses of our coloured ground underneath, just showing through. I also strengthen the colours on the boat shadows in the water.
Now I’ve got all that in; I can start to work on the paler shadows within the boats.
Step #8. Observing the shadows in the boats

I’ve added a very subtle shift from purple to blue to the shadow on the very rear of the central boat. It will show more clearly when white is next to it.
Step #9. Adding our lightest light

Now with some pure Titanium White blocked in, you can really see the form of the boat come to life. It feels more lifelike, with a real sense of three-dimensional depth to it.
Step #10. Balancing cool greys

I add some cooler greys to the far boat and also add a pattern of light and dark in-between the boards on the central boat. These little dashes if white can really help to move the viewer’s eye around the painting.
Step #11. Adding details to the boats

I then paint in a lighter pale brown using Burnt Umber, Titanium White, and a little Cadmium Yellow Light mix. I also paint in some more fine details on the ropes. Having these darker lines move across the frame help to bring movement to the foreground.
Also, notice the little dark dashes on the far boat, just like the white dashes in-between the boards on the central boat, these help to add an impression of detail.
Step #12. Experimenting with a glaze
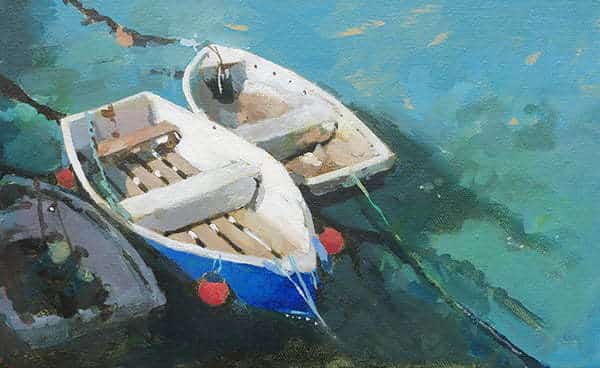
I paint in the red buoys using the Alizarin Crimson, Cadmium Yellow Light and darkened with the Burnt Umber.
I also add a little glaze of Green Gold diluted with Glazing Liquid Gloss, to the water in the foreground to see how well it would work.
Step #13. Adding glimmer to the water

Fishing Boats, St Ives, Will Kemp, Acrylic on Canvas
I felt the glaze darkened down the water a little too much, so I added back in some thicker turquoise paint using the filbert brush into the foreground water.
I really hope you enjoy the lesson, and it is reminiscent of those long summer days exploring coastal paths, and giving you a sense of coastal calm.
Cheers,
Will
You might also like:
1. How to Paint a Cornish Harbour in Acrylics – Video Tutorial
2. Painting the Winter Light in Cornwall
3. Painting, Pasties & Padstow – A Cornish Painting Trip



What a beautiful painting, Will! You can really get a sense of the play of the light on the water.
Thanks so much Sue, glad you like it.
Will
We are never too old to learn more techniques. Thanks
My pleasure Dolores
You’re a good man Charlie Brown!
Ha, ha, cheers Greg!
I love it! Thank you Will.
My pleasure Trudi,
Will
Love your work and technique, Will! Thanks so much for sharing.
Glad you enjoyed the lesson Linda.
Will
Love this painting !
What I love about your tutorials is you explain each stage so clearly.
Thank you.
So pleased you found the steps helpful Catherine.
Will
I so appreciate the calm joy presented in your painting tutorials. For me, they are a retreat – thank you so much :-)
You’re very kind to say so Mairi, thanks so much.
Will
Hi Will, It is very kind of you to send us this tutorial on the boats. Thank you so much.
My pleasure Imola, hope you enjoy painting it.
Will
Thanks for sharing Will!
My pleasure Geli.
Will
Your generosity in making this super lesson available to all is much appreciated, Will.
Really hope you enjoy it John.
Will
Hello Will. I am so excited to begin this painting and will begin as soon as my order for green gold paint arrives. I am a total newbie to painting….having taken several drawing classes in the past, covid lockdown has inspired me to being the painting journey. I have completed many of your tutorials and also the paintings from the Still Life Project Book. This leads me to my next question: what lessons do you recommend next after the Project book. I can’t tell from your descriptions what is the most logical next course to purchase.
I love your work and trying hard to loosen up my painting. It’s so hard for me to ignore the details. You are an amazing teacher and love that you are teaching me in the classical manor.
Hi Ginger, so pleased you enjoyed the still life project book.
what lessons do you recommend next after the Project book.
For more still life lessons, the colour mixing course would be a good next step to work with an extended colour palette or the acrylic beginners for a more rounded overview and introduction to mediums and gels with acrylics.
Cheers,
Will
This is exciting. I can’t wait to begin. Thank you for sharing this tutorial with us.
That’s great to hear Barbara.
Will
Thanks Will,
Always enjoy receiving your tutorials. I miss the mountains like you miss the sea!
Cheers Ruth.
Will, thank you for sharing your generous tutorial with us. The painting is just charming and is on my bucket list of projects to paint next. St. Ives has also been on my wish list of places to visit once Covid is under control. Thank you again.
My pleasure Karen, hope you enjoy painting it.
Will
I just recently joined your group and already enjoying the videos and tutorials. Thank you so much for giving of your time and talent. Now that we are all in quarantine it’s a perfect time to paint. I too have been looking through my photos and just chose one of boats on the water. So, perfect timing with this tutorial. Thanks again for bringing so much enjoyment and education. Be well!
Good one Reva, hope it helps sparks some paintings from your own collection.
Will
Thank you very much for this tutorial. It is fantastic !!!
I appreciate it very much !
My pleasure Margarita.
Will
Haven’t painted for the last few years but am inspired to take it up again. Thank you, Will, for detailed instructions.
That’s fantastic to hear Arikibelle.
Looking forward to watching this tutorial. I also love Cornwall and anything to do with the beach. Thanks for sharing this Will.
Hope you enjoy painting the scene Esther
Will! This new tutorial is a wonderful early Christmas present! Thanks so much – you are a star!
You’re too kind Karen, really hope you enjoy painting it.
Will
Thank you Will. Your tutorials, and lessons are of the highest quality. I will look forward to trying this one.
Karen
Thanks very much Karen,
Cheers,
Will
Hi Will,
Thank you for sharing your wonderful tutorials! Being on semi-lockdown here in BC, Canada they provide me with hours of constructive activity instead of sitting on the couch eating bonbons and watching TV! Keep providing the tutorials…my waistline will appreciate it. Stay safe and well.
Ha, ha, maybe bonbons and painting? stay safe too.
Will
Thank you so much for sharing us another tutorial, Will.
Hope you enjoy it Sandy
Really nice, Will, and I especially like the shadows underneath the stem to stern planks!! God bless, C-Marie
Thanks C-Marie, yes there where some lovely shadow patterns.
Will
Was looking for a new tutorial on your site yesterday and found this one this morning! Set aside some time this afternoon and had a go at it. Thanks so much!
Perfect timing Jeff!
Thanks Will, appreciate these posts and am hoping to really get into them this winter,in my quiet times. Love your colors
Thanks Pat.
Once again you fill the gap! Thanks for being you.
You’re very kind Lennie.
Will
Fantastic, I would love a whole seaside course – I miss the sea so much!! Is there an alternative to Green Gold? I’ve only been painting a few lock-down months but you’ve inspired me to try acrylics and I am very grateful.
Hi John, yes, you could use a mix of Hansa yellow with a touch of Phthalo Green.
Will
Morning Will. Thanks for yet another excellent tutorial. As always, full of useful information and techniques for an enthusiastic amateur like me.
My pleasure Peter, glad you found it helpful.
Will
What a lovely surprise to find your latest tutorial in my Inbox this morning! Your color combinations always seem to open up new pathways to explore. Thanks for sharing your talents, inspirations and insights.
Cheers,
Grace
You’re very kind Grace, pleased you enjoyed it.
Will
Hi Will
thanks for the lesson.
Hearing from you makes me know you are well and this makes me happy.
You are my therapist, keeping my brain off the yucky stuff.
Thanks Jackie, that’s so nice to hear. Keep well.
Will
Thanks so much for the tutorial on this Will!
My pleasure Sue.
Will
Thanks Will , you are a great teacher , thank you
Cheers Antonio.
Will
I cannot wait to give this a go. Thank you for sticking with us through a very weird year. Cheers.
Really hope you enjoy it Micki.
Will
Your work and how you share is most inspiring. I’ve had to sideline painting for a time, but look forward to returning, in part, because of the inspiration you bring!
So pleased you’re feeling inspired Jennifer.
Will
Thank you so much Will, can’t wait to try it.
Lesley
Cheers Lesley, hope your painting turns out well.
Will
Thank you so very much Will for this and all your beautiful tutorials. You are an absolute gem of a teacher. You always go to such lengths in explaining not just the methods you use but the principles behind them. Your website is a goldmine of information for anyone who wants to be or even already are, artists in paint. Thank you again for all your generosity. Off to get a brew and biscuits and make a start.
You’re very kind Chris, so glad you’ve been enjoying the tutorials, and are well prepared to start with your brew!
Will
Hi Will I ditto Mairi comments,(15 Nov). I love the light of Cornwall. It reminds me of NZ.
Cheers Joan.
Very many thanks for the early Christmas present. I look forward to using it during the hols.
Hope you enjoy it Bernie.
Will
Thank you Will. You are very generous to share this. I will enjoy it while on lockdown in South Carolina. Cheryl
That’s great to hear Cheryl.
Will
Hi Will,
That is really beautiful. I am definitely going to give it a go.
Stay safe and keep up the amazing turtorials.
Jean
Thanks Jean, really hope you enjoy it.
Will
OMG! I just love your tutorials! I’ve followed you for years on and off and realize how much I miss watching you. A question…I believe you started out with oil paints and switched to acrylic ..why did you switch and can you get that same luscious “look” of oils with acrylics. I use oil paints but would consider acrylics if I could get good results. Thank you for your lovely artist energy and sharing it so freely with us.
Hi Linda, glad you like it. The glossiness on an the oil painting surface is due to sheen of the oil contained within the paint. You can achieve this with acrylics by applying a unifying varnish layer to your finished painting.
Cheers,
Will
This is beautiful and very gracious of you to share! Ive been out of the loop for a while, but this piece is calling to me. The energy of the water with the sun, salt, and breeze in your painting is just what I need right now, so looking forward to making space in my currently disorganized life to try this tutorial. Thank you!
My pleasure Jennifer, so pleased its inpired you in your work.
Will
Hello Will,
Thanks for your tutorial. I enjoyed seeing you create a lovely painting from a photograph – I’ve never been to Cornwall, so when this awful pandemic is past I’ll definitely go and see if I can get some inspiration there — so many artists have !
With all good wishes ,
Patrick .
Thanks Patrick, hope you enjoy being transported there via paint!
Will
I grew up by the sea and love to go back there, so this is perfect. You’ve chosen an evocative photo for this painting! I’ve really enjoyed having a go, and it’s produced a lovely result. Really like the green gold. Thanks very much for all the guidance, you’re a great teacher!
So glad you enjoyed it Catherine, yes Green Gold is a lovely colour, ace for glazing with.
Will
What I’m learning from you is to be diligent and patient at finding the right image to start with. Seems like you make a point to tell us this at every lesson and the repetition of your process is helpful. I really do like what you end up focusing on as the subject to paint, it’s interesting, and I’d really like to be able to do that more on my own.
Hi Laura, exactly right, taking the time to find a composition that ‘paints itself’ will make all the difference in your progress. Thumbnail sketches and simple value studies can be invaluable in testing your assumptions about your painting subject.
Will
wonderful painting Will….love the blue waters and the boats….will definitely give it a try…thanks for the tutorial….
Thanks so much Parul, reallly hope you enjoy it.
Will
Hi Will, Just starting this one, it’s so lovely. I love the shimmering water and the panoramic view from above. Makes me smell the mist of the Oregon coast, as I sit in Colorado!
So pleased you’re enoiyng the painting Barbara, great to hear.
Will
Will, I finally got the opportunity to paint this on a very cold snow-covered day. I didn’t completely follow your instructions, but I am happy with my version of it. This was a good lesson for me to learn what to leave out and how to make what I want to stand out, stand out. One thing I realize is my next problem to work on is how to “lighten” up the painting. My paintings end up darker than yours. I feel how you teach gives me the freedom to do it my way. Thanks!
That’s brilliant to hear Michael, being able to have the lessons as a starting point to developing your own style is the best way to go, so glad it turned out well for you.
Will
I’d love to have a go at this painting Will, but don’t have the Green Gold or Phthalo Blue green shade (I have Phthalo Blue though, and a ready-mixed Turquoise). Is there any way of mixing these or using alternatives as I don’t feel I can afford to keep buying new colours, addictive though this is lol!
Sure, just use your Phthalo Blue and add a touch of the turquoise and you’re be away.
Will
Can’t wait to try this painting, beautiful colours
Really hope you enjoy it Jenny.
Will