
Simple Colour Mixing Acrylic Course
(Scroll down ↓ to Add to Cart)
You might have been struggling to understand colour mixing for years, sometimes getting it spot on, but other times, when it goes wrong, you have no idea why or how to fix it.
Or maybe you’ve read articles on colour theory but have not had the confidence to put that new knowledge into actual painting practice?
In this new Colour Mixing Course, we take a really simple, practical approach that can help you achieve the perfect colour mixes and harmony in your paintings every time.
Over 5 hours + of tuition, you’ll gain an understanding of the properties of paint, learn the foundations of colour theory and put brush to canvas.
Putting this theory into practice, you’ll create a series of four still-life paintings, applying all that new knowledge.
We’re going to take it one step at a time, starting with learning the language of colour. Everything will be broken down simply so that the painting exercises and studies give you the confidence you need to develop your colour-mixing skills.
I demonstrate using a traditional three-primary and three-secondary colour wheel to teach you a step-by-step approach. Working through these progressive tutorials, you’ll be guided by your new colour-mixing intuitions, opening up the fantastic world of colour.
£63.00
- Description
- Lesson Breakdown
- Course Delivery
- Course Requirements
- What Students Say
- Student Success
- Gift Card
- FAQs
Description
Would you believe you can transform your colour-mixing in a weekend?
Have you ever stood in front of your painting, trying to mix the perfect colour, with absolutely no idea how to do it?
Are you frustrated that your mixes don’t work? Muddy browns or vivid greens and your paintings just look wrong.
If so, then you need to know about a simple approach that can get you the perfect colour mixes and harmony in your paintings every time – and if you don’t know about it, you’ll probably keep making the same mistakes for years to come!
Discover a Simple Colour Mixing method that works
Understanding how colour works in painting gives you the knowledge to start mixing the perfect colour yourself in a weekend – regardless of your current level of skill.
I want to teach you a clear step-by-step approach that will give you the greatest results in the shortest amount of time, using the best techniques I have developed over 20 years of painting so you don’t make all the mistakes I did!
I’ve tried to include every step and explanation as if you were an absolute beginner, because sometimes you can watch a lesson where the teacher assumes you already know the colour mixing basics, so skips over them.
This can be very frustrating as it’s hard to understand the ‘why’ when you’re first beginning.
The simple colour mixing method is quick
When I was studying classical painting in Florence, I would often come across students that were so keen to emulate the classical techniques; they seemed stuck in a time warp.
One student I met, let’s call him Leonardo, was in his third year visiting a specialist art atelier summer school. Each week of study cost him over $1,500. His drawing was great, but he was scared stiff by colour.
Convincing himself that he would be ‘ready soon’ he kept on putting off using paint.
I asked if he was going to try painting a portrait the next day, and he recoiled in shock. Tomorrow? No, I might be ready next year…to move on to charcoal!
I too love comprehensive classical education.
But that’s not what Simple Colour Mixing method is.
It’s a way of getting you painting and feeling confident with colour.
Understanding the theory is only half of the problem, the other issue? Putting theory into practice without ‘mixing mud’. So this course contains four simple still life paintings using a limited palette (Only eight colours to create all four still life paintings)
You’ll discover how to mix 80% of the colours you actually – in 20% of the time.
I want to help you conquer your fear, make colour work for you and help you increase your colour mixing confidence (not have drawers of paint tubes that you rarely use!)
“Colour is a matter of taste and of sensitivity”
Édouard Manet, Artist
What’s in the Course?
- 4 x acrylic still life paintings taking you step-by-step from preparing your canvas and drawing out, right through to the final brushstrokes.
- 9-downloadable video lessons, split into separate chapters that follow on sequentially.
- Over 5 1/2 hours of detailed step-by-step video instruction so that you can follow along at your own pace.
- Materials Guide PDF
- Downloadable JPEG reference images, line drawings.
- Timecodes for chapters so you can jump straight back to the place you left off.
- One-time payment, lifetime access, downloadable on separate devices so you can reference again and again.
Lesson Breakdown

Lesson One
The Properties of Colour
Understanding the three elements of every colour, allows you to evaluate any pigment in seconds, giving repeatable steps for any colour mix.Putting theory into practice by mixing and matching a colour accurately in the studio, using the colour wheel as a guide.

Lesson Two
Understanding the Colour Wheel
Discovering the relationship between different pigments and how they can create harmonious colour mixes. Learning about the colour bias of pigments and complementary colours gives greater understanding of the different properties of paint.
Using this new knowledge for subtle, muted and bright, saturated mixes.

Lesson Three
Performance & Purity
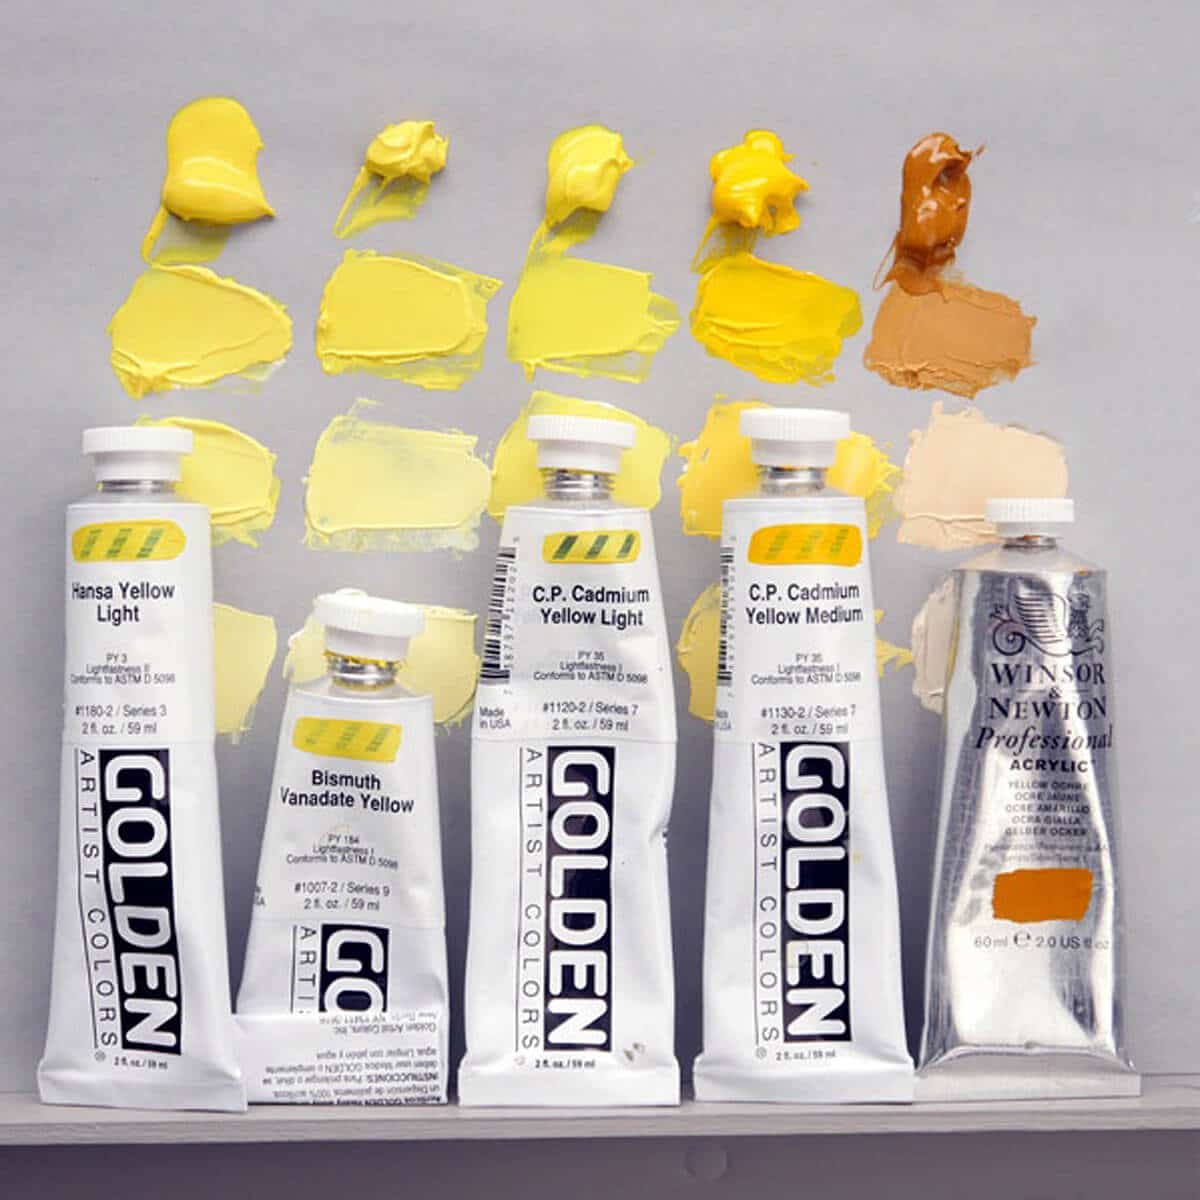
Learn how to read a paint tube and then to the studio to compare multiple pigments side by side, uncovering each pigments individual intensity and bias.
Followed by a demonstration of how to make your own colour wheel.

Lesson Four
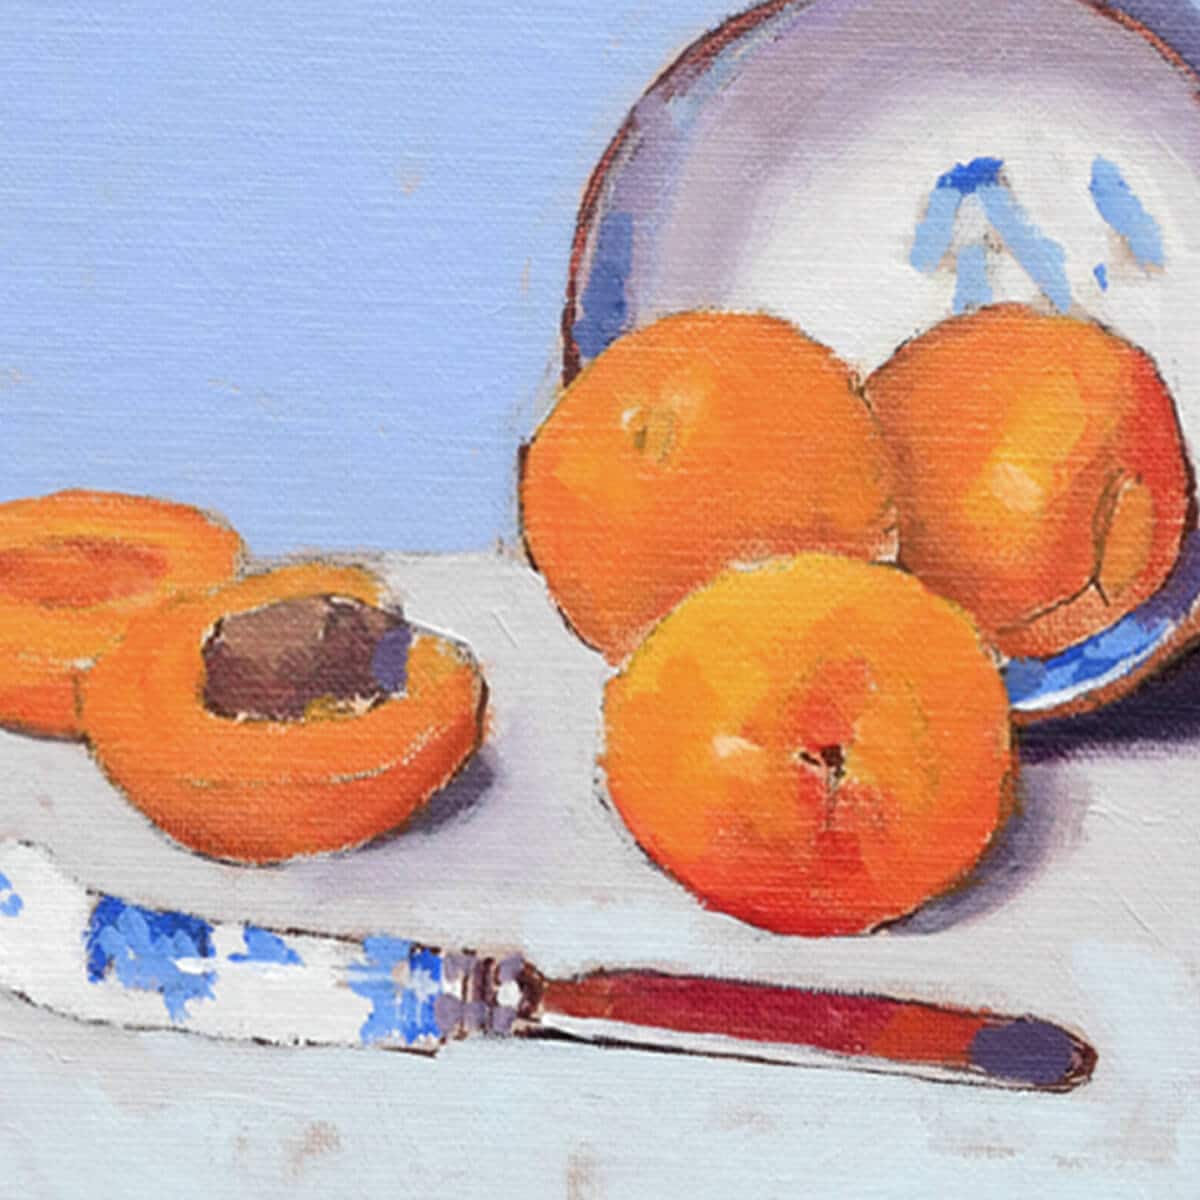
Blue & Orange Complementary Study
A warm and cool step-by-step contemporary painting of apricots created just with three pigments.
Learn how to balance saturation and muted mixes using a blue and orange complementary colour scheme.

Lesson Five
Yellow & Purple Complementary Study
A practical tutorial of a simple lemon study.
You’ll learn to add colour in the shadows by using the principles of the colour wheel and create a tonal range just using two complementary colours, yellow and purple.

Lesson Six
Colour Perception
Discovering how powerful colour perception can be and how your mind can play tricks on you when judging colours.

Lesson Seven
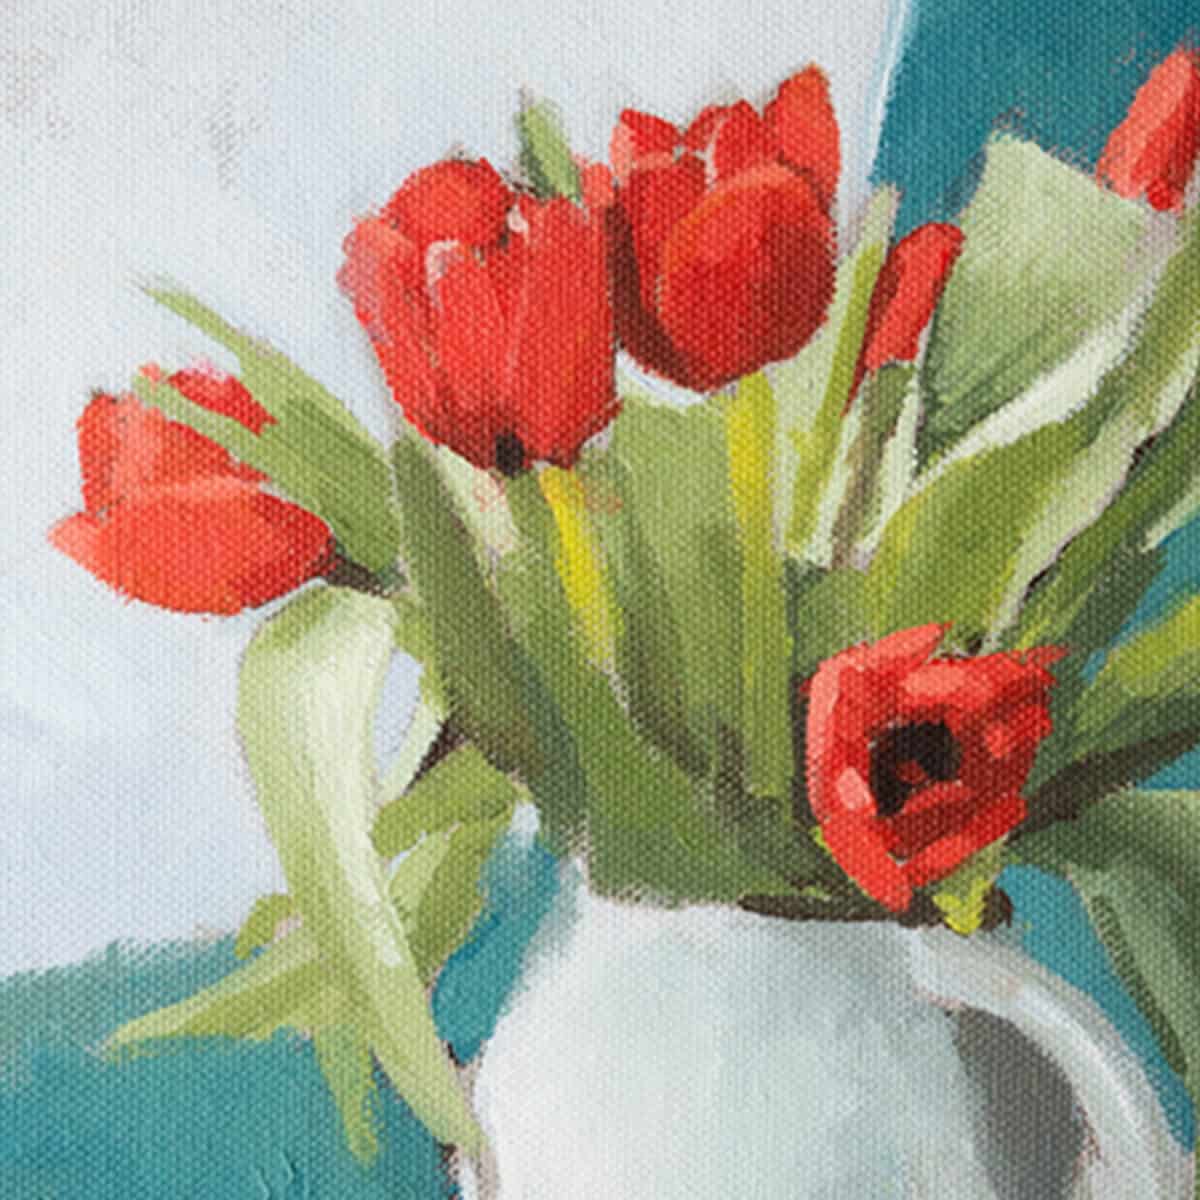
Red & Green Study
A more complex and detailed tulip still life tutorial.
You’ll learn how to mix harmonious greens and how a final pop of red, exploits the effect of simultaneous contrast and give this complementary study the real ‘wow’ factor.

Lesson Eight
Smart Palette Choices
How to choose the right palette for the style of paintings you’re trying to create.
How to select paints in the art store and the value of keeping your painting kit small.
Drawing inspiration from the Old Masters’ and Impressionist’s palettes.

Lesson Nine
Tonal Jug Study
Putting all our knowledge into practice for a more challenging muted still life composition.
How to approach pre-mixing a tonal string and what isolating a colour can teach you, just using 5 smart pigments.
Course Delivery
I’ve taken care to film everything from my perspective so you can see exactly what I’m doing as we go through the entire painting process in real-time. With over 5 1/2 hours of video instruction, full-colour photographs and drawing guides.
How is the course delivered?
When you purchase the course, you will receive an email with all the downloadable video links to the course. You then have to download and save the Video Lessons onto your home computer/iPad.
- 9 Downloadable Step-by-Step Video Lessons – over 5 1/2 hours of video instruction that once downloaded – you have any time, anywhere access. (please note: you do not receive a DVD)
- A Materials Guide PDF – which includes all the reference images used throughout the course, alongside JPEG reference images and your materials list.
- The video files are large (4.5 GB) so you need a broadband internet connection and enough space on your computer hard drive.
Please note: You will not receive a DVD.
Cut by the Artist
I filmed, edited, and coloured the course myself (with a little help from Vanessa!) rather than working with a production company.
Artists have different needs than editors so I wanted to cut the course like an artist, showing you exactly what I wanted to see when I was learning. I show all the real-time brushstrokes for the paintings so you don’t miss a step.
There are 2 main camera views I cover:An over-the-shoulder view of the work – so you can see how I build up the painting as if you were standing behind me in the studio.
A close-up of the brush contacting the canvas – with extreme close-ups, so you can see the grain of the canvas and the bristles in the brush.
Real-time filming – No long jumps in progress
I don’t like long jumps in progress when the paintbrush goes off-camera, the shot changes and suddenly the picture has seemed to drastically improve. I include all the stages so you can clearly see the progress of a work.It’s simple. It’s thorough. And it’s easy-to-digest.
Course Requirements
Requirements for the Course
A broadband internet connection – the files sizes for the video lessons are quite large (4.5 GB in total) so can take a while to initially download (depending on your internet speed.) Once downloaded, they are yours to keep forever, watch without buffering or take to the garden and watch away from an internet connection!
Enough free space on your Computer or iPad – You can download the files to a separate USB stick if you need extra storage.
A Colour Printer – to print out the reference images or access to a Print Shop.
Glossy Photo Printer Paper – I use Epson Photo Glossy.
1 hour of distraction-free ‘you-time’ – You’ll need to be able to dedicate 1 hour for each painting demonstration
A love of tea & biscuits (optional, but some may say essential!)
What Students Say
I have finished 2 of the four paintings in the course and already I can see a huge difference in how I am seeing color and thinking about color mixing. This course has shifted me forwards just in two weeks what I have been dithering about with for years. Will’s lessons are really superb.
His attention to every step of the process means that you really learn so much. My apricots painting was really one of my best paintings after an adult lifetime of being always disappointed with my results. When you see the results it will boost your confidence in many other areas of your artistic practice including composition.
Already I can feel many of the lessons slipping into any other art work I put my hand to. You’ll be very happy with this course: and besides who cannot be inspired by that lovely greeting: “Morning class!” : so grab a brew and buy the class. Its a great investment in yourself.
Lawrence Driscoll
Student Success

Simple Colour Mixing

Simple Colour Mixing

Simple Colour Mixing

Simple Colour Mixing

Simple Colour Mixing

Simple Colour Mixing

Simple Colour Mixing

Simple Colour Mixing

Simple Colour Mixing

Simple Colour Mixing

Simple Colour Mixing

Simple Colour Mixing
FAQs
Simple Colour Mixing Acrylic Course
No, there is no time limit, you can watch them as many times as you like.
The course is a series of downloadable video lessons, once they are downloaded they are yours to keep forever. If you change computer in the future just drop me an email and I’ll send you through some fresh links.
You can watch the lessons and courses as many times as you like and have lifetime access. If you change computer in the future just drop me an email and I’ll send you some fresh links through.
Yes, you can download to an iPad using Files App, or the free app called ‘Documents’. Without either of these apps, you will not be able to download directly to an iPad.
You can also download the video lessons to multiple devices (home PC, laptop etc) and if your storage space is running low on your laptop, you can download to a separate USB stick.
No, not at the moment.
The courses are available as a download only, there is not a streamable option.
If you only have an iPad you need to use either the Files App or the free Documents App to download and have enough space on your device
But there is one exception.
If you open the download links in the Safari browser on an iPad, Safari will give you an option to View or Download, if you click View, you can watch the videos without downloading.
Not hugely, I’ve kept the material list as small as possible.
For the painting courses, I try to keep the colour palette small and use the same base colours for many of the other courses. I demonstrate with artist quality paints which have a higher pigment ratio so a little goes a long way.
Yes, there are jpeg reference images and line drawings to work from.
I’m a big fan of drawing, and if you have a good understanding of how drawing works, it can make the biggest jump forward in your paintings. But if you’re super keen to get started with painting and engrossed in colour, then I’ve added a few downloads to help you out.
All of the images can be printed out A4 size allowing you to work 1:1 with your reference image (a classical technique called sight-size)
I’m a big fan of drawing and if you have a good understanding of how drawing works, it can make the biggest jump forward in your paintings (it seems counter-intuitive but it can make dramatic changes).
But if you’re super keen to get started with painting and engrossed in colour, then I’ve added a few downloads to help you out. These are line drawings that you can work from.
All of the images can be printed out A4 size so you can work 1:1 with your reference image (another classical technique called ‘sight-size’). You can then draw out freehand or trace the lines to get you started, this course is all about getting you painting.
Absolute beginner.
No, all the painting demonstrations are studio based.
Although the demonstrations are in acrylics, the course has been designed so you could transfer the skills and knowledge to oils. The smart palette I use is available in acrylic and oils.
No, this course takes a minimalist approach to transform a beginner or someone who feels lost with colour, to being a painter who is confident with colour mixing and colour choices.
There are other colour wheels and other colour mixing systems you may come across, such as Munsell, Quiller wheel or the Yurmby wheel. Many realist painters and designers relying on print use the Munsell colour notation system for more technical, advanced and exact descriptions of colour.
However, I don’t demonstrate them on this course, I believe the traditional approach is the easiest and most straightforward for a beginner to gain a full understanding of colour mixing and work like an artist rather than a technician when finding your confidence with colour.
If you’re new to acrylic painting or have been painting for years but still have trouble mixing tonally accurate colours and judging colour harmony, then you would see instant improvements on this course.
Why? Because you would have learned the foundations of colour theory and understand how simple it is to mix and match the perfect colour, every time.
If you’re looking for ‘cheat sheets of colour swatches’ this isn’t the course for you – there’s nothing wrong with specific recipes for colours but I believe having the tools and knowledge is far more powerful to develop as an artist.
You’ll have gained a foundational knowledge of how to mix acrylics.
If you follow the lessons in progression then by the end of the course you will have four finished paintings, an apricot still life, a lemon and tulip study, a tonal jug composition and colour mixing exercises.
Each completed with four different styles of colour palette.
The shopping cart will convert to your local currency. You can use a currency converter to get an idea of the current exchange rate: https://www.xe.com/currencyconverter/
Yes, you can from another screen, such as an iPad or a desktop. That will let you keep the reference image visible while you follow the lesson.
However, in some of the lessons, I physically test colours directly on the printouts. This can be very helpful when you are first learning, because it makes colour matching clearer and easier to judge.
