


Absolute Beginners Water-Mixable Oils Course
(Scroll down ↓ to Add to Cart)
If the thought of using Traditional Oil paints, cleaning up your brushes with strong-smelling solvents in a small room just isn’t practical, you might find that Water-Mixable Oils are a perfect balance – the blending time of oils with the super easy clean up of water.
Water-mixable oils are real oil paints, they have a lovely buttery consistency, a long working time which enables you to make changes over a longer period of time, blending colours, adjusting shapes, or working wet-into-wet with thick impasto marks.
They can be mixed with water, low-odour mediums or natural drying oils. So if you paint in an enclosed space without good ventilation or have developed a turpentine sensitivity, working in a fume-free painting environment makes water-mixable oils really appealing.
They are extremely bespoke; how you use these paints can be tailored to your needs.
In this course, we’ll cover the best oil techniques to use, the different mediums and levels of sensitivity of some products specially developed for water-mixable oils. Then you can take a safe approach for you.
With over 5+ hours of tuition, you’ll slowly and methodically be introduced to the theory and practice of painting in water-mixable oils.
The course covers materials and setup, absolute beginner basics, moving on to more advanced classical oil painting methods from underpainting to impasto. I want you to fully understand fat-overlean, know when to work alla prima or indirect – practice palette knife techniques and introduce classical oil mediums.
And also, oils can get messy! So throughout this course, you’ll see me demonstrating clean working methods.
You’ll complete 3 paintings, showing every stage from drawing out, colour mixing, brush handling and edge control, always being aware of the handling of the paint, drying times and toxicity.
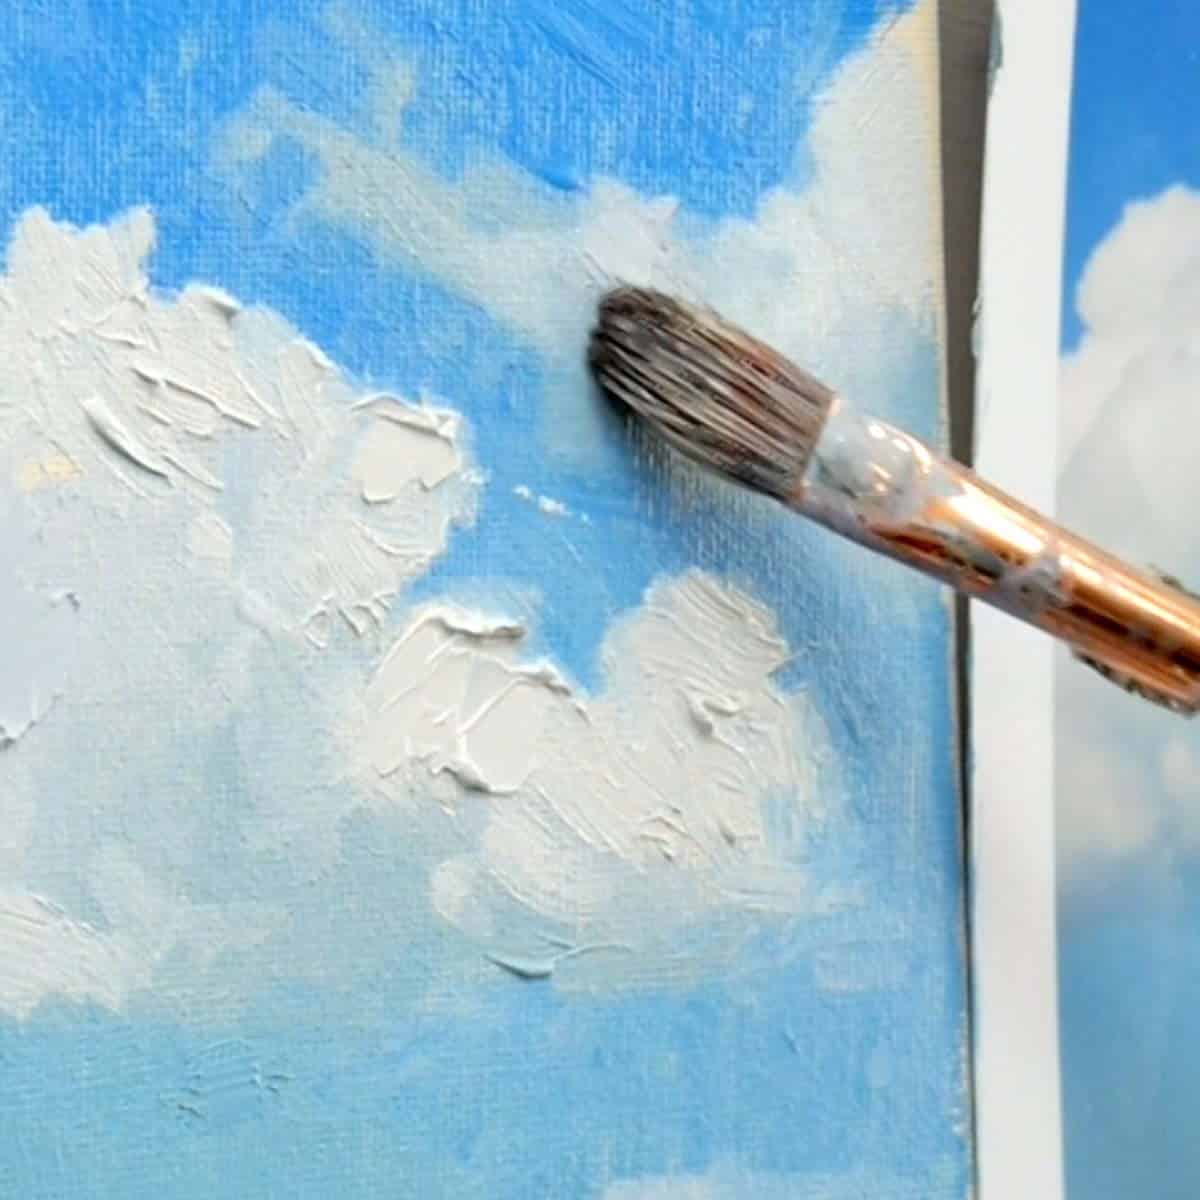
The first is an impressionistic alla prima cloud study where we compare and contrast acrylics and water-mixable oils.
The second is a master copy of a section of a Vermeer painting the little street where we build it up in layers with an indirect approach so I can demonstrate the fat-over-lean principle.
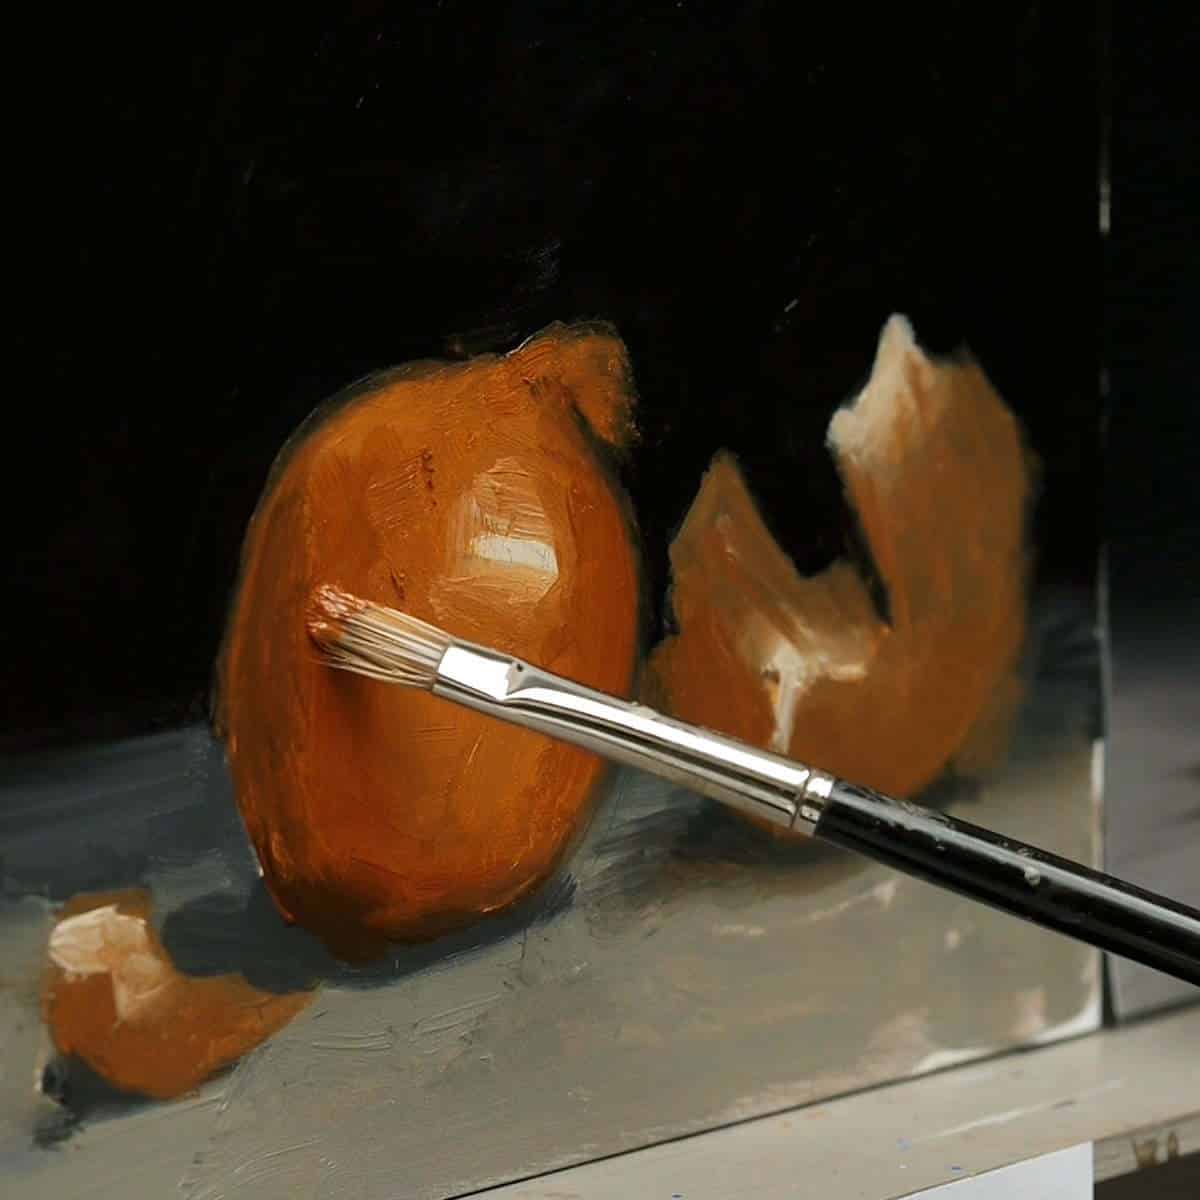
Our final study is a classical still life painting bringing all the principles together working through the underpainting, and colour mixing to create form and edge control.
So why don’t you grab a brew maybe a couple of biscuits and join me on this Absolute Beginners Water-Mixable Oils Course and discover your inner oil painter.
£63.00
Description
Water-Mixable Oils are relatively new to the market so on this Absolute Beginners Water-Mixable Oil Painting Course; I want to help address some of the most commonly asked questions and help aspiring oil painters understand the theory and practice of painting in this medium.
Water-mixable oils are real oil paints; they are water mixable, not water-based. They can be mixed and applied using the same techniques as traditional oils, but whilst wet they can be removed from brushes and palettes with soap and water rather than using a solvent.
Designed with the acrylic painter in mind
If you’ve ever painted in acrylics and have struggled to achieve lovely smokey blends because the paints dry too quickly – then using water-mixable oils will make the blending process so much easier. And this course has also been designed with the acrylic painter in mind.
We look at how water-mixable oils compare to acrylics, the pros and cons of handling and opacity and how the speed of acrylics drying can be used to your advantage in underpainting, blocking in and canvas preparation. Utilising the best of both worlds.
Sensitivity to Solvents
For this course, I’ve created 3 painting tutorials with downloadable reference images for you to work along from. Because there are varying degrees of sensitivity to consider from painters with multiple allergies and asthma – to painters who can tolerate low odour solvent or others that work in a well-ventilated studio space, I’ve designed this course bearing 3 different levels of sensitivity in mind.
- Hypersensitive with allergies – We create a completely solvent-free painting, just diluting with water and oil.
- Less sensitive and can tolerate low odour solvents – We mix our own mediums using a low odour water-mixable thinner.
- Low sensitivity/paint in a well-ventilated room – Discover advanced pre-mixed mediums you can use to manipulate the drying time of the paints.
Over 5+ hours of tuition
This is a simple, easy-to-follow downloadable video course with over 5 hours of tuition where you will discover the essentials of how to create an oil painting using both a direct impressionist Alla-prima method and an in-direct classical approach, both aimed at the absolute beginner.
It has been designed as a step-by-step rounded learning experience bringing together all my knowledge as a student, painter and teacher.
What’s in the Course?
- 3 x water-mixable oil paintings demonstrations taking you step-by-step from drawing, mixing and matching colours through to the final brush strokes.
- 9-downloadable video lessons, split into separate chapters that follow on sequentially.
- Over 5 hours of detailed video instruction so that you can follow along at your own pace.
- Downloadable reference jpeg images, line drawings, and a full materials list.
- Lifetime access, downloadable on separate devices.
Lesson Breakdown

Lesson One
Introduction & Materials
Answering some of the most commonly asked questions about Water-Mixable Oils followed by a visual introduction to all the materials for the course – from pencils, paints, to mediums & palettes.

Lesson Two
Surface, Lines & Strings
Our first painting study compares Acrylics and Water-Mixable Oils, drying times, handling properties and paint coverage. We cover how to prepare a surface for Water-Mixable Oils, draw out using acrylic markers and mix ‘colour strings’ for efficient painting methods.

Lesson Three
Alla-Prima Painting
Working in an ‘direct’ or alla-prima style for an impressionistic cloud study. A technique where the painting is completed in one session, working wet-into-wet. Observing and manipulating edges, water- control, and palette knife techniques.

Lesson Four
Introducing Fat-over-Lean
Looking at the importance of fat-over-lean when working in an ‘in-direct’ approach, a method of building up a painting in many layers. Our second study is a Vermeer ‘master copy’, introducing an imprimatura, drawing out and the first blocking-in.

Lesson Five
Colour Mixing
Step-by-step methods for mixing and matching colours looking at hue, value and chroma. Using a limited palette to create a muted, historical colour scheme for the Vermeer study.

Lesson Six
First Painting & Mediums
Introducing the first painting, blocking in the masses of colour and looking at the different mediums available for Water-Mixable Oils. Depending on sensitivity, controlling our flow with water, thinner or oil and using oil recipes and manipulating drying times with mediums.

Lesson Seven
Second Painting
Working with an extended palette we now build up the painting to a finish, increasing the flow, introducing impasto paste and more advanced quick-drying mediums.

Lesson Eight
Classical Still Life
Our final piece brings all of the elements together to create a classical still life painting. We use an approach for working in layers more quickly and a limited palette of 5 colours to keep the colour mixes simple and harmonious.

Lesson Nine
Edges, Shape & Form
Looking at lost and found edges to give that illusion of form in our still life painting. Completed in one session, making it alla-prima so we don’t have to worry about fat-over-lean and stripping it back to basics diluting just with water for this final piece.
Course Delivery
I’ve taken care to film everything from my perspective so you can see exactly what I’m doing as we go through the entire painting process in real-time. With over 5 hours of video instruction, full-colour photographs and drawing guides.
How is the course delivered?
When you purchase the course, you will receive an email with all the downloadable video links to the course. You then have to download and save the Video Lessons onto your home computer/iPad.
- 9 Downloadable Step-by-Step Video Lessons – over 5 1/2 hours of video instruction that once downloaded – you have any time, anywhere access. (please note: you do not receive a DVD)
- A Materials Guide PDF – which includes all the reference images used throughout the course, alongside JPEG reference images and your materials list.
- The video files are large (4.5 GB) so you need a broadband internet connection and enough space on your computer hard drive.
Please note: You will not receive a DVD.
Cut by the Artist
I filmed, edited, and coloured the course myself (with a little help from Vanessa!) rather than working with a production company.
Artists have different needs than editors so I wanted to cut the course like an artist, showing you exactly what I wanted to see when I was learning. I show all the real-time brushstrokes for the paintings so you don’t miss a step.
There are 2 main camera views I cover:An over-the-shoulder view of the work – so you can see how I build up the painting as if you were standing behind me in the studio.
A close-up of the brush contacting the canvas – with extreme close-ups, so you can see the grain of the canvas and the bristles in the brush.
Real-time filming – No long jumps in progress
I don’t like long jumps in progress when the paintbrush goes off-camera, the shot changes and suddenly the picture has seemed to drastically improve. I include all the stages so you can clearly see the progress of a work. It’s simple. It’s thorough. And it’s easy-to-digest.
Course Requirements
Requirements for the Course
A broadband internet connection – the files sizes for the video lessons are quite large (4.5 GB in total) so can take a while to initially download (depending on your internet speed.) Once downloaded, they are yours to keep forever, watch without buffering or take to the garden and watch away from an internet connection!
Enough free space on your Computer or iPad – You can download the files to a separate USB stick if you need extra storage.
A Colour Printer – to print out the reference images or access to a Print Shop.
Glossy Photo Printer Paper – I use Epson Photo Glossy.
Have a read through the Oil Painting Safety.pdf – Water-mixable oils and low odour thinners do not present any major dangers when used with care and common sense. However, as with any products, high standards of general hygiene should be adhered to. This safety guide is intended for traditional oils, but please read it through. It covers ventilation, sensitivities, and safe studio practice with oils.
A love of tea & biscuits (optional, but some may say essential!)
FAQs
Absolute Beginners Water-Mixable Oils Course
No, there is no time limit, you can watch them as many times as you like.
The course is a series of downloadable video lessons, once they are downloaded they are yours to keep forever. If you change computer in the future just drop me an email and I’ll send you through some fresh links.
You can watch the lessons and courses as many times as you like and have lifetime access. If you change computer in the future just drop me an email and I’ll send you some fresh links through.
Yes, you can download to an iPad using Files App, or the free app called ‘Documents’. Without either of these apps, you will not be able to download directly to an iPad.
You can also download the video lessons to multiple devices (home PC, laptop etc) and if your storage space is running low on your laptop, you can download to a separate USB stick.
No, not at the moment.
The courses are available as a download only, there is not a streamable option.
If you only have an iPad you need to use either the Files App or the free Documents App to download and have enough space on your device
But there is one exception.
If you open the download links in the Safari browser on an iPad, Safari will give you an option to View or Download, if you click View, you can watch the videos without downloading.
Yes, there are jpeg reference images and line drawings to work from.
I’m a big fan of drawing, and if you have a good understanding of how drawing works, it can make the biggest jump forward in your paintings. But if you’re super keen to get started with painting and engrossed in colour, then I’ve added a few downloads to help you out.
All of the images can be printed out A4 size allowing you to work 1:1 with your reference image (a classical technique called sight-size)
Mmm, kind of. The course has been developed specifically to look at water-mixable oils, however, if you have used oils before, there are many similar methods that you could replace the water-mixable mediums and thinners with traditional oil mediums.
The reference images are available as JPEG images that you can refer to throughout the course. There is also a PDF materials list.
These are both within a zip file that needs to be ‘unzipped’ to view the files.

It is usually the first (or the last) link on the downloads column.
Click this link.
Most computers will automatically unzip the file to reveal several files within it.

How to unzip a file

On a Mac
Double-click the .zip file to uncompress (unzip) the file:
On Windows (Applies to: Windows 7 | Windows 10 | Windows 8.1)
To unzip all the contents of the zipped folder, press and hold (or right-click) the folder, select Extract All, and then follow the instructions (see How to zip and unzip files)
If the file is still ‘zipped’ you need to ‘un-zip’ it and extract the files.
How do I know if it has downloaded?
On most web browsers it will start to automatically download to your downloads folder on your computer.

Here’s where your download progress is on Google Chrome

Please note: On the Firefox web browser, you will have an option to ‘Open’ or ‘Save As’ Click either option as even if you choose to open the file it will save a version in your downloads.
It depends.
I don’t use a specific beginners starter set for the course.
The materials that best suit you will vary depending on your sensitivity to mediums and how you prefer to paint.
I demonstrate with a wide range of different materials to show the options that are available so you can make decisions based on your own preferences, sensitivities and working style.
I use artist quality paints, which are initially more expensive than student grade but offer a higher pigment to oil ratio.
I also show how they compare to acrylics, so also list the acrylics in the materials list.
However, as a start, the three painting demonstrations could be completed using a Cobra (from Royal Talens) starter set. (10 x 40ml tubes)
A small bottle of water-mixable thinner and water-mixable linseed oil from the Artisan range from Winsor & Newton, to be able to practice mixing medium ratios.
The shopping cart will convert to your local currency. You can use a currency converter to get an idea of the current exchange rate: https://www.xe.com/currencyconverter/
Yes, you can from another screen, such as an iPad or a desktop. That will let you keep the reference image visible while you follow the lesson.
However, in some of the lessons, I physically test colours directly on the printouts. This can be very helpful when you are first learning, because it makes colour matching clearer and easier to judge.
