


Market Day Peaches Acrylic Still Life Course
(Scroll down ↓ to Add to Cart)
Morning class, I’m Will Kemp, and welcome to Market Day Peaches Acrylic Still Life, the third painting in my series of short courses.
‘The Morning Paintings’ are designed to be easy-to-follow single-project courses. You can complete them in just a few 1-hour painting sessions.
Each one follows the same approach:
- A single painting from start to finish.
- A limited colour palette.
- A handful of brushes.
- A small canvas.
- A simple subject.
- Taught over 4 x 45-minute lessons.
Simple Impressionistic Brushstrokes
I’ve started this series because sometimes you can find yourself overthinking the end result of a painting, and the pressure of having to make it a masterpiece or even arranging a still life can keep you from starting!
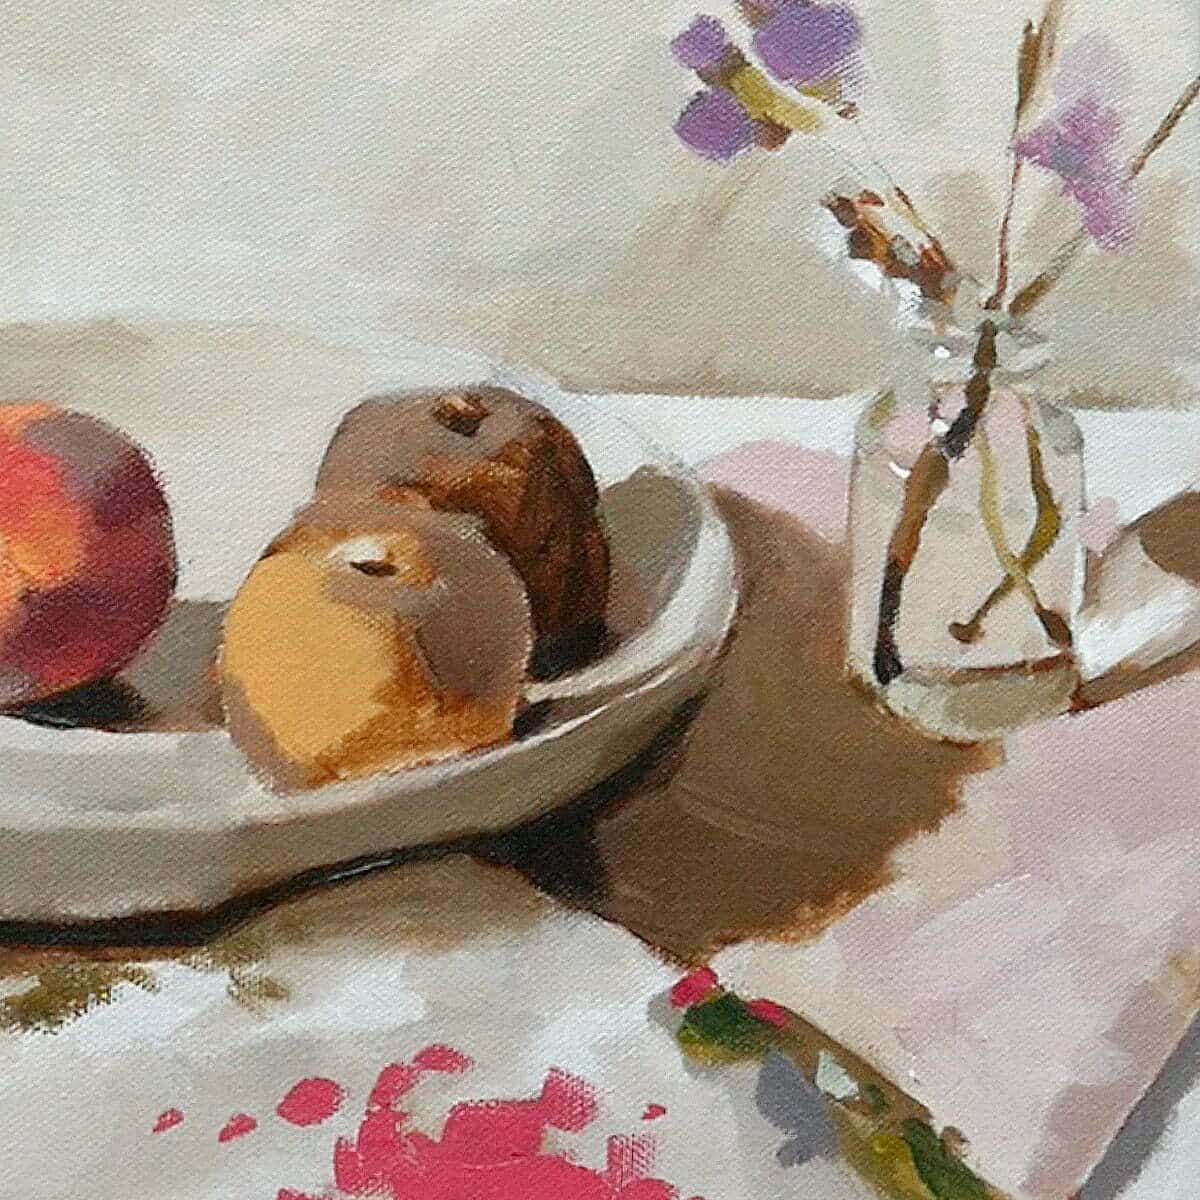
I recently came home from the local market with these amazing-tasting peaches and just dropped them in a bowl on the kitchen table, and they looked good enough to paint. The placement felt more casual, like a snapshot of everyday life, which inspired this painting.
In this third short course, I’ve taken all the principles of a traditional still life but kept the composition informal.
This subject has been expanded from the first simple modern still-life painting course of a jug and three pears; we’re now introducing folded fabric, adding glass, a vase of flowers and a bowl.
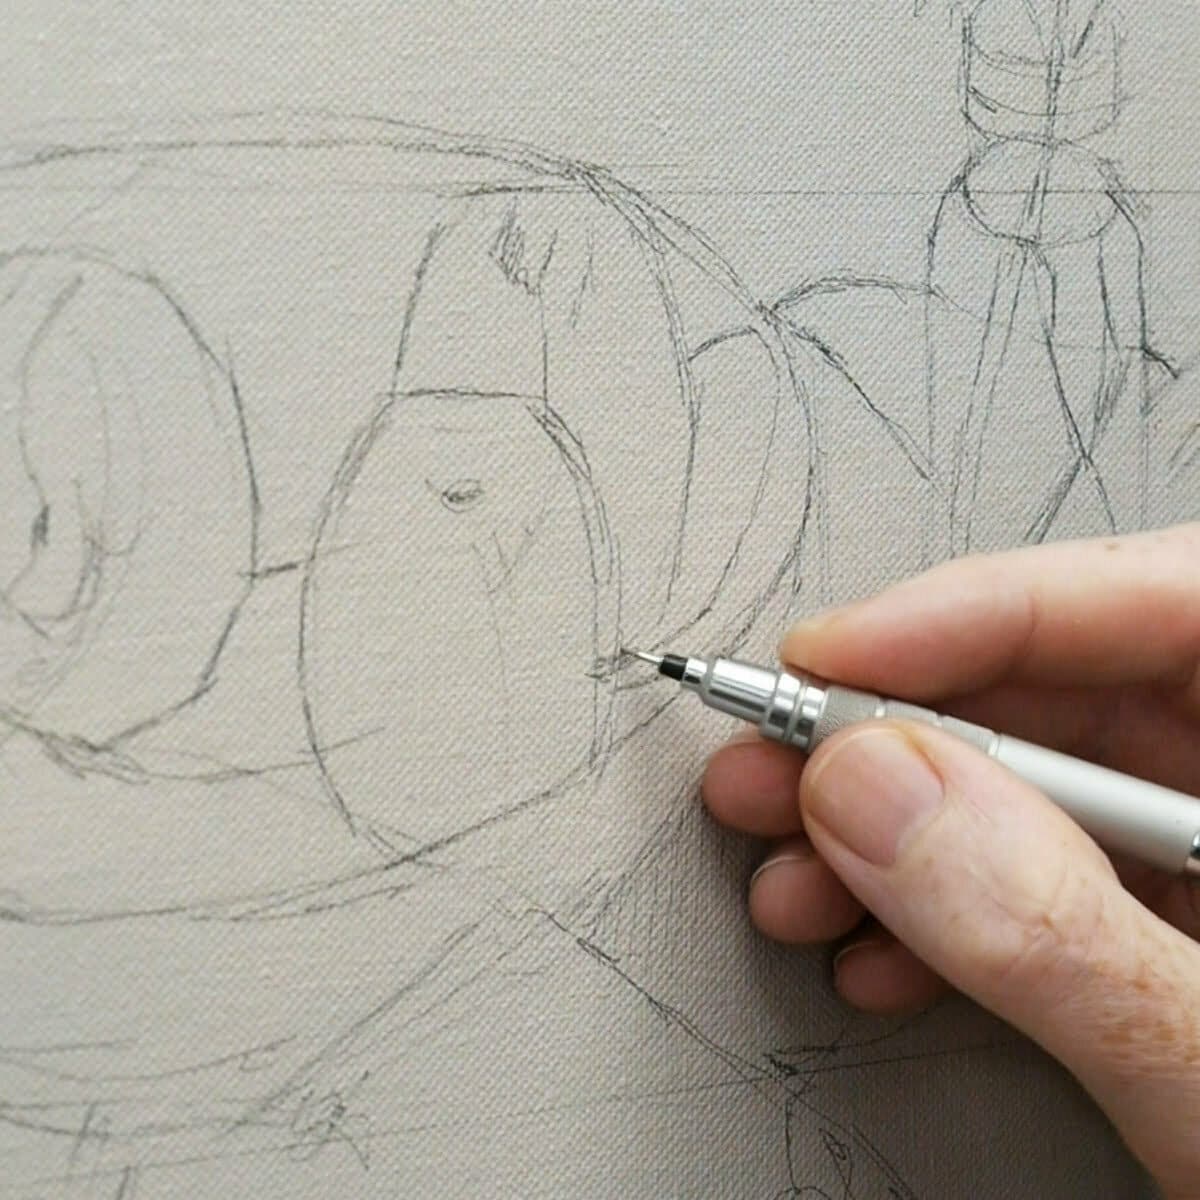
We’ll cover the preparation of your surface & drawing out, mixing colour strings and blocking in.
So although we are expanding our horizons a little bit, the course has been designed with simple learning blocks. Clear step-by-step instructions to keep you on track.
We’ll only use six colours, including white, and if you’ve been following some of my other courses, you will already have most, if not all, of the colours.
The focus of this piece is those beautiful, colourful peaches, but I’ve designed the lessons so you approach them last.
We start with just two colours, looking at the subtle shifts between the cools and warms, building up the shadows and shapes so that when we get to the peaches, and you extend your palette, all of a sudden they’ll come together so real because you’ve spent the time doing all the supporting work up to that stage.
(The counterintuitive approach for this painting is to spend more time with the first stages to get our form and tones balanced.)
Release the Pressure of Perfection
So find a comfy seat, a strong cup of coffee or a pot of tea, and see what can be achieved in a 1-hour painting slot.
Gain confidence and embrace the process of practice!
You could make a big step forward in the painting every day, and after three days or even over a weekend, I think you will be amazed at how far your image has progressed!
What’s in the Course?
- 1 x Market Day Peaches Still Life from start to finish, based in the studio, working from a reference image.
- 4 x downloadable video lessons, split into separate chapters that follow sequentially. Step-by-step instructional videos so that you can follow along at your own pace.
- Each stage is a detailed yet easy-to-follow process.
- Lifetime access, downloadable on separate devices.
- One-time payment
- Downloadable JPEG reference images and reference line drawings.
- Printable Class materials list
- 2.5 hrs of detailed video instruction.
(You will need a printer or print shop for the reference image)
This course is for you if..
- You would like a drawing guide and composition, so you can just get to work quickly.
- You work in acrylics but would also like to learn some classical oil techniques (by stealth!)
- You want to wow the local art group with your kick-ass painting skills
- You want to learn “over-the-shoulder” and see every brushstroke of the progress.
- You want a one-off payment course so that you can rewatch at your own pace and don’t want to pay a subscription.
- You love tea and biscuits
Here are some student success paintings from the course to inspire you!
£45.00
Description
Market Day Peaches – Single Project Course
This course will guide you step-by-step to create an impressionistic still-life painting with acrylics.
We’ll cover set-up, blocking-in, colour mixing and brush techniques. With simple blocks of learning, clear instruction will keep you on track.
Who is the course for?
I’ve designed this acrylic still life course with the beginner in mind. You’ll be guided through the basics of working with acrylics, learn the power of a limited palette, and then move on to choosing accurate pigments to achieve the right effect.
Imagine going to your paint box, opening up the lid and picking out just three brushes. That’s all you need to complete the painting.
From the reference image, everything has been set out, a simple drawing to work from with a step-by-step plan to follow.
You only need to focus on the next step.
You’ll be using simple brush techniques and materials, so even if you’re completely new to painting, you’ll get great results!
What materials will I need?
We’ll only use six colours, and that includes white, and if you’ve been following some of my other courses, you will have most, if not all, of the colours already.
” I could paint for a hundred years, a thousand years without stopping, and I would still feel as though I knew nothing.” – Paul Cezanne.
What are the colours?
- Titanium White – (Golden Heavy Body Acrylics)
- Cadmium Yellow Light – (Golden Heavy Body Acrylics)
- Burnt Umber – (Golden Heavy Body Acrylics)
- Raw Umber (Golden Heavy Body Acrylics)
- Ultramarine Blue – (Golden Heavy Body Acrylics)
- Permanent Alizarin Crimson – (Winsor & Newton Acrylics)
And Brushes?
Isabey Isacryl – Flat, Size 6, Series 6562
Isabey Isacryl – Filbert, Size 6, Series 6572
Princeton Aspen – Round, Size 4, Series 6500R
Will I be able to download the video lessons?
Yes, the course is delivered by a series of downloadable video lessons that are yours to keep forever.
What will I achieve at the end of the course?
You’ll have created an impressionistic still life, gained confidence painting glass, lost the pressure of perfection, and embraced the process of practice!
Lesson Breakdown

Lesson One
Preparation & Drawing Out
Learn how to choose a colour for our coloured ground, giving us a great base to work colours on top of and prepare the surface for painting. We’ll then draw out, looking for tension and balance in our negative spaces.

Lesson Two
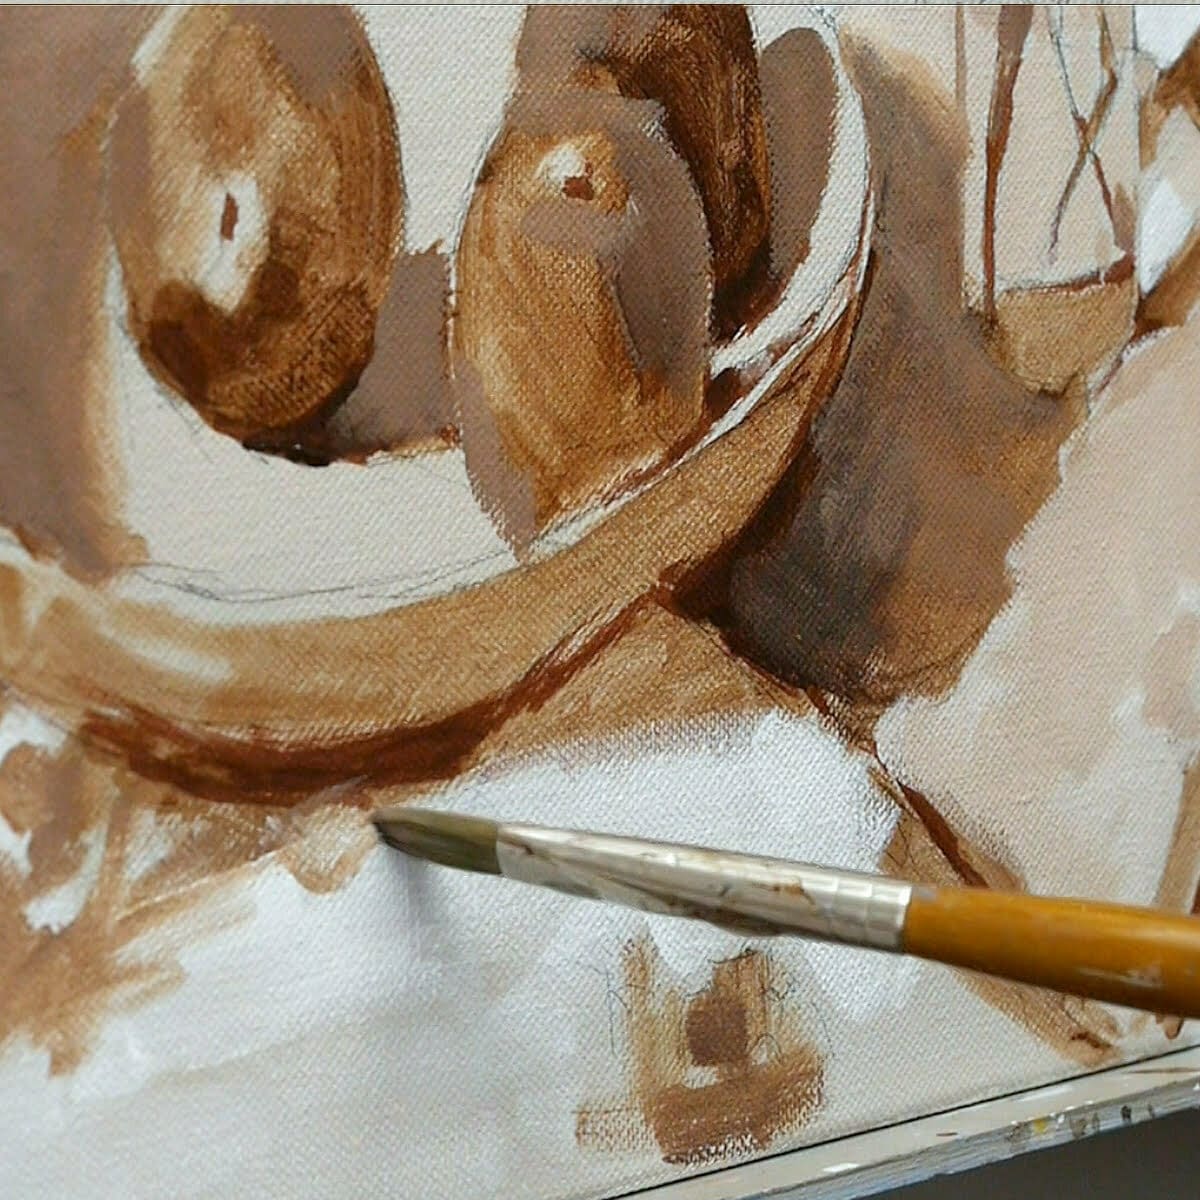
Blocking-In
Using Burnt Umber & Raw Umber, we’ll create the foundation for our painting by observing the warm and cool colour relationships.

Lesson Three
Full Palette
Everything but the Peaches! By focusing on the fabric and the glass vase, we can create the perfect subdued setting for the peaches.

Lesson Four
Full Palette – Peaches
In this last lesson, we’ll introduce a warm colour string to paint those beautiful peaches. Using a filbert brush for softer transitions to balance against the painterly background.
Course Delivery
Course Delivery
I’ve taken care to film everything from my perspective so you can see exactly what I’m doing as we go through the entire painting process in real-time.
- Downloadable Full-colour reference photograph
- Downloadable Line Drawing
- Downloadable Value Scale
This course has been developed with a beginner in mind, carefully going through the steps at a pace that introduces new colours and techniques slowly.
How is the course delivered?
When you purchase the course, you will receive an email with all the downloadable video links to the course. You then have to download and save the Video Lessons onto your home computer/iPad.
4 Downloadable Step-by-Step Video Lessons.
With 2.5 hours of detailed video instruction, once downloaded – you have any time, anywhere access.
- A downloadable materials list.
- JPEG reference image, including the photo reference I demo with, a copy of my pencil sketch for the line drawing.
The video files are large (2.5GB) so you need a broadband internet connection and enough space on your computer hard drive.
Please note: You will not receive a DVD.
Cut by the Artist
I filmed, edited, and coloured the course myself (with a little help from Vanessa!) rather than working with a production company. Artists have different needs than editors, so I wanted to cut the course like an artist, showing you exactly what I wanted to see when I was learning. I show all the real-time brushstrokes for the paintings, so you don’t miss a step.
There are 3 main camera views I cover:
An over-the-shoulder view of the work – so you can see how I build up the painting as if you were standing behind me in the studio.
A close-up of the brush contacting the canvas – with extreme close-ups, so you can see the grain of the canvas and the bristles in the brush.
Stable shot of the palette for when I pick up paint – see exactly how I mix colours. There is nothing worse than when the brush disappears from view, only to reappear with some fantastic new colour. Where did that colour come from?! How did it get mixed?
The palette view is very important, not just at the beginning of the video. I want to show you every single mix I make, so I film with the palette directly next to the painting; then, you can see shots of the palette throughout the course and gain a sense of my approach to colour mixing.
Colour Corrected Footage
Filmed under constant colour balanced conditions, so the paint colours are as accurate as can be. (Computer monitor screens and print-outs can vary)
Real-time filming – No long jumps in progress
I don’t like long jumps in progress when the paintbrush goes off-camera, the shot changes, and suddenly the picture seems to improve drastically.
I include all the stages so you can clearly see the progress of the piece.
Course Requirements
Course Requirements
Requirements for the Course
A broadband internet connection – the files sizes for the video lessons are quite large (2.5GB in total) so can take a while to initially download (depending on your internet speed.) Once downloaded, they are yours to keep forever, watch without buffering or take to the garden and watch away from an internet connection!
Enough free space on your Computer or iPad – You can download the files to a separate USB stick if you need extra storage.
A Colour Printer – to print out the reference images or access to a Print Shop.
Photo Printer Paper – I use Epson Archival Matte or Epson Photo Glossy.
1 hr per painting session – You’ll need to be able to dedicate 1hr for 4 painting sessions.
FAQs
Market Day Peaches Acrylic Still Life Course
When you purchase a course, you’ll receive an Order Receipt containing all your downloadable video links, JPEG reference images and PDF files for the course as an email.
You must then download and save the video lessons onto your home computer or laptop. Once you have saved the files, you can watch them as many times as you like, whenever you like, forever.
Yes, there are reference images in jpegs and line drawings to work alongside from.
Yes, there is a line drawing you can work from and I go through the drawing process in the course.
We accept all major credit and debit cards such as Visa, Mastercard. We also accept Paypal.
Yes, you could follow along with the course with Oils or Water-Mixable Oils. There are a couple of tweaks you’d have to be aware of. The coloured ground will take longer to dry, and you’d have to spray fixative on the drawing before painting, but after that, the colour mixing and approach would be very similar.
Send me an email, my direct email is: [email protected] and I’ll do my best to help.
The shopping cart will convert to your local currency. You can use a currency converter to get an idea of the current exchange rate: https://www.xe.com/currencyconverter/
Yes, you can from another screen, such as an iPad or a desktop. That will let you keep the reference image visible while you follow the lesson.
However, in some of the lessons, I physically test colours directly on the printouts. This can be very helpful when you are first learning, because it makes colour matching clearer and easier to judge.
I’ve tried to keep the materials small, so we can focus on the process.
Here is a full materials list: Market Day Peaches Materials List PDF
