
Oil Portrait Colour Glazing Course
(Scroll down ↓ to Add to Cart)
Do you know your Couche from your Scumble?
If you’re new to oil painting, you might have heard about the magical effects of ‘glazing’ and how using secret Old Master recipes could take your paintings to new heights. You find yourself nodding along but inside thinking, ‘What is everyone talking about? What even is a ‘glaze recipe’?
Maybe you’ve overheard someone mention a ‘Scumble’ or read about a ‘Velatura’. What difference do they make?
Glazing can seem like the missing link to your portrait paintings.
And sometimes, it is.
This oil portrait course looks specifically at colour glazing techniques. You’ll study two portraits using two different colour palettes based in the studio, working from reference images.
Over 6 hours of tuition, you’ll learn how to simplify the structure of the face in Grisaille, mix natural subtle skin tones with a limited palette and softly model the form.
You’ll gradually build up the colours to increase the intensity, learning to think in layers of translucent veils of colour and multiple layers of transparent glazes over a tonal underpainting.
Working through these simple step-by-step tutorials, you’ll build progressively, so by the end of this course, you’ll be creating complex, realistic, luminous portraits and have a really great understanding of how to utilize glazing in your own portrait practice.
£89.00
- Description
- Lesson Breakdown
- Course Delivery
- Course Requirements
- What Students Say
- Student Success
- FAQs
Description
Thin layers of Mistakes
Safe in the privacy of your studio, you decide to have a little experiment.
This glazing thing can’t be that hard, it’s just like painting a watercolour … isn’t it?
Thin colours over opaque.
This is going to be it, this is going to capture those lovely translucent skin tones and as the colours go on, you’re feeling a litte bit like Rembrandt.
Mmm, this doesn’t look right.
You step back to see your results.
Ahh.
It looks like a stained black and white photograph. The skin tones look flat, not translucent at all, and come to think of it the portrait itself doesn’t look three-dimensional. Where did I go wrong?
Don’t fret, you’re not alone. This is exactly how my first foray into oil glazing started too!
Discovering a successful method has taken me to the Atelier’s in Florence, Italy, I’ve searched through long-forgotten manuscripts in libraries and distilled the complicated art of glazing into a simple, repeatable process.
Thinking through the layers of transparency, building up of the painting structure and keeping the freshness to the finished painting is down to layers of clear sparkling jewel-like transparent final colour glazes and semi-transparent veils of paint called Velatura.
A velatura is a thin layer of opaque paint, spread out so it creates a milky or foggy haze that obscures some of what’s beneath it, but not all. It’s like a glaze, but created using an opaque or semi-opaque pigment rather than a transparent one.
Save time
To discover these painting techniques have taken me many years of failed paintings, you can save time by shortening the learning curve!
Reduce costs
To study these techniques at a painting Atelier can cost over $1,000 a week in fees (not including travel & accommodation) being able to study at your own pace in your own studio can save thousands of pounds in your education.
“If you hear a voice within you say ‘you cannot paint,’ then by all means paint, and that voice will be silenced.”
Vincent Van Gogh, Artist
What’s in the Course?
The course is split into 18 downloadable video lessons, with each lesson made up of separate chapters that follow on sequentially.
This is a comprehensive, easy-to-follow 6-hour video course, where you will discover a fresh, quick approach to painting 2 different portraits.
- 2 x portrait paintings, taking you step-by-step from drawing, right through to the finishing touches.
- 18-downloadable video lessons, split into separate chapters that follow on sequentially.
- Step-by-step instructional videos so that you can follow along at your own pace.
- Downloadable jpeg reference images, line drawings and a full materials list.
- Nearly 6 hours of detailed video instruction.
- Lifetime access, downloadable on separate devices.
Lesson Breakdown

Lesson One
Shadow Lines & Establishing the Drawing
A visual introduction to the range of paints, brushes & mediums you’ll need for the first portrait of Imogen. Mixing a muted green using acrylics for a tonal ground, drawing out and blending the shadow line.

Lesson Two
The Underpainting
Mixing different ratios of medium to build up the layers of the painting, keeping it technically sound. Using Burnt Umber alkyd (quick drying) oils to block-in the shadows.

Lesson Three
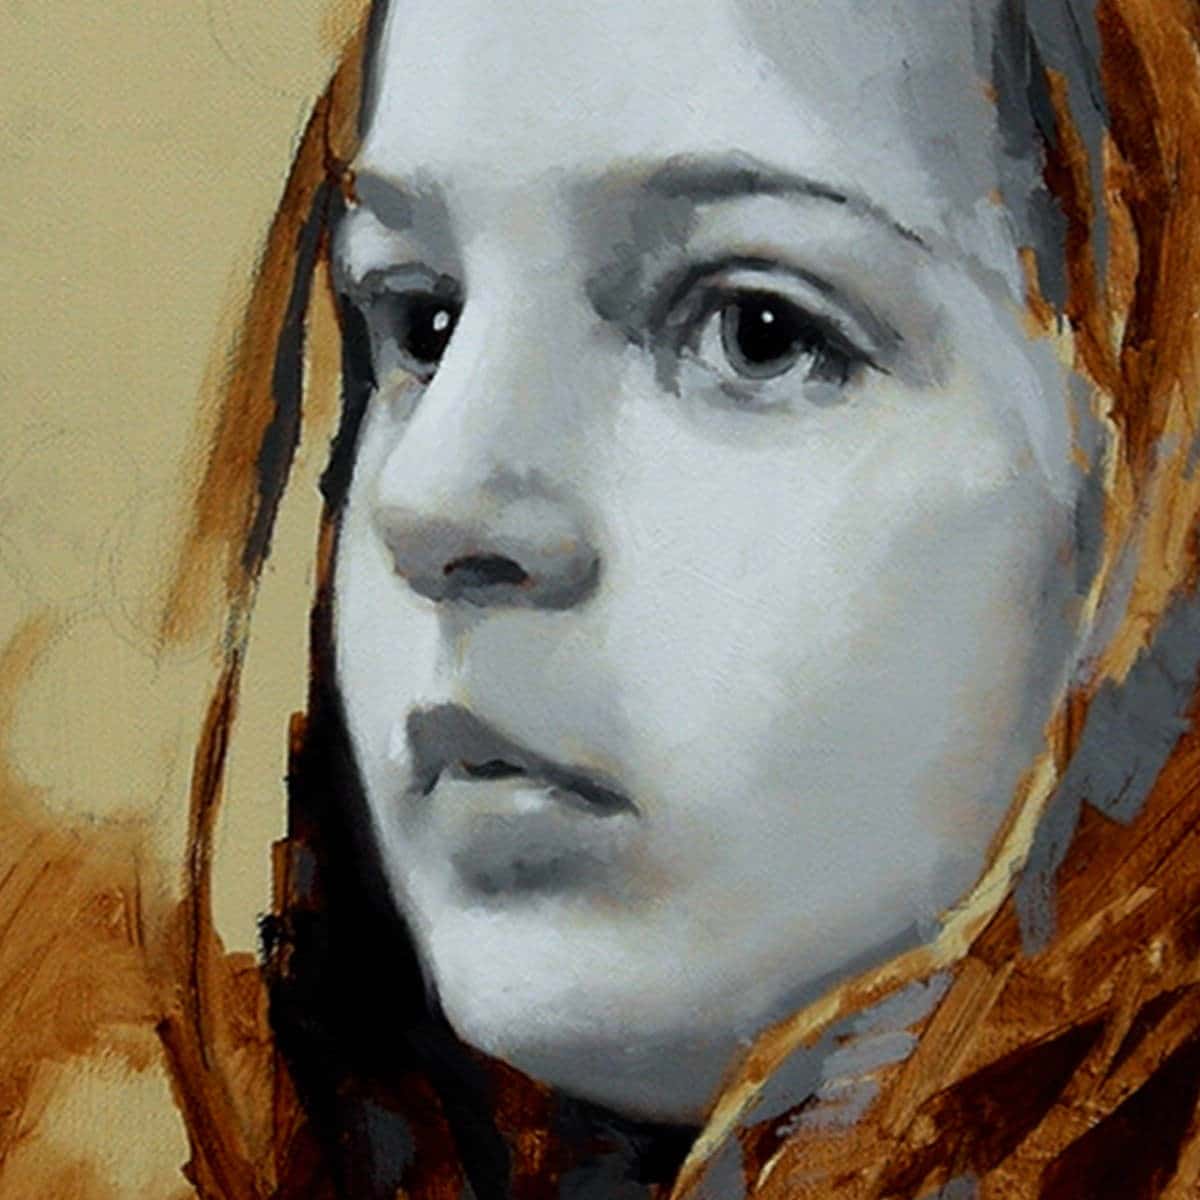
Grisaille
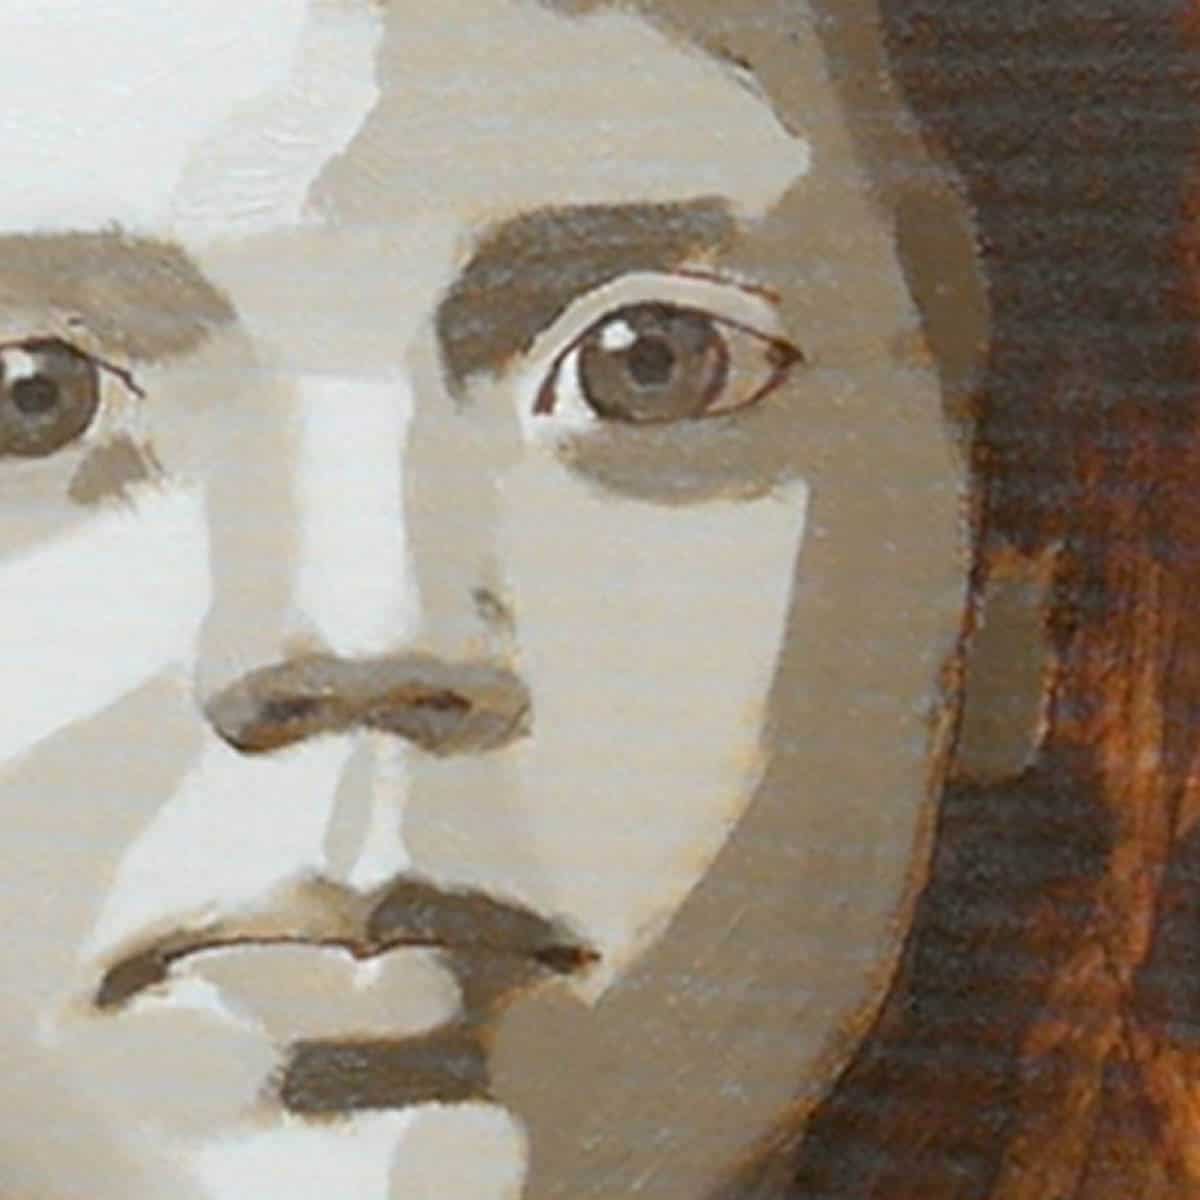
Painting the planes of the face in a geometric mosaic of grey tones. Observing the extra drying time and applying grey tones clean and sharp, safe in the knowledge we have the working time of oils to blend the edges.

Lesson Four
Tuning your eye to colour
Softening the edges and working with a soft filbert brush to model the form.

Lesson Five
Mixing Skin Tones
Using a limited colour palette including Ivory Black and Titanium White to create a wide range of skin tones.

Lesson Six
First Painting
Introducng a warmer brown into the shadows to get a balance between warm and cools before mixing a base skin tone.

Lesson Seven
First Painting
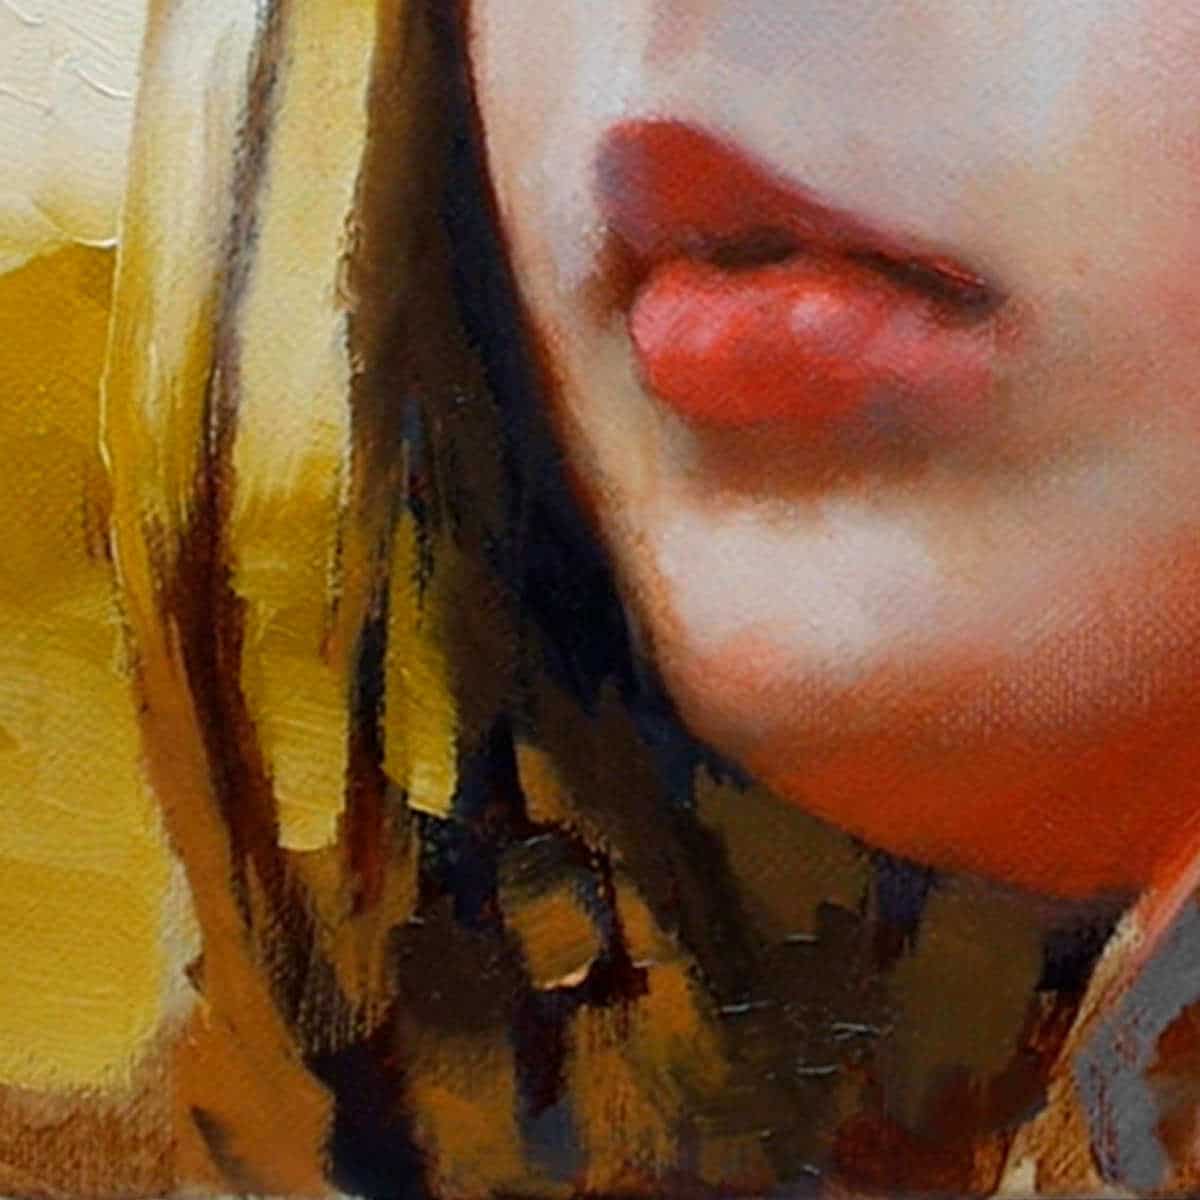
Starting to add blushes of colour to the lips and cheek and increasing the colour saturation. Using thicker paint mixes, to enhance the colours in the background, altering our perception of the skin tones.

Lesson Eight
Second Painting
Working with the same limited palette we explore how much you can get out of one colour by using it thickly or transparently to apply finishing glazes. We now work on top of a wet medium to apply the final glazes to our first portrait.

Lesson One
Drawing Out & Blocking In
A visual introduction to the range of paints, brushes & mediums you’ll need for the second portrait of Grace.
Using an acrylic marker to draw in the features of the portrait before blocking-in the shadow tone.

Lesson Two
Grisaille
Mixing a cool green/grey tone and a Grisaille to compliment the orange/pink complexion of Grace for the tonal underpainting. Painting the planes of the face to add the form to the portrait.

Lesson Three
Mixing Skin Tones
Using a different skin tone palette for Grace, from a warm brown to a cool purple.

Lesson Four
First Painting
Blushing on the base layer using cool and warm skin tones. Once the base is painted in, we can then push the range of the palette to incorporate the stronger tones from the hair.

Lesson Five
First Painting
Building up the warmth on the shadow side of the face to harmonise the colours from the skin tones and the hair, by warming the flesh tones.

Lesson Six
Second Painting
Now we’ve established the cools and warms to the muted underlayer of the face, we add in pink to the cheeks and lips.

Lesson Seven
Glazing
Using Grace’s complexion to really push the different transparent pigments. Working with translucent veils we add a glow of blue to the eyes, cool greens into the shadows and purples around the face.

Lesson Eight
Glazing and Scumbling
For the final stages we go back to the start. Reassessing the drawing, adding areas of thicker paint and scumbling the lights to bring the second portrait to a finish.
Course Delivery
I’ve taken care to film everything from my perspective so you can see exactly what I’m doing as we go through the entire painting process in real-time. With over 6 hours of video instruction, full-color photographs and drawing guides.
How is the course delivered?
When you purchase the course, you will receive an email with all the downloadable video links to the course. You then have to download and save the Video Lessons onto your home computer/iPad.
- 18 Downloadable Step-by-Step Video Lessons – 6 hours of video instruction that once downloaded – you have any time, anywhere access. (please note: you do not receive a DVD)
- A Getting Started & Materials List PDF – which includes your materials list.
- JPEG reference images used throughout the course, Including the photo reference I demo with, black and white copies for the Grisaille and a copy of my pencil sketch for the line drawing (7 separate images per portrait to guide you through each stage)
- The video files are large (5 GB in total) so you need a broadband internet connection and enough space on your computer hard drive.
Please note: You will not receive a DVD.
Cut by the Artist
I filmed, edited, and coloured the course myself (with a little help from Vanessa!) rather than working with a production company. Artists have different needs than editors so I wanted to cut the course like an artist, showing you exactly what I wanted to see when I was learning. I show all the real-time brushstrokes for the paintings so you don’t miss a step. There are 3 main camera views I cover: An over-the-shoulder view of the work – so you can see how I build up the painting as if you were standing behind me in the studio. A close-up of the brush contacting the canvas – with extreme close-ups, so you can see the grain of the canvas and the bristles in the brush. Stable shot of the palette for when I pick up paint – see exactly how I mix colours. There is nothing worse than when the brush disappears from view, only to reappear with some fantastic new colour. Where did that colour come from?! How did it get mixed?The palette view is very important, and not just at the beginning of the video. I want to show you every single mix I make, so I film with the palette directly next to the painting, then you can see shots of the palette throughout the course and gain a sense of my approach to colour mixing.
Colour Corrected Footage
Filmed under constant colour balanced conditions, so the paint colours are as accurate as can be. (Computer monitor screens and print-outs can vary)
Real-time filming – No long jumps in progress
I don’t like long jumps in progress when the paintbrush goes off camera, the shot changes and suddenly the picture has seemed to drastically improve. I include all the stages so you can clearly see the progress of a work.
Course Requirements
Requirements for the Course
A broadband internet connection – the files sizes for the video lessons are quite large (5GB in total) so can take a while to initially download (depending on your internet speed.) Once downloaded, they are yours to keep forever, watch without buffering or take to the garden and watch away from an internet connection!
Enough free space on your computer or iPad – You can download the files to a separate USB stick if you need extra storage.
A Colour Printer – to print out the reference images.
Glossy Photo Printer Paper – I use Epson Photo Glossy.
30 mins – 2hr per session, You’ll need to be able to dedicate between 30 minutes to 2 hrs for each section, for example, the blocking-in might take 10 minutes to paint but 12 hrs to dry.
Patience and a week of contemplation – although some of the stages are very quick to complete, you then need to leave that layer to dry before applying the next layer. We work the early stages with quick drying oils (called Alykds) so the process is quicker than using traditional oils for the entire process.
Some experience of drawing portraits – the biggest issues you’ll have if you’re new to painting portraits will be the drawing of the portraits. You can work from my line drawing to help out as a guide but as the painting progresses and the line drawing has been painted over, you have to rely on your observation skills for making corrections. Tweaking and changing your painting is all part of the process.
A basic knowledge of colour mixing – we work extensively with mixes for accurate skin tones but the course doesn’t cover basic principles of colour mixing.
A love of multilayered biscuits! imagine pink wafers, mille-feuille if you think in layers you’ll achieve some great results!
What Students Say
This video course is packed full of useful tips for portrait painting, that could actually be used for any medium. For example, I found the advice on identifying skin tones and mixing colour strings particularly useful. I liked the way this course covers 2 portraits of faces with different skin tones and hair colours. The techniques are slightly different with each portrait, so you can choose which approach you prefer when you paint portraits of your own. I loved learning how to blend, which is so well-suited to oils, as they don’t dry too quickly. And the glazing part of the course was very interesting and helpful. This course has been very inspiring, and I can’t wait to try some portraits of my family members! Thank you, Will, for an excellent and informative course!” Jan, Oil Portrait Colour Glazing Course
Will, I hope you recognize this precious young lady. Your lessons were wonderfully helpful in my first attempt at a color portrait. Many thanks. Austine, Oil Portrait Colour Glazing Course
Sending you my finished painting of Imogen. What a hard work, but I enjoyed it so much!Thank you so much for this art “secrets”, they are changing my life! Catherina, Oil Portrait Colour Glazing Course
Hi Will, Thanks for these superb courses! Quite challenging, and I’ve learnt so much. Tone, Oil Portrait Colour Glazing Course
I completed the class and this is the first time that I spend money on a course that I actually complete the entire class. I loved your pace and explanation of colors the steps and all the tools you provide. It improve my painting by 90% in the sense that my portraits look realistic now. I will highly recommend this class to anyone who is interested in improving their oil portraits. Thank you. Luly
Oil Portrait Colour Glazing Course
Student Success

Oil Portrait Glazing

Oil Portrait Glazing

Oil Portrait Glazing

Oil Portrait Glazing

Oil Portrait Glazing

Oil Portrait Glazing

Oil Portrait Glazing

Oil Portrait Glazing
FAQs
Oil Portrait Colour Glazing Course
No, there is no time limit, you can watch them as many times as you like.
The course is a series of downloadable video lessons, once they are downloaded they are yours to keep forever. If you change computer in the future just drop me an email and I’ll send you through some fresh links.
You can watch the lessons and courses as many times as you like and have lifetime access. If you change computer in the future just drop me an email and I’ll send you some fresh links through.
Yes, you can download to an iPad using Files App, or the free app called ‘Documents’. Without either of these apps, you will not be able to download directly to an iPad.
You can also download the video lessons to multiple devices (home PC, laptop etc) and if your storage space is running low on your laptop, you can download to a separate USB stick.
No, not at the moment.
The courses are available as a download only, there is not a streamable option.
If you only have an iPad you need to use either the Files App or the free Documents App to download and have enough space on your device
But there is one exception.
If you open the download links in the Safari browser on an iPad, Safari will give you an option to View or Download, if you click View, you can watch the videos without downloading.
Not hugely, I’ve kept the material list as small as possible.
For the painting courses, I try to keep the colour palette small and use the same base colours for many of the other courses. I demonstrate with artist quality paints which have a higher pigment ratio so a little goes a long way.
Yes, there are jpeg reference images and line drawings to work from.
I’m a big fan of drawing, and if you have a good understanding of how drawing works, it can make the biggest jump forward in your paintings. But if you’re super keen to get started with painting and engrossed in colour, then I’ve added a few downloads to help you out.
All of the images can be printed out A4 size allowing you to work 1:1 with your reference image (a classical technique called sight-size)
I’m a big fan of drawing and if you have a good understanding of how drawing works, it can make the biggest jump forward in your paintings (it seems counter-intuitive but it can make dramatic changes).
But if you’re super keen to get started with painting and engrossed in colour, then I’ve added a few downloads to help you out. These are line drawings that you can work from.
All of the images can be printed out A4 size so you can work 1:1 with your reference image (another classical technique called ‘sight-size’). You can then draw out freehand or trace the lines to get you started, this course is all about getting you painting.
Not in detail, I talk through the things to look out for when sketching out the piece but I don’t go into anatomical details or processes on drawing a portrait head.
No, the 2 studies are both head and shoulder studies, concentrating on the face.
No, this course works from downloadable photographs, so you can follow along with the demonstration that I’m working on.
I find this approach gives confidence with glazing and brush techniques.
Beginners to oil painting who want to learn about how to use coloured glazes with oil paint for portraiture. Working in multiple layers from a black and white (Grisaille) underpainting to a full-colour portrait.
Beginner to Intermediate
Imagine yourself in your studio two weeks from now staring at two portrait paintings that you can’t quite believe ‘you’ painted.
That’s what I want you to achieve.
Not to watch a demonstration and glean a few extra ‘secret tips’ but to actually put these methods into practice and create your own portraits.
Then you can start to paint family, friends & grandchildren. Your conversation starters will be, ‘Wow, you have a great face, can I paint it?’
Mmm, it’s a tricky one. In theory, yes. Although in practice, I wouldn’t recommend this particular course with acrylics.
Why?
It’s all about a balance between having enough time to soften and blend the modeling of the face without feeling like your glazing layers are taking weeks and weeks to complete.
Due to the speed of the drying of the acrylics, they could appear to be the perfect choice of paints for glazing, however, when you’re first starting portraiture it’s easier to have more blending time to model the Grisaille underpainting accurately.
That’s not to say I don’t use acrylics at all on the course, on the coloured ground and for some sections of the hair I demonstrate how you can incorporate acrylics into your underpainting, but sticking to oils for the Grisaille of the face will give you the best results.
If you work small and paint quickly, you could adapt the techniques to acrylics, but if you’re new to portraits you would get more realistic results, more easily with oils.
Yes, they are slower drying, but if you paint a thick layer of OPEN acrylics for the underpainting (we want this to be opaque) you might actually have to wait longer than if working with the Alkyd quick drying oils before applying the next layers. And if you painted the underpainting with OPEN acrylics and then applied standard acrylics on top, you run the risk of the upper paint layers drying before the OPEN acrylics underneath.
Yes and no.
The first stage of the painting, the black and white grisaille, I paint with fast-drying alkyd oils. These dry within 24 hrs, which enable the rest of the layers to be applied. if you were just using WMO the drying time would be much slower for this initial stage.
For the building up of the glazing sections, you couldn’t just use water but would have to use a thinner (such as Winsor & Newton Artisan thinner) and Water-Mixable linseed oil and a fast-drying medium to mimic the medium mixes I demo on the course.
You couldn’t just use water and water-mixable paints for the whole of the course. You would have to add a linseed oil or a medium that contains oil. You would then have to use a thinner for diluting/cleaning brushes. If you added a water-mixable medium (that contains oil) or a linseed oil you could adapt the mixes. You would then have to use a thinner for diluting/cleaning brushes.
This is from Cobra paints:
“The first layer must be applied lean. For this, the paint is thinned with water. During the drying of this layer no compact film of paint is formed, but rather a porous one. Oil from a following layer will, therefore, be absorbed by the underlying lean layer and so when drying will adhere within the numerous pores. This helps to create good adhesion between these two layers. As an underlying (lean) layer abstracts oil from the top layer, it has to be ensured during painting that the underlying layer has relatively more oil. If this is not the case this will affect the quality of the painting.
As of this point, there are various possibilities for continuing further:
Thin each subsequent layer with increasingly less water; each subsequent layer, therefore, contains relatively more oil. You can eventually end up with pure paint.
Thin the paint for the following layer with painting medium.”
Although the techniques could be adapted to other subjects 90% of the lessons are focused on colours and techniques for skin tones and portraits, so I wouldn’t recommend it as a general oil glazing course.
If you like to work quickly, this is not an Alla-Prima technique.
It’s more of a slow and steady build up. There isn’t a time limit for the course, once you’ve downloaded they are yours to keep forever, so see it more as a meditative approach. Most layers will be dry within 24hrs, the first layers quicker than that.
For this course, I demonstrate with Odourless Mineral Spirits, which aren’t as strong smelling as Turpentine, but having access to an open window/door when you paint is still advisable.
We accept all major credit and debit cards such as Visa, Mastercard. We also accept Paypal.