
Acrylic Portrait Course
(Scroll down ↓ to Add to Cart)
Painting portraits with acrylics can be frustrating.
After the pleasure of not getting headaches from oil paint and toxic turpentine, there seems to be double payback for daring to tackle a portrait with acrylics.
Not only do the colours appear unsophisticated and garish but the paint dries too quickly to blend together successfully, especially when you’re trying to mix subtle skin tones. You can be left feeling disappointed with your results, admit defeat and crack out the thinners for another go with the oils.
I want to introduce you to a new portrait course, that can help develop your portrait skills and dramatically shorten your learning curve to achieving classical looking portraits with acrylics.
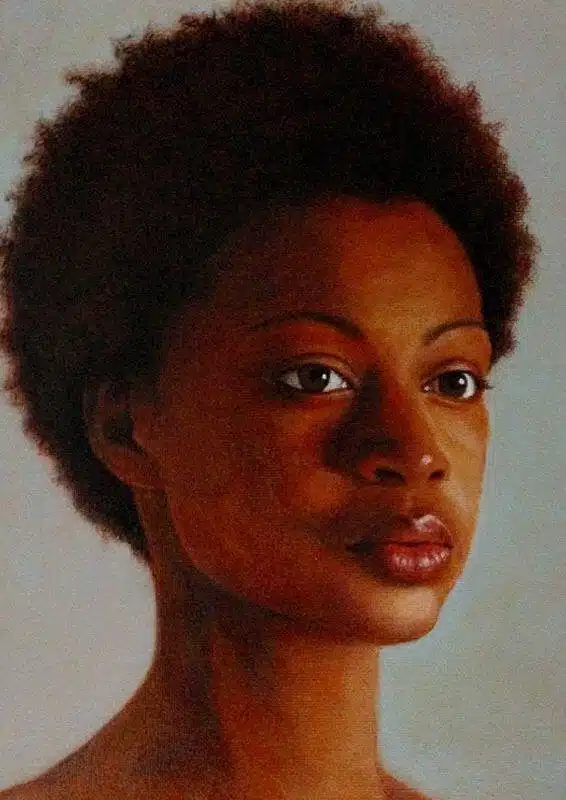
This portrait course will guide you through 3 different colour portraits tackling natural-looking subtle skin tones.
Over 4 1/2 hours of tuition, you’ll focus on simple colour mixing with a limited palette so you can achieve repeatable results. Each portrait tutorial looks at a different complexion and builds progressively, introducing mark-making and loose brushwork as your acrylic skills grow.
Working through these simple step-by-step tutorials, you’ll learn how to approach a colour portrait from a photograph for maximum results, every time.
£89.00
- Description
- Lesson Breakdown
- Course Delivery
- Course Requirements
- What Students Say
- Student Success
- Gift Card
- FAQs
Description
Taking you from Rookie to Rembrandt
I’d always painted with oils through art college and had used full strength turpentine – safe in the knowledge my fellow students were cool with the fumes and I had the luxury of time to wait for the oil paint layers to dry (perfect time for a few pints down the pub!)
However, when the relaxing days of college ended, I found myself painting in a small studio at the front of a teapot factory that was open to the public and mounting bills to pay…now the 6-month drying time of oils didn’t seem so attractive!
Plan B – a crash course in acrylics.
So I knew how to structure an oil painting but translating that knowledge to acrylics, to make them look like oils – wasn’t easy.
The paint tube names were different to the historical colours I’d used with oils and they all seemed to be a lot brighter in saturation as well.
The acrylics dried so quickly – I didn’t have time to alter the shapes on the canvas and the edges of my brushstrokes were just too severe.
On top of that, there was a colour shift in the drying of the paints, that kept on putting my mixes out.
I tried painting really thick …. then really thin and I did produce a lot of acrylic portraits,
So how did the paintings turn out? Pretty good, some award-winning.
I exhibited at the Mall Galleries in London, became a finalist in the Artists & Illustrators Portrait Artist of the Year but the subtleties of tone and smokiness of the Old Masters still eluded me.
I needed to change direction, think around the problem and come back with a new approach.
The Royal Seal of Approval
Then I received the letter.
You know the ones you don’t really think exist. It was a letter wax sealed with a Royal Crest.
Had I been asked to paint the Queen?
Not quite, but for me, the prize was even better.
I’d been awarded a Queen Elizabeth Craft Scholarship to study classical portraiture in Florence, Italy.
I could finally put all the pieces of historical information I’d put together myself, into an order that worked for me.
It changed the way I painted and cemented my existing practice.
I developed a method that enabled me to get consistently natural skin tones, keep the paint wet whilst using the minimum amount of colours and this is what I want to teach you in this course.
Discover a method for mixing natural skin tones with Acrylics that look like Oils
The main problem with acrylics is they dry too quickly. You don’t have enough ‘blending time’ to create smooth subtle transitions.
But what if you did 80% of your mixing before you even picked up your brush?
If you just mix your portrait with the colours straight from the tube, you’re missing a trick.
Subtle mixes, scumbling and glazing effects can all be easily achieved with acrylics if you have the right approach.
We’re going to take techniques and colour palettes from the past Masters and combine them with the qualities and properties of acrylics, turning the ‘disadvantages’ to our advantage.
You’ll gain a solid foundation in acrylic painting techniques, so you can build on your successes to create portraits you’ve always dreamt about, so when they’re hanging in your local gallery people will say to you “Did you use Oils?”
“Every portrait that is painted with feeling is a portrait of the artist, not of the sitter.”
Oscar Wilde, Poet & Playwright
What’s in the Course?
This is a comprehensive, easy-to-follow 4 1/2 hour video course, where you will discover a fresh, quick approach to painting 3 different portrait styles.
Coming from an art education background I’ve designed Art Curriculum for schools, developed interactive learning resources with the National Gallery, London and taught students from all different starting points the principles of how drawing and painting works.
This course has been designed as a step-by-step rounded learning experience bringing together all my experience as a student, painter and teacher.
- 3 x portrait paintings, taking you step-by-step from drawing, right through to the finishing touches.
- 8-downloadable video lessons, split into separate chapters that follow on sequentially.
- Step-by-step instructional videos so that you can follow along at your own pace.
- Downloadable jpeg reference images, line drawings and a full materials list.
- Over 4 1/2 hours of detailed video instruction.
- Lifetime access, downloadable on separate devices.
Lesson Breakdown

Lesson One
Welcome & Materials
A visual introduction to all the materials for the course from brushes to pigments. Introducing a 2-palette system that instantly increases the working time you’ll have at the easel.

Lesson Two
Studio Lighting
Understanding the importance of your studio lighting to create accurate colour mixes for your portraits.

Lesson Three
Zorn’s Limited Palette
The amazing power of a limited palette to help you learn about your pigments.

Lesson Four
Naturalistic Skin Tones
The first painting looks at cool, naturalistic colours working in an ‘in-direct’ style. This is a method of building up many layers working with glazing and scumbling.

Lesson Five
Base Colours & Poster Study
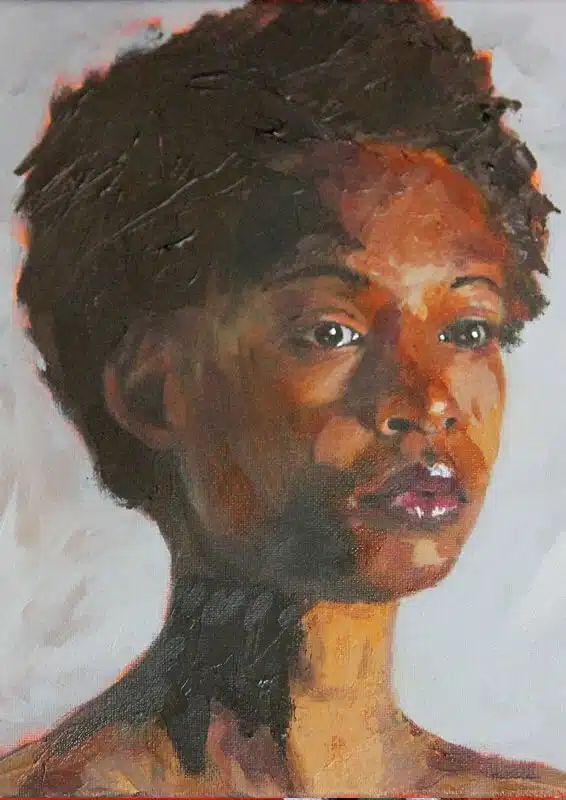
The second study is a warmer palette working with colour strings and base colours so your painting practice becomes more effective and efficient. We use a more direct, Alla Prima style for this poster study.

Lesson Six
Advanced Skin Tone Mixes
Extending our palette, and introducing a wider range of pigments for more advanced skin tone mixes.

Lesson Seven
Final Project – Part One
The final piece challenges your skills and combines thick impasto work with the palette knife and subtle delicate glazes for a darker skin tone.

Lesson Eight
Final Project – Part Two
Glazing scumbling & blending, allowing you to create atmosphere, mood and sophisticated tonal shifts for this final piece.
Course Delivery
I’ve taken care to film everything from my perspective so you can see exactly what I’m doing as we go through the entire painting process in real-time. With over 4 1/2 hours of video instruction, full-color photographs and drawing guides.
How is the course delivered?
When you purchase the course, you will receive an email with all the downloadable video links to the course. You then have to download and save the Video Lessons onto your home computer/iPad.
- 8 Downloadable Step-by-Step Video Lessons – over 4 1/2 hours of video instruction that once downloaded – you have any time, anywhere access. (please note: you do not receive a DVD)
- A Quick Start PDF guide – which includes your materials list.
- A Your Paintings Downloads PDF guide – which includes all the reference images used throughout the course, alongside stages of my more detailed paintings.
- The video files are large (2.8GB in total) so you need a broadband internet connection and enough space on your computer hard drive.
Please note: You will not receive a DVD.
Cut by the Artist
I filmed, edited, and coloured the course myself (with a little help from Vanessa!) rather than working with a production company.
Artists have different needs than editors so I wanted to cut the course like an artist, showing you exactly what I wanted to see when I was learning.
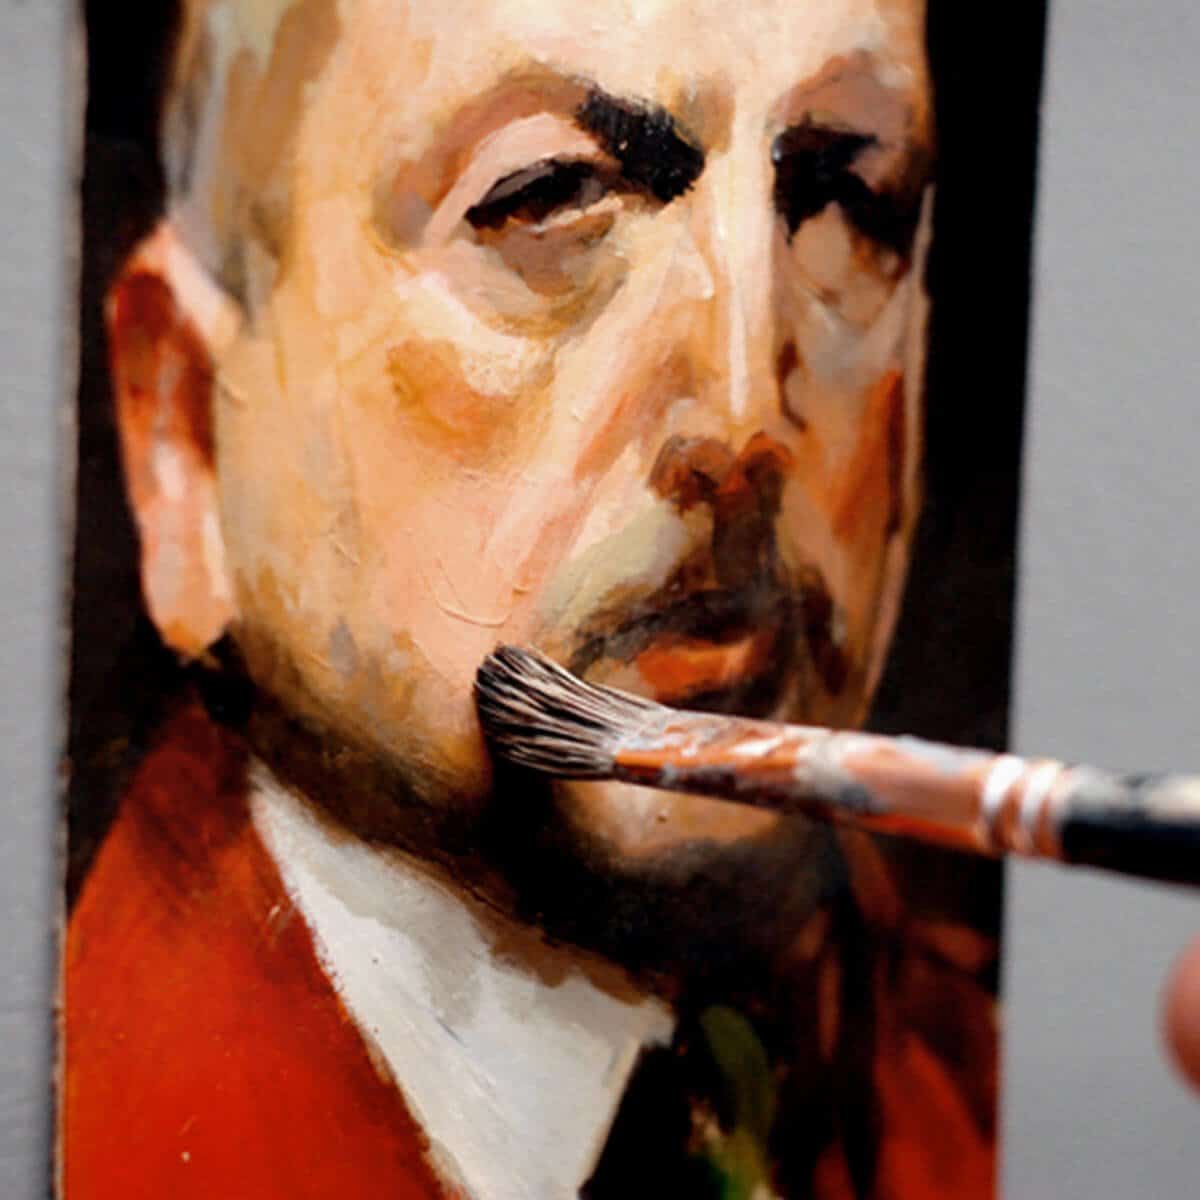
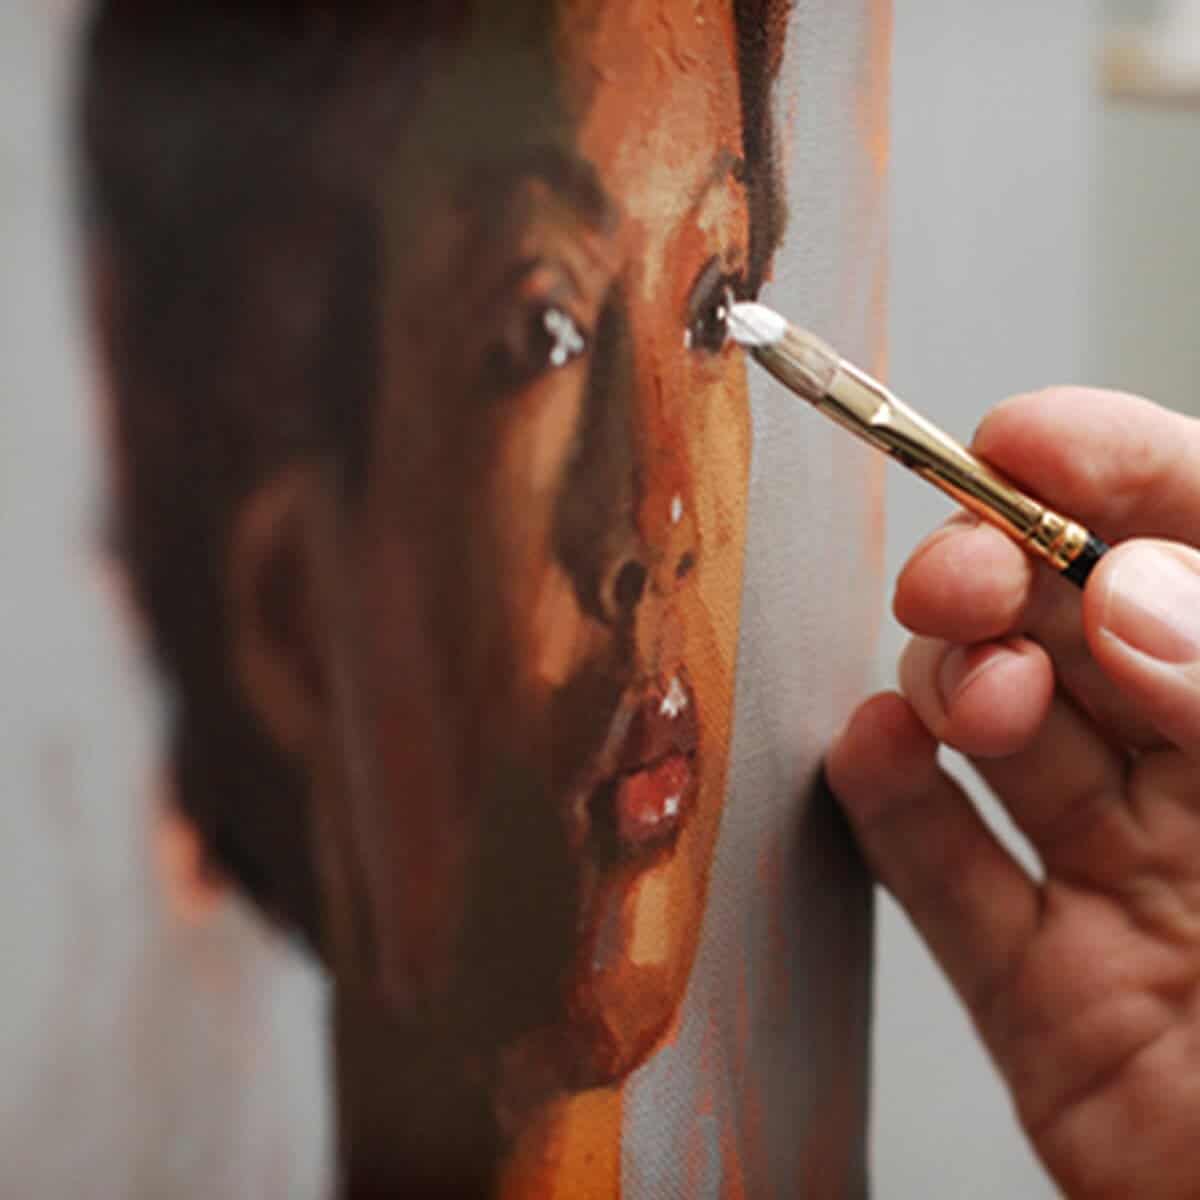
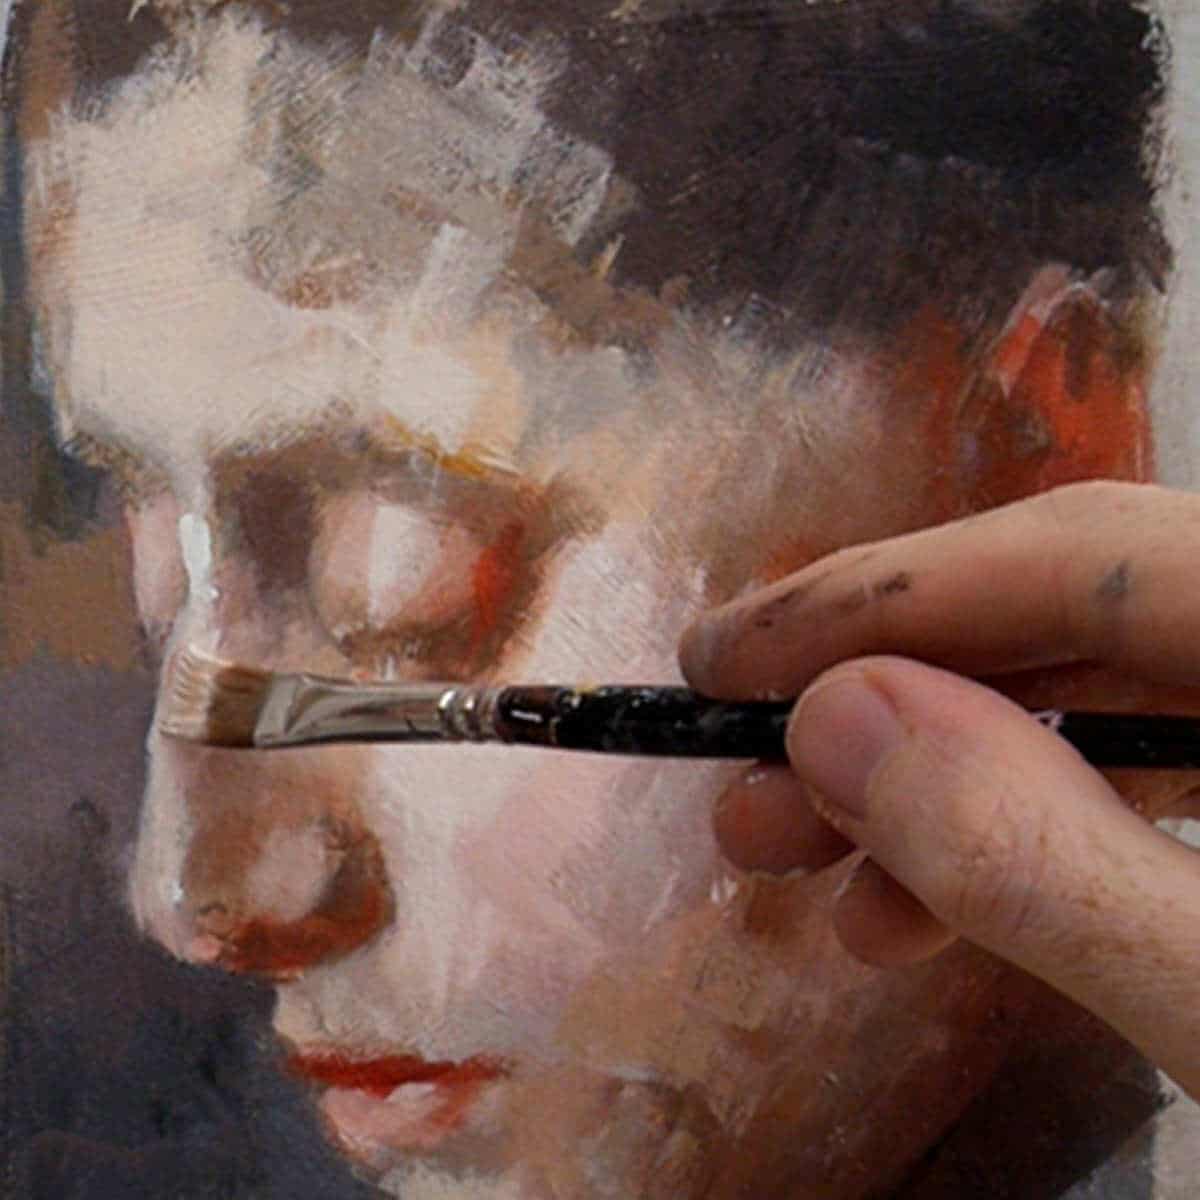
I show all the real-time brushstrokes for the paintings so you don’t miss a step.There are 3 main camera views I cover:
An over-the-shoulder view of the work – so you can see how I build up the painting as if you were standing behind me in the studio.
A close-up of the brush contacting the canvas – with extreme close-ups, so you can see the grain of the canvas and the bristles in the brush.Stable shot of the palette for when I pick up paint – see exactly how I mix colours.
There is nothing worse than when the brush disappears from view, only to reappear with some fantastic new colour. Where did that colour come from?! How did it get mixed?The palette view is very important, and not just at the beginning of the video. I want to show you every single mix I make, so I film with the palette directly next to the painting, then you can see shots of the palette throughout the course and gain a sense of my approach to colour mixing.
Colour Corrected Footage
Filmed under constant colour balanced conditions, so the paint colours are as accurate as can be. (Computer monitor screens and print-outs can vary)
Real-time filming – No long jumps in progress
I don’t like long jumps in progress when the paintbrush goes off camera, the shot changes and suddenly the picture has seemed to drastically improve. I include all the stages so you can clearly see the progress of a work.
Course Requirements
Requirements for the Course
A broadband internet connection – the files sizes for the video lessons are quite large (2.8 GB in total) so can take a while to initially download (depending on your internet speed.) Once downloaded, they are yours to keep forever, watch without buffering or take to the garden and watch away from an internet connection!
Enough free space on your Computer or iPad – You can download the files to a separate USB stick if you need more storage.
A Colour Printer – to print out the reference images or access to a Print Shop.
Glossy Photo Printer Paper – I use Epson Photo Glossy.
A love of tea & biscuits (optional, but some might say essential!)
What Students Say
My art teachers were all magnificent human beings and often gifted practitioners, but not one of them ever sat me down and showed me the mechanics of sketching, or painting, beyond advice to the effect of “Don’t make such faint marks,” “Stop drawing outlines,” or “What do you mean you’re too young to drink cider?” Or maybe they did, and I just forgot. Serves them right for giving me cider.As a result, I learned my drawing from comics and galleries and my painting from Tony Hart (little reference there for the kids, yeah).
This can only carry you so far.So after several false starts and two quick decades, in 2017 I decided to do something about it. After a trawl of the web and a realisation that I didn’t have the funds to afford a regular real world art class, I stumbled upon this excellent chap, and I can’t praise him highly enough.
Will Kemp is the art teacher I wish I’d had all those years ago. After a very intensive month following his Acrylic Portrait online course, I had all the tools I needed to mix my colours confidently, lay a decent ground colour for my canvas, apply glazes, and generally achieve something approaching the results I’d had in my head all those years. I tell you, what Will Kemp doesn’t know about the Zorn Palette isn’t worth knowing. Before my last coursework study was dry, I’d begun to subject my immediate family, my bedraggled self, several passing strangers, and my ailing cat to the rigours of my newly refined brushwork. There’s no stopping me now.
Anyway, I couldn’t in all conscience go posting my paintings up here without tipping my hat to him.
Cheers, Will
Ben, Acrylic Portrait Course
I’m not one to gush, but I just want to thank you for your tutorials. I’ve always loved to draw but was afraid of painting b/c I didn’t feel I had enough control, like when I grip a pencil. I took a local class a couple of years ago ( pretty much worthless) which led me to search Youtube. After watching many videos, I found yours, and have virtually watched everything you have for free.
Then I bought 3 of your courses – I’m in the middle of your acrylic portraiture.
I have learned so much from you that I feel I’ve actually finished my college art degree. Your classes are so informative, easy to follow, profound in what they impart, that I’m thinking why have I not pursued this all before. But, then, you weren’t around when I was flailing. I’ve completed 25 paintings in the last 2 months…and they aren’t half bad. At least, I’m happy with them and having SO MUCH fun. Thank you.
Brenda, Acrylic Portrait Course
Dear Will,
I have taken two of your tutorials and I cannot tell you how much they have helped me – in both technique and confidence.
My husband has wanted me to draw, sculpt, paint, etc. for most of our married life. For the first time last year, I did 6 10×10 acrylic portraits of each of my grandchildren (all outlined silhouettes – pretty my like a sketch) type pictures. They turned out pretty well and I fell in love with painting. I had not done anything else since, so I decided to experiment with some portraits for my husband for this Christmas.
After attempting 3 times do a single portrait and washing over the same canvas for the third and final time – I throw my hands up and decided painting was not for me. But, my husband kept the pressure on and seemed to believe in me more than I did myself. I did some research on YouTube and online and found your courses (acrylics for beginners and portraits). I loved them both, they were so helpful to me.I have had no other training/education in art, but after I completed your courses in October, I set up my small studio and began to go to work again with “my painting”. I painted the first picture and thought it turned out pretty well, then another and finally just a couple of weeks ago the final of three all 10×20 on canvas. I am still having issues with my blending techniques, shading and color corrections, but figure that will come in time.Well, to say the lease my husband love them! I just wanted to take this opportunity to thank you, thank you, thank you for helping me give my Husband the priceless gift of a lifetime.
Best regards,
Kelly, Acrylic Portrait Course
It’s been 40 years since I last painted so over the last year I have been looking for resources to help me re-acclimate to painting. I looked at and read over thirty sources most of which contradicted each other. Then I came across you on the web. Your courses are hands down the best I’ve come across and I’m looking forward to the journey.
Thank you Acrylic Portrait Course
Student Success
Acrylic Portrait

Acrylic Portrait

Acrylic Portrait
Acrylic Portrait

Acrylic Portrait

Acrylic Portrait
Acrylic Portrait

Acrylic Portrait

Acrylic Portrait
FAQs
Acrylic Portrait Course
No, there is no time limit, you can watch them as many times as you like.
The course is a series of downloadable video lessons, once they are downloaded they are yours to keep forever. If you change computer in the future just drop me an email and I’ll send you through some fresh links.
You can watch the lessons and courses as many times as you like and have lifetime access. If you change computer in the future just drop me an email and I’ll send you some fresh links through.
Yes, you can download to an iPad using Files App, or the free app called ‘Documents’. Without either of these apps, you will not be able to download directly to an iPad.
You can also download the video lessons to multiple devices (home PC, laptop etc) and if your storage space is running low on your laptop, you can download to a separate USB stick.
No, not at the moment.
The courses are available as a download only, there is not a streamable option.
If you only have an iPad you need to use either the Files App or the free Documents App to download and have enough space on your device
But there is one exception.
If you open the download links in the Safari browser on an iPad, Safari will give you an option to View or Download, if you click View, you can watch the videos without downloading.
Not hugely, I’ve kept the material list as small as possible.
For the painting courses, I try to keep the colour palette small and use the same base colours for many of the other courses. I demonstrate with artist quality paints which have a higher pigment ratio so a little goes a long way.
Yes, there are jpeg reference images and line drawings to work from.
I’m a big fan of drawing, and if you have a good understanding of how drawing works, it can make the biggest jump forward in your paintings. But if you’re super keen to get started with painting and engrossed in colour, then I’ve added a few downloads to help you out.
All of the images can be printed out A4 size allowing you to work 1:1 with your reference image (a classical technique called sight-size)
I’m a big fan of drawing and if you have a good understanding of how drawing works, it can make the biggest jump forward in your paintings (it seems counter-intuitive but it can make dramatic changes).
But if you’re super keen to get started with painting and engrossed in colour, then I’ve added a few downloads to help you out. These are line drawings that you can work from.
All of the images can be printed out A4 size so you can work 1:1 with your reference image (another classical technique called ‘sight-size’). You can then draw out freehand or trace the lines to get you started, this course is all about getting you painting.
Beginner to intermediate.
No, this course works from downloadable photographs, so you can follow along with the demonstration that I’m working on.
I find this approach gives confidence with glazing and brush techniques.
The demonstrations have been designed to utilize the quick-drying properties of acrylics and to work around all the issues they can have.
If you work with oils, the smart palette I use is available in acrylic and oil, so you could transfer most of the skills and pigments but you’ll find the glazing layered approach on the first tutorial impossible to achieve in the same time frame that I demonstrate in.
If you add a quick drying medium, such as Liquin into your paints and waited for each layer to dry, you’d still get really good results as the principals of all the tutorials stem from classical oil painting.
If you’re new to acrylic painting or have been painting for years but still have trouble mixing tonally accurate skin tones and find creating subtle blends difficult, then you would see instant improvements on this course.
If you’re looking for ‘cheat sheets of skin tone recipes’ this isn’t the course for you – there’s nothing wrong with specific recipes for skin tones but because of the huge variety in sitters complexions, lighting conditions and style of painting there isn’t a one size fits all.
Having the knowledge to create your own recipes is much more powerful as an artist.
Not in detail, I talk through the things to look out for when sketching out the piece but I don’t go into anatomical details or processes on drawing a portrait head.
No, the 3 studies are all head and shoulder studies.
If you follow the lessons in progression then by the end of the course you will have three finished portraits. Each complete in three different colour palettes, from muted grey tones to warm oranges and browns.
You’ll have gained a foundational knowledge of how to mix base skin tones and a deeper understanding of controlling a colour’s saturation and intensity.
We accept all major credit and debit cards such as Visa, Mastercard. We also accept Paypal.
The shopping cart will convert to your local currency. You can use a currency converter to get an idea of the current exchange rate: https://www.xe.com/currencyconverter/
Yes, you can from another screen, such as an iPad or a desktop. That will let you keep the reference image visible while you follow the lesson.
However, in some of the lessons, I physically test colours directly on the printouts. This can be very helpful when you are first learning, because it makes colour matching clearer and easier to judge.