
This week we’re going to bring our pen sketching skills into the urban environment.
Sketching your surroundings can be such a fantastic way to create a visual diary of your daily experiences and I’m always a sucker for a sketch of a bike.
This video tutorial looks at how you can use different thicknesses of pens to create variety in your sketches, and how thinking about the surrounding shapes outside your main subject can add context to your drawings.
A Step-by-Step Urban Sketching Lesson
How do you start a sketch?…
One of the first things to consider is the layout of the page – portrait or landscape.
For this sketch, from a side street in Florence, I wanted to use the environment to help set a context for the bike, so I went for a portrait composition.
When sketching buildings I often work from the larger abstract shapes to the smaller detailed shapes, for this demo, the method is the same.
I also wanted to illustrate how important the shapes around the main subject can be, so in this example, I’ve left the drawing of the main focus of the bike until last and drawn everything around it first.
Downloading the reference photograph
The photo below can be ‘right clicked’ and ‘Save image as’, so you can use it as a reference image, print it out and follow along with the video above.

You can also download a High-Resolution Image here.
In the demo, the sketch is 6 x 4 inches (15 x 10cm)
Pro tip: I draw a light pencil rectangular guide of 6 x 4 inch on my drawing paper and positioned the reference image at the same height. That way, it’s easier for you to be able to jump your eye between the reference image and your drawing.
Materials you will need:
Paper
- A4 (UK size approx 29 x 21cm) I use a smooth Bristol board about 220gsm weight.
Pens


- Micron 0.2mm – Permanent fine line pen

- Faber Castell PITT Artist Pen – Black permanent fibre tip pen

- Muji 0.5mm Fine line Pen
- Pentel Brush Pen – Permanent black brush pen
Step 1. – Framing your View

I wanted the drawing to be about the bike but use the architecture of the environment to help frame the scene and our focus.
The one thing you’ll always notice in Florence is the amazing architectural windows and doors that just seem to appear out of all of the buildings on the side streets.
By including the crumbled window within the top of the drawing frame, it helps to tell a great deal about the place and space.
The darker shadow shapes at the top and the bottom of the image roughly split the composition into thirds.
Here are a few of the elements I considered in the background:
- Framing the composition
- Giving the viewer a sense of place
- Revealing the lighting – by showing the shadow angle, adding a strong dark at the top of the frame to balance with the dark shadow at the bottom of the frame.
- Adding textural marks – in contrast to the smooth lines on the bike.
- Splitting the composition into thirds
- The edges have also been arranged to avoid a tangent of the diagonal line hitting the corner of the frame. Always check your corners.
Step 2. – Using Shadow Shapes to Describe the Subject

The variety in the thickness of the pen acts like using different brushes in a painting.
The choice of the nib along with the speed of the application, help to describe the material quality of what you’re drawing.
So, a fine line pen used speedily will create a broken line. Which would be perfect to indicate crumbling brickwork.
If I was to use the same pen at a slower speed I would create a more solid uniform line which wouldn’t be as effective. It’s an important consideration to match the right pen with the right speed to achieve the right effect.
I want my first lines to be purposely ghostly, thin and broken, so the first pen I use is the superfine 0.2mm micron pen which can give you a scratchy feel.
It’s like using a hard pencil, but with a pen.
So once I’d established the fines lines of the top third of the picture, I moved onto the all-important cast shadow and swap to a wider fibre tip pen. This gives a more uniform solid dark mark.
When I was taking the photograph, I noticed the bottom half of the image had a nice dark area to ‘ground’ the bike within the frame, this helped to compose the drawing and focuses the viewer on the centre of the composition.
Step 3. – Adding Texture to the Foreground
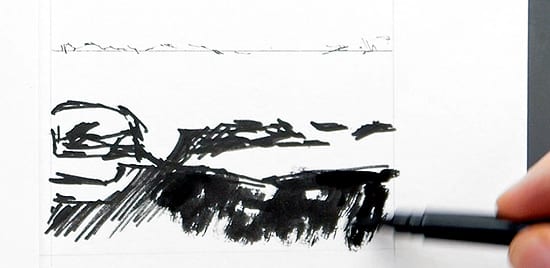
Here I swapped the brush pen and used the pen on its side so it doesn’t completely cover the paper (this effect can be more pronounced on textured paper). It gives a texture to the pen marks and an indication of the broken light hitting the pavement,
- Cast shadow reveals the shapes and angle of the wheels
- Broken dark shapes add a texture to the foreground
Where is the light coming from?
What angle does the cast shadow produce?
Where are the darkest darks and lightest lights?
Step 4. – Thin Scratchy Pens to Thick Brush Pens

Shadow shapes can utilise thin, medium and thick lines, adding variety to the drawing of the shadows.
Step 5. – Cast Shadow Shapes

The Brush pen acts as the larger brush in the set, giving a more broken line when used quickly and a more organic feel to the marks.
Step 6. – Composing qualities of Light

For the next stage, I use a 0.5mm Muji fine line pen.
This pen has a great flow to it and gives you an even mark if you’re working upright at an easel or quickly in a sketchbook. (It’s also available as a 0.38mm if you prefer a finer feel, Vanessa swears by the 0.38mm!)
Adding hatch lines to your drawing gives an extra texture and mark to the surface and the diagonal direction brings movement into the drawing.
Step 7. – Large Shapes to Smaller Shapes

Now I’ve got the two extremes of the top and the bottom drawing in place, I can start to draw the bike.
Approaching a drawing this way:
- Establishing the shadow shapes first
- Indicating the light direction
- Checking the framing of the composition
- Adding variety in the thickness and weight of the line
Will all help to bring the final drawing together quickly and with a sense of ease!
Step 8. – Drawing Ellipses (don’t squash your edges)

The cast shadow shape guides the drawing of the first wheel.
Here I swap to the Fibre-tip pen which acts as the perfect thickness for the bike frame.
It enables me to sketch the shape quickly.
Drawing ellipses can be a skill in itself, just watch out for ‘squashed ellipse syndrome’ where there are sharp angles at the tips of each curve.
Step 9. – Adding Detail with a Fine Line

Now I can put in the detail and I swap back to the 0.2 Micron to add the super-fine lines of the bike spokes and brake cables.
Step 10. – Finishing Touches

I correct anything that grabs my eye and here we have the finished drawing:

You can watch the full video tutorial (10min) below. Enjoy!
If you’d like to learn more about how to start in Urban sketching (and embrace your wonky drawing lines!) you should have a look at the New Beginners Urban Sketching Course looking forward to seeing your sketches!


Hi, Will,
Bicycles are such compelling subjects, and the light/shadow in this photo makes it more so. Thanks for posting such a super video demo. Even if I don’t do this particular exercise, you’ve reminded me that painters need to keep sketching. We tend sometimes to forget about drawing for its own sake. Cheers, Will!
Helene
You’re welcome Helene, yes drawing can be so helpful in your paintings, pleased you enjoyed the demo.
Cheers,
Will
Hello Will, great to hear from you and I love this sketch. We’re almost finished your Urban Landscaping Course so following up with this bike sketch will be perfect for testing out our new skills. You make it look deceptively simple, it’s certainly going to take me more than 10 minutes to complete! Many thanks, Anne
Good one Anne, hope you’re keeping well, enjoy sketching the bike.
Cheers,
Will
Very nice tutorial. I got alot from it, especially the tip about leaving the bike for last…counter intuitive to what I would have done, but I see how it works better.
Glad to hear it and pleased you enjoyed the lesson.
Cheers,
Will
Sketches done in pen are so delightful to look at. Perhaps it’s that element of danger — once you make a mark, there’s no changing it — that makes the drawing have a bit more life to it. I love sketching with pen, but I’m not brave enough to not do a very light outline with pencil first. This tutorial gives me the courage to try. Thanks!
Thanks Greg, yes, pens a great practice for getting decisive in your drawing decisions, hope you enjoy the tutorial.
Cheers,
Will
Really enjoyed watching this. It was particularly interesting to see your use of a range of pens within one sketch. Now I can’t wait to get out and sketch for myself. Thank you!
Thanks Jackie, glad you enjoyed it.
Will
Hi Will
Thanks for so generously sharing your knowledge and skills on this website. I run an art therapy group and often recommend this website to my group members. My question relates to what you think is a good balance between drawing and painting. I have drawn more than painted most of my life ( due to fear of failure in regard to painting) but I’d really like to get more into painting. I read that that Lucian Freud just stopped drawing in order to get more into painting and I have tried this over the last few months but I’d be terribly upset to lose my drawing skills, such as they are, which honed over many years, and I fear this is happening. What’s your opinion? Can one dispense with drawing once you reach a certain level without losing this vital form- describing skills and instead simply “draw with paint’? or is it essential to keep drawing in order to paint well? Many thanks, Jenny
Hi Jenny, nice to hear from you and thanks for recommending the site to your group, much appreciated. To answer your question:
‘Can one dispense with drawing once you reach a certain level without losing this vital form describing skills and instead simply “draw with paint’? or is it essential to keep drawing in order to paint well?’
Every time I’m painting I’m always engaging the same looking and observing skills learnt through drawing, even when working on abstract pieces. So you’re always developing your drawing skills even when painting. Carolus Duran taught a method that was aimed at students developing the technique of ‘drawing with paint’ which is evident in his most famous students Singer Sargent’s work, but the shapes and forms of portraits where still often drawn out in charcoal first. The most effective portraits will always have a solid drawing and balance of tone. But drawing usually comes because its enjoyable, and sketches and black and white work can really help to tune your eyes into the importance of tone, which then helps out when painting.
Cheers,
Will
Thanks Will !
Thank you so much, Will, for sharing this tutorial. You impart confidence as you teach and I am grateful. Austine
Thanks Austine, pleased you enjoyed it.
Will
What a timely tutorial. I’ve just been thinking that I need to get back into sketching to help me get improve my painting and get out of a block, and along comes this simple sketching tutorial, as well as great suggestions for materials. Thanks Will.
Glad to hear it Graham, hope it helps kickstart your sketching.
Cheers,
Will
Hello Will. You are so inspirational. I have already started sketching .The bike is next on my list, which I will find very interesting. Thank you for a wonderful subject
All the Best, Shirley
Thanks Shirley, looking forward to seeing how your drawing turns out.
Cheers,
Will
Thank you so much for this tutorial. It is really helpful for me.
Kalyani Paul
You’re welcome Kalyani, pleased you found it helpful.
Will
Hi Kemp thanks for sharing good one
My 8 yr son loved your sketch very much its very interesting!
Padhi
Thanks Padhi, pleased your son enjoyed it.
Will
Hello will,
Thankyou for sharing this quintessential sketch lovers video. I really enjoyed the tutorial.i have been doing a lot of scribbling with micropens. But this gave me a structure to build upon. Kudos !!
Hi Disha, great to hear that you enjoyed the tutorial and it gave you a structure to approach strongly lit subjects.
Will
Great video, Will – as usual. As Greg commented, we have to be bold and make our marks. Too often we are inhibited by ‘getting it wrong’.
Thanks John, yes stepping out of the comfort zone of the eraser can really add a sense of freedom to your sketches.
Thank you for this tutorial. It was interesting to see how you used the different pens and that you started with the shadow of the bike. I would like to try that today. Did the tutorial start with bikes in Amsterdam? I studied there and thought I recognized the area.
Hi Gerda, yes well spotted, the first few shots are in Amsterdam when I visited the Rembrandt exhibition.
Cheers,
Will
Hi Will,
Thank you do much for this. I was out looking for inspiration yesterday and found an old bike but In didn’t know how to tackle it! This is great, and has made me feel much better about starting to do some urban sketching. Looking forward to the new course.
Thanks again!
Barbara
You’re welcome Barbara, and how timely with your spot of the old bike, they can be such great subjects, hope you enjoy the tutorial.
Cheers,
Will
Hi Will,
Thank you for posting video dem….
Wonderful and Amazing …..as always, Such a help.
I so enjoyed the Urban Sketching video…reminding me I need to keep up the pen/pencil skills…and get those shadows in!
Hope you are keeping well.
Best wishes
Adrienne
Hi Adrienne, lovely to hear from you, I’m doing great thanks and so pleased you found the demo helpful.
Cheers,
Will
Thanks Will for this beautiful sketch sure learned a lot from it. I like to share this with all the beginners.
Best wishes Will
Thanks Will, pleased you found the lesson helpful and thanks for sharing, appreciate it.
Cheers,
Will
Absolutely fantastic…thank you Will. You are very generous. When I first started drawing my tutor insisted on looking at the shadows and working with shapes it created. Made the whole learning experience so much easier and indeed great fun… Loved this one.. You are one cool guy!
Thanks Katja, sounds like you had a great drawing tutor! pleased you enjoyed it.
Will
Thanks Will! Love watching your tutorials. I’ve been wanting to sketch more and I love the idea of using bicycles. cant wait to start. Knowing what pencils/ pens to use are so helpful. Thanks again
Ellen
Good one Ellen, hope you enjoy experimenting with some new pens.
Cheers,
Will
Dear Will,
always a great pleasure to receive your tutorial videos, be it sketching in Florence or Cornwall….or…or….
So helpful, I always learn a little bit extra after every view. I have your Acrylic Painting for Beginners downloaded and can look forward to immersing myself in all the videos. Winter is around the corner, perfect timing. Thank you Will for always thinking of your “art hungry” students.
Take care
Anita
You’re welcome Anita, glad you enjoyed it, and have a great time painting through the lessons on the course.
Cheers,
Will
Amazingly helpful Videos and lessons, thanks for sharing your knowledge with the world.
Best regards,
Nelson G
So pleased to hear it Nelson,
Thanks,
Will
Thank you so much for another awesome tutorial. You are the man. I try to tell people about your site whenever I can, because the content you make available for free is absolutely amazing. And if you buy the other content, it is even better. I have learned so many useful things. Glazing and rubbing out with a paper towel is something I may never have done and it is such a valuable technique.
Thanks Doug, hope you’re doing well, very kind of you to say so and really pleased you’ve been enjoying the Glazing/paper towel technique, it really can be effective.
Cheers,
Will
Hi Will,
Enjoyed the tutorial.
I am just getting back to drawing after many years, so I would not have thought of leaving the bicycle until last.
Regards,
Tom
Hi Tom, glad you enjoyed the lesson, and hope it gives you some techniques on how to approach tackling bikes.
Cheers,
Will
thanks Will, it just emphasise what my present art teacher Val Stevens says, small sketches of a picture emphasising the light and shaddows i.e. tonal value is the most important picture you could ever draw. thanks for the tutorial.
You’re welcome Jennifer, pleased you enjoyed it.
Will
Dear Will. What a wonderful detailed example.! Thanks so much for sharing it and your other videos as well. You make me want to photograph every bike I see now. I always thought me rather daunting. Cheers. Taylor
Hi Taylor, pleased you found the tutorial helpful and hope you find some inspiring bikes around!
Cheers,
Will
Will,
Beautiful tutorial and drawing – your tutorials are inspirational and enjoyable to watch. I love that you balanced small details with the big picture. I often get overwhelmed by all the details of a photograph or scene, but I’m finding that the beauty is often in NOT including every detail. It’s easy to get wrapped up in the precise proportions, position, and shape of an original scene, but I lose both the essence of the scene and enjoyment of the process when I do so. You balance them beautifully. Well done.
Crystal
Thanks very much Crystal, glad you enjoyed it, yes simplifying your drawing without getting caught up in the details is an art in itself!
Hi Will,
Another impressive sketching tutorial lesson! Thank you so much to help me to understand how to use the fine tip pens, fiber and brush pens to draw those different shadows in this landscape. Most importantly I learned besides using different pens to represent various shadows, the splitting of the composition and the division into three parts in the frame really helps me a lot in catching where window, bicycle, and footpath go. You’re an excellent tutor! I surely will recommend my friends to look at your website. Nualnapa Brown
Thanks Nualnapa, glad you enjoyed the breakdown of the lesson and thanks for sharing the tutorial, much appreciated.
Cheers,
Will
Echoing Jenny Kyng; generousity is the opperative word here.
So many of us derive greater understanding of form from your explanatory tutorials and are inspired to keep drawing and in turn, passing on what we learn to others.
Nice.
Thanks Jenni, pleased you enjoyed it.
Will
Re: Doug. Glazing/ paper towel techniqe; did I miss something?
That was in reference to methods used on the still life masterclass course.
Cheers,
Will
Thank you Will. Am trying my luck with pen and ink this year. Doing the shadows first is something I haven’t tried yet. Will do so on my next sketching trip.
My pleasure Helen, hope it helps with arranging the composition for your sketches.
Cheers,
Will
Hi Will
I recently took up drawing but not good at it. When I get the spacings wrong using pencils I can always erase and begin again. You kindly sent the bicycle picture to be copied with pens. I thought I would have a crack at this medium but my finished bicycle had it been a mans bike could have taken four people sitting on the crossbar. Of course using pens I was unable to erase the faults.
I think that I will stick with pencils.
Good web site
Hi John, yes, drawing with pens takes a leap into the void of an eraser free sketch! it’s a great way of getting used to embracing the initial mistakes as part of the process, drawing (as with painting) is all about many smaller and smaller adjustments as your eye becomes in tune with the subject.
Cheers,
Will
Hi Will
As a newly retired person, I’m itching to get started on drawing and possibly painting – something I’ve wanted to do for a long time. Your website and tutorials are just the inspiration I need. Thank very much
Chris
You’re welcome Chris, hope you find the website helpful in your journey.
Cheers,
Will
Thank you so much for sharing this tutorial. I’ve just been thinking to get back into sketching and painting. to get improve my painting and sketching. Thanks for sharing your knowledge with us.
My pleasure Haylen, hope you enjoy the tutorial.
Cheers,
Will
Hello Will, so good to hear from you.
Great tutorial on sketching…. I like how you have been able to breakdown the subject you are drawing, hence simplifying every stage to come up with a great sketch…..
Really inspired. Thank you.
Mustafa
Hi Mustafa, nice to hear from you too and pleased you found the lesson easy to follow.
Cheers,
Will
Thanks for sharing this, Will! It was so interesting to see how you move between pens for different kinds of lines. I also thought it was interesting that you choose to do the main focus of the image the last. Would that change if you were sketching in plein air, or do you always begin your sketches with the supporting bits rather than the main focus?
Hi Theresa,
It’s very similar to the approach I would take when sketching on location, just with the separation between the shadow shapes and the main object separated more on this tutorial to emphasise the importance of looking at the composition as a whole, which can then help with the drawing of the main focus.
If drawing a vast landscape or panoramic I would usually start with the main focal point and then ‘build out’ the drawing from there.
The more experienced you become the more you would be noticing and processing these shapes and marks on a more subconscious level so then you can switch between the shadows and the main object knowing what the final end result is you have in mind would be.
Hope this helps,
Will
Hi Will, Thank you for sharing this tutorial, you make it look so easy and to do that in 10 minutes….wow! I shall try sketching my sons bike now and I suspect it will take me all day!
Thanks Sue, hope the sketch of your sons bike goes well.
Cheers,
Will
Your teaching technique is very helpful. I’m actually convinced I can do this! Good reminder to continue sketching…
Pleased you enjoyed it Sally, and hope your sketch comes out well.
Cheers,
Will
Hi Will,
Thanks for the tutorial. Love your enthusiasm! Also love that the lesson is short enough to fit into my lunch break :)
Good one Jo, really pleased you enjoyed it.
Cheers,
Will
Hello Wiil ,
Thanks for the simple tutorial –simple for you ! Really good exercise and a challenge for us less talented .
Patrick .
Hi Patrick, pleased you enjoyed the lesson. Hope your sketch turned out well.
Cheers,
Will
Hello Will, you have inspired me to do sketches in my environment. Thanks for such a wonderful lesson on sketching. Keep up the good work.
So pleased to hear it Mohamed, really glad you enjoyed the sketching lesson and are feeling inspired to get out sketching around you.
Cheers,
Will
enlightening & enjoyable. I have decided of buy a few pens as a result of your tutorial and give it a go.
thanks, Larry
Good one Larry, really pleased you enjoyed it, hope you enjoy drawing with them.
Cheers,
Will
Hello will,
thanks for sharing such things,
your teaching techniques are very helpful for every true artists…
cheers man
Hi Vaibhav, thanks very much, really pleased you’re finding the lessons and techniques helpful in your sketches.
Cheers,
Will
sir
Salute to u and people like me are grateful to you, especially the students from India those who can not afford much to buy online stuffs or tutorials
Pleased you are enjoying the lessons Seshadri.
Cheers,
Will
will .this is very interesting tutorial
Really pleased you enjoyed it Viraj.
Cheers,
Will
Thank you so much!
I am in awe of how quickly you captured this charming image. Thank you for sharing your skills.
My pleasure Rosanna, really glad you enjoyed it.
Will
thanks again, watched you do pen and ink last year… love watching you draw…
I paint with watercolor so pen and ink is so nice when i blur… Have a wonderful spring…
Always watching… ez
Thanks Elize, hope your watercolours are going well.
Will
hi, enjoyed going through your work, that cycle speaks to the veiwer.
Glad you enjoyed it Manisha.
Will
Will,
I’ve done two of these bikes over the last 2 weeks. The first while following your tutorial; the second from my 4×6 print of the reference. These are the first times I’ve used your approach of blocking in the big (shadows) first, then taking it down to the fine details. I REALLY like doing it that way. I hope I can upload pics, but maybe I can’t. I found personally difficult to switch back and forth with the tools, so for the 2nd one i used a 2H pencil to lightly put the landmarks in, then used 02 micron and micron brush. THANK YOU!
So pleased you enjoyed it Jennifer, yes tuning your eye to the shadow shapes first can really help when arranging and choosing compositors. You can send through the images to direct email from the contact page.
Cheers,
Will